RETINAL CAMERA TOOLKIT - The Provision of Eye Health and Equipment Training Project funded by the Australian Government Department of Health
←
→
Page content transcription
If your browser does not render page correctly, please read the page content below
RETINAL CAMERA TOOLKIT
The Provision of Eye Health
and Equipment Training Project
funded by the Australian Government Department of Health

This Toolkit is designed to aid the embedding of retinal cameras into a primary health care service. Although it is designed
to accompany the Canon CR-2AF camera, most of the resources are relevant for the embedding of any retinal camera.

                 Provision of Eye Health Equipment and Training — funded by the Australian Government.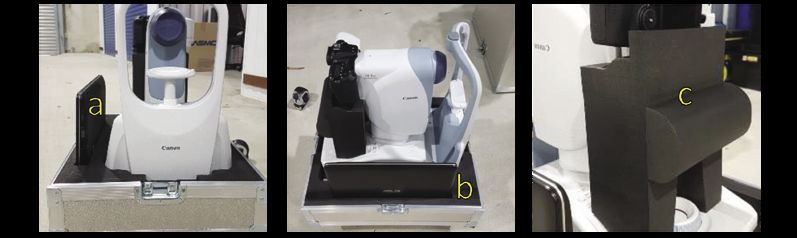
We acknowledge the
traditional Aboriginal and
Torres Strait Islander
Custodians of the many lands
that we live and work on, and
their continuing connection
to Country and Culture.

We pay our respects to Elders
past, present and emerging.

We thank all Aboriginal and
Torres Strait Islander Peoples
whose participation and
contribution has been key to
the success of this project.

        Provision of Eye Health Equipment and Training — funded by the Australian Government.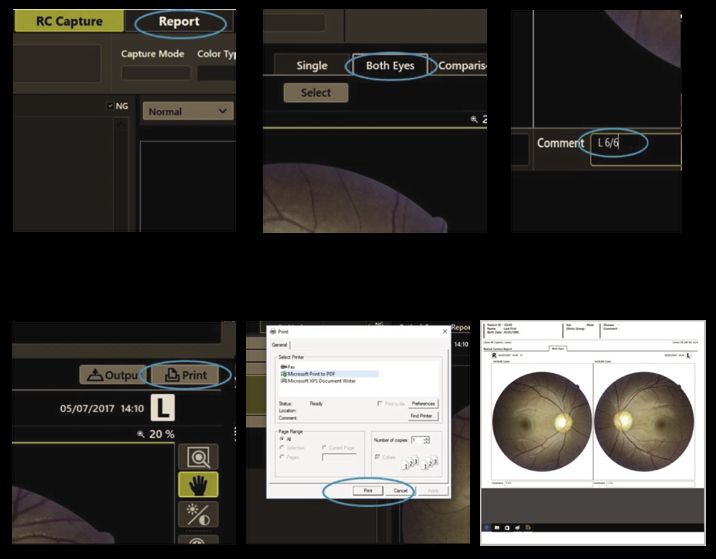
The Consortium thanks
those who attended the
2018 November
Embedding Workshop
and all others who have
contributed in the
making of this Toolkit.

       Provision of Eye Health Equipment and Training — funded by the Australian Government.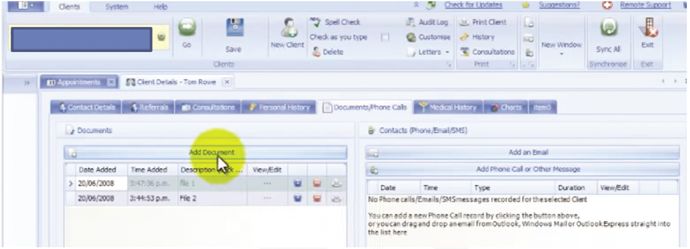
RETINAL
CAMERA
TOOLKIT
Section 4
Retinal Camera
Canon CR-2AF

    Provision of Eye Health Equipment and Training — funded by the Australian Government.
RETINAL CAMERA FLIGHT CASE 4.1
& ACCESSORIES INSTRUCTIONS
Canon CR-2 AF Retinal Camera – Flight Case & Accessories Instruction Sheet
This instruction sheet provides you with a quick guide on the pack up and pack down of your Canon CR-2 retinal camera.
}
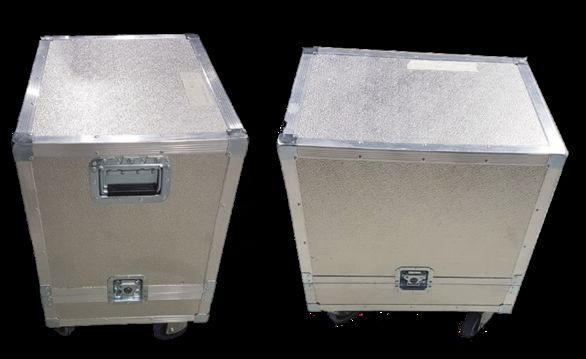
You have been provided with:
• A custom made flight case 580 x 440 x 670 19kg
• Canon CR-2 AF retinal camera 660 x 500 x 630 21kg
• Notebook PC 550 x 350 x 70 3.5kg
• UPS power supply 340 x 150 x 240 6kg
80.5kg
• TN-18 table 750 x 600 x 390 23kg
• Table top 850 x 520 x 80 8kg
• Cables
The flight case
The aluminum flight case has four sides. Each side has a rotating lock at the base. The locks separate the two components of
the case into base with wheels and top. The top has two handles for carrying and for removal of the lid.
TECHNICAL
SUPPORT:
1300 657 720
Provision of Eye Health Equipment and Training — funded by the Australian Government.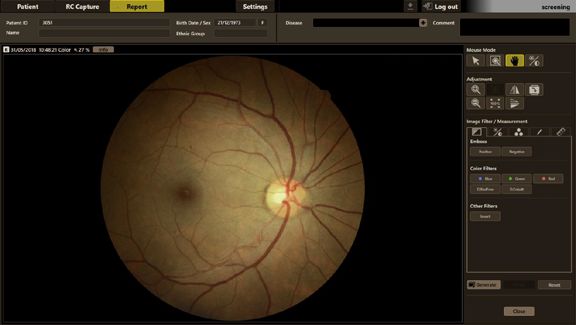
RETINAL CAMERA FLIGHT CASE                                                                                                        4.1
& ACCESSORIES INSTRUCTIONS
 Step 1: Removing the lid
 •   Turn the lock on each side till the locks unclip and flip away from the case

 •   Using the handle, gently raise the lid from the case and place nearby

 •   You will now notice the retinal camera and notebook PC (a) sitting in high-density foam mouldings (b)

 Please note, the foam support (c) at the camera rear, can be removed and stored until pack up

       a                                                                                                                     c

                                                                                b

 Step 2: Removing the camera from the case

 • Remove the notebook PC

 • Carefully slide your hands into the foam cut outs at the front and rear of the camera where you will find lift points for the camera

 • Carefully lift the camera and place it onto the electric table

 • You will now notice the bottom of the case contains manuals, cables and a cover for the camera (d)

 •	Once you have removed the accessories that you require, replace the lid back on to the case and secure the locks and
    wheel out of the way

                                                                          d

                 Provision of Eye Health Equipment and Training — funded by the Australian Government.
RETINAL CAMERA FLIGHT CASE                                                                                            4.1
& ACCESSORIES INSTRUCTIONS
 Step 3: Connection of the cables to the camera

 Accessory/cables               Description                   Plugs from                     Plugs to

                                AC power adaptor with
                                extension
                                Connects table power supply
                                to notebook PC

                                                              Notebook PC                    Table supply (under table top
                                                                                             on top of column)

                                IEC power extension
                                Connects table power supply
                                to camera

                                                              Camera                         Table supply (under table top
                                                                                             on top of column)

                                USB cable
                                Allows data transfer from
                                camera to notebook PC

                                                              Flatter end inserts into USB   USB outlet on camera (large
                                                              port on notebook PC            end of cable)

                                Ethernet cable                                               Your network Ethernet port
                                Allows connection to your
                                network                                                      Note: This can also be done
                                                                                             wirelessly

                                                              Notebook PC

                Provision of Eye Health Equipment and Training — funded by the Australian Government.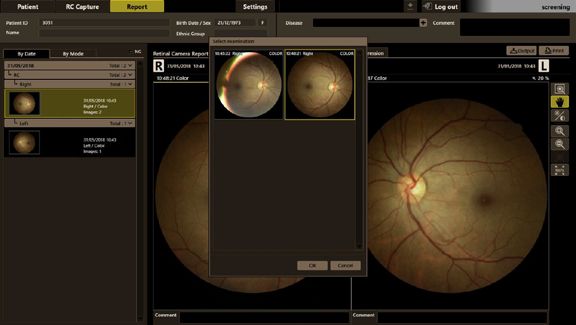
RETINAL CAMERA FLIGHT CASE                                                                                              4.1
& ACCESSORIES INSTRUCTIONS

 Accessory/cables                 Description                     Plugs from                      Plugs to

                                  UPS power supply                The electronic table power      The UPS power supply cable
                                  Protects all camera and table   cord (found at the bottom of    plugs into the wall
                                  components from electrical      the table) plugs into the UPS
                                  power surges                    power supply

 Step 4: Prepare camera and software for use
 •   Turn on the table (wall, UPS, green switch on table)

 •   Turn on the camera

 •   Turn on the laptop
                                                                                                             e
 •   Wait for 5 minutes for RX Capture to automatically load

 Step 5: Shut down camera and software
 •   Shut down the laptop software (shut down on RX capture)

 •   Wait until the laptop has turned off completely before packing into case

 •    o place the camera into transport mode - press and hold the fixation
     T
     button (e), then turn the camera back on from the side on/off switch

 •    old the fixation button until there are two beep sounds – the head and/or
     H
     chinrest will move down

 •   Wait until the head and chinrest have finished moving

 •   Turn off the camera

 •   Turn off the table and wall UPS outlet

 Step 6: Pack down of camera into flight case
 •   The packing of the camera into the flight case is the reverse of the set up process

                 Provision of Eye Health Equipment and Training — funded by the Australian Government.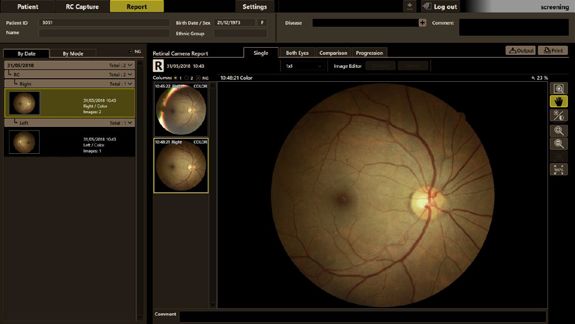
EXTRACTING IMAGES FROM                                                                                                    4.2
RX CAPTURE SOFTWARE

 Extracting images from RX Capture software
 Background - Software set up at your health service
 On installation of the new retinal camera at your health service, the IT support team will have been advised to set up your
 retinal camera software to allow ease of transferring retinal images and reports across to the patient management system.
 There are a number of ways the camera software can be set up (as below). If you are experiencing difficulty with the systems
 in place please advise your IT support team and/or OptiMed (1300 657 720).

 Option 1 – Automatic                                                                            Option 3 – Not connected
 connection to health                                                                            to servers
 service systems
                                                                                                 •	Your camera and
 •	IT services at your health                                                                      software can be used
    service will set up a file                                                                      as a standalone unit
    pathway that will
    automatically transfer                                                                       •	Whilst you are waiting for
    generated output images                                                                         your camera to be set up to
    and reports to a shared                                                                         the network, the camera is
    database folder                                                                                 operational

 •	Share settings will enable                                                                   •	Output images and reports
    staff to access the database                                                                    need to be saved to a USB
    folder from their own                                                                           or external hard drive and
    user accounts                                                                                   uploaded to the patient
                                                                                                    management system from
 •	Images and reports then
                                          Option 2 – Patient management system                      one of the clinic computers
    need to be uploaded to the
                                          upload to camera software
    patient management system             •	IT services at your health service will
                                             upload the patient management system
 •	File size per item on database
                                             onto your camera laptop
    = 100kb to 500kb
                                          • T
                                             hey will set up a file pathway that will
                                            automatically transfer generated output
                                            images/ reports generated to a shared
                                            database folder

                                          •	Share settings will enable staff to
                                             access the database folder from their
                                             own user accounts

                                          •	Images and reports then need to be
                                             uploaded to the patient management system

                                          •	File size per item on database =
                                             100kb to 500kb

                                                                                                                    TECHNICAL
                                                                                                                     SUPPORT:
                                                                                                                   1300 657 720

                 Provision of Eye Health Equipment and Training — funded by the Australian Government.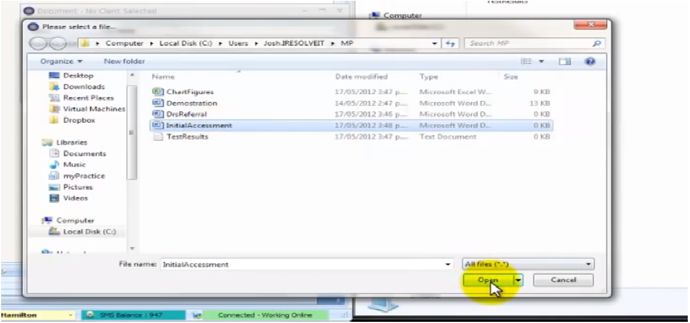
EXTRACTING IMAGES FROM                                                                                                     4.2
RX CAPTURE SOFTWARE

 •   Option 1: Automatic JPEG images
 When you click on the Report tab in Rx Capture, the JPEG files for the photos are automatically
 exported into C:\JPEG EXPORT or C:\EXPORT JPEG; a shortcut is on the desktop:

 Within this folder the JPEGs will be filed in subfolders according to the date (YYYYMMDD) with
 the file name starting with the patient ID you have entered, for example:

 Note: It is possible to change which folder these JPEGs are exported to, if you would like to change this – see the
 How to change photograph output settings on RX Capture software documen Section 4.3.

 • Option 2: Manual JPEG images
 Your system may not have been set up to have the automatic output. In this case, you must manually export the
 JPEGs to the Export JPEG folder, as follows:

 1. Click Report                           2. Click Both Eyes

 3. Input visual acuity        4. Click Output                           5. Click JPEG Report & click OK;
     for both eyes in                                                         JPEG will now be exported to
     Comment box                                                              the “EXPORT REPORT” folder
     [optional]                                                               (access via the desktop shortcut)         TECHNICAL
                                                                                                                         SUPPORT:
                                                                                                                       1300 657 720

                   Provision of Eye Health Equipment and Training — funded by the Australian Government.
EXTRACTING IMAGES FROM 4.2
RX CAPTURE SOFTWARE
• Option 3: PDF report
1. Click Report 2. Click Both Eyes 3. Input visual acuity for
both eyes in Comment
box [optional]
4. Click Print 5. Click Print 6. Report generated as a PDF:
name & save it as you desire
TECHNICAL
SUPPORT:
1300 657 720
Provision of Eye Health Equipment and Training — funded by the Australian Government.HOW TO CHANGE PHOTOGRAPH 4.3
OUTPUT SETTINGS
How to change photograph output settings on RX Capture software
• Administration access
• Changing the location of the automatic outputs
• Changing information displayed on the photograph
• Changing the photograph file name
TECHNICAL
SUPPORT:
1300 657 720
Provision of Eye Health Equipment and Training — funded by the Australian Government.HOW TO CHANGE PHOTOGRAPH 4.3
OUTPUT SETTINGS
Administration access
Step 1
Login with the
username: canon
password: canon
Step 2
Go to Output Settings
TECHNICAL
SUPPORT:
1300 657 720
Provision of Eye Health Equipment and Training — funded by the Australian Government.HOW TO CHANGE PHOTOGRAPH 4.3
OUTPUT SETTINGS
Step 3
Select JPEG Output or JPEG
Report then click Edit
* Change user name back to “screening” when done*
To change the location of the
automatic outputs
Change the Output folder to the
desired location
* Change user name back to “screening” when done*
TECHNICAL
SUPPORT:
1300 657 720
Provision of Eye Health Equipment and Training — funded by the Australian Government.HOW TO CHANGE PHOTOGRAPH 4.3
OUTPUT SETTINGS
To change information
displayed on the photograph
Click the Other Device Settings
tab then click Settings
Click OK when done
* Change user name back to “screening” when done*
TECHNICAL
SUPPORT:
1300 657 720
Provision of Eye Health Equipment and Training — funded by the Australian Government.HOW TO CHANGE PHOTOGRAPH 4.3
OUTPUT SETTINGS
To change the
photograph file name
Click the drop down menu,
select the file name and
click OK
* Change user name back to “screening” when done*
TECHNICAL
SUPPORT:
1300 657 720
Provision of Eye Health Equipment and Training — funded by the Australian Government.CHANGE THE DATE AND TIME IN WINDOWS 10 4.4
Change the Date and Time in Windows 10
Instructions
1. To change the date and time in Windows 10, open the “Settings” window.
2. Click the “Time & Language” button in the middle of the screen to display time and language settings.
3. Click the “Date & time” category at the left side of this window to view date and time settings in the area to the right.
4. Another way to change the date and time in Windows is to click the date/time display in the taskbar.
5. Then click the “Date and time settings” link in the pop-up window that appears.
6. In the “Date and time” section, you can see the computer’s current date and time.
7.
To enable or disable Internet time synchronizing, click the “Set the time automatically” toggle switch to set it to either
the “On” or “Off” position.
8. If disabled, you can click the “Change” button to manually set the date and time in the window that appears.
9. Select your time zone from the “Time zone” drop-down.
10. T
o let your device automatically adjust for daylight savings time, ensure the “Adjust for daylight saving time
automatically” toggle switch is set to the “On” position.
11. You can click it to toggle it “Off,” if needed.
12. In the “Formats” section, you can see the display of date and time increments.
13. To change the formatting of this display, click the “Change date and time formats” command.
14. In the window that opens, use the drop-downs for each time and date increment to choose the display format to use.
15. Click the “Back” arrow button in the upper-left corner to return to the “Date & time” settings, when finished.
16. T
o open the “Clock, Language, and Region” window within the Control Panel, click the “Additional date, time, & regional
settings” link under the “Related settings” section.
17. To open the “Date and Time” dialog box, click the “Add clocks for different time zones” link.
18. When finished, you can close either window by clicking the “X” button in its upper-right corner.
Provision of Eye Health Equipment and Training — funded by the Australian Government.RETINAL CAMERA TOOLKIT Section 4a Taking photos with Canon CR-2AF Provision of Eye Health Equipment and Training — funded by the Australian Government.
AT THE START OF DAY

TURN ON in this order:
           1                              2                              3                            4
  TURN
  TURN ON
       ON                                                                                       SOFTWARE
                                    CAMERA
                                    CAMERA                          LAPTOP
                                                                    LAPTOP                      SOFTWARE
TABLE POWER
TABLE POWER                                                                                       (RX
                                                                                                  (RX Capture
                                                                                                      Capture
  (green
  (green light
         light switch
               switch                                                                         automatically
                                                                                              automatically loads)
                                                                                                            loads)
   on
   on table
      table column)
            column)

If
If light
   light does
         does not
                not come
                     come
on,
on, check the lead
      check  the   lead is
PLUGGED
PLUGGED INTO  INTO UPS
                     UPS
                        is
                                       Then
                                       Then WAIT
                                            WAIT WHILE
                                                  WHILE THE
                                                          THE SYSTEM
                                                               SYSTEM LOADS
                                                                        LOADS
and
and thethe UPS
           UPS isis TURNED
ON    at wall.
                    TURNED           (e.g. measure Visual Acuity on your patient).
ON at wall.

                               AT THE END OF DAY

SHUT DOWN in this order:
           1                              2                              3                            4
   SOFTWARE
   SOFTWARE                          LAPTOP
                                     LAPTOP                                                    TURN
                                                                                               TURN OFF
                                                                                                    OFF
 (close
 (close RX
        RX Capture)
           Capture)            Completely
                               Completely shut
                                           shut down               CAMERA                    TABLE
                                                                                             TABLE POWER
                                                                                                   POWER
                               and
                                                 down              CAMERA
                               and allow screen to
                                    allow screen  to go
                                                     go                                        (green
                                                                                               (green light
                                                                                                      light switch
                                                                                                            switch
                               blank
                               blank before closing lid,
                                      before closing  lid,                                      on table column)
                               don’t                                                            on table column)
                               don’t just
                                     just log
                                          log out
                                              out or
                                                   or let
                                                      let
                               it
                               it hibernate.
                                  hibernate.

   Shutting
   Shutting the
             the laptop
                 laptop screen
                        screen in
                                in the
                                   the middle
                                       middle of
                                              of the
                                                 the capture
                                                     capture program
                                                             program
         is not the correct  way  of shutting the system  down
         is not the correct way of shutting the system down
    and
    and will
        will cause
             cause potential
                    potential loss
                              loss of
                                   of data
                                      data and
                                           and corrupted
                                               corrupted databases.
                                                         databases.
              Provision of Eye Health Equipment and Training — funded by the Australian Government.
TAKING PHOTOS WITH CANON CR-2AF 4a.1
1. At the start of the day
• Remove the dust cover, lens cap and make sure the camera is plugged in and turned on at the power switch
• Turn on the camera, then the laptop
2. Set up and clean
• Make sure the camera is unlocked
• Sterilise chin rest with alcohol wipe
• Enter new patient details OR find existing patient details
• Select RC Capture
• Instruct patient to place chin on chin rest and forehead on forehead rest
3. Align the camera – front of eye
• You now need to line up the eye so that it is in the middle of the circle, and the top and bottom half of the eye is equal in size
Figure 1. Front of eye alignment
• To move the camera:
- Side to side – move the joystick side to side
-U
p and down – twist the joystick (twisting clockwise moves the camera up and twisting anti-clockwise moves the
camera down)
- To make the circles a full circle – move the joystick forward or backwards
- Note: moving the joystick is the same as moving the base of the camera, but with finer movements
Note: the size of the pupil needs to be at least the same size as the small circle to take a good photo and for the automatic functions
to work; you can select the small pupil (SP) function if the pupil is smaller
• Once aligned, the machine will automatically switch views to the back of the eye
4. Align the camera – back of eye
• The camera will automatically focus the image
Line up the white dots to the boxes in the 3 and 9 o’clock position by moving the joystick side to side, or twisting the
•
joystick to move it up and down
• Sharpen the white dots by moving the joystick forward or backwards
Figure 2. Back of eye
alignment (white dots
highlighted in yellow)
Note: try moving only the joystick when at the back of the eye with one hand and use the other hand to steady the base.
Provision of Eye Health Equipment and Training — funded by the Australian Government.TAKING PHOTOS WITH CANON CR-2AF 4a.1
5. Take the photograph
• Once aligned, the camera will automatically take the photograph
Tips:
- Consider entering the patient’s details in a dark room to allow the pupils to dilate
- Ask the patient to close their eyes (up to a minute) between photos to allow pupils to redilate
Manual functions - The camera is set up to automatically switch views from the front to the back of the eye, automatically
focus, and automatically take the photograph when aligned correctly.
If the automatic functions are on, they are indicated by the following icons:
Auto-fundus – indicates the camera will automatically switch views from the front to the back of the eye
Auto-focus – indicates the camera will automatically focus the back of the eye
Auto-shot – indicates the camera will automatically take the photograph
Note:
- At any time if you move the focus wheel, the automatic functions will turn off
- To reset the automatic functions, move the camera back and over to the other eye, and then back to the eye being photographed
- I f the pupil is too small or smaller than the inner circle, the automatic functions may not work and you will need to
manually control the camera
1
Figure 3. Operation lever / joystick showing
2
1. the shutter release button
3
2. alignment button
3. vertical movement ring
4 4. focus ring
Manual alignment - Manually change alignment from the front to back of the eye and vice versa by pressing the alignment button (2).
Manual focus - Focus by turning the focus ring (4) by lining up the two white lines into one straight line.
Figure 4. Manual focussing
Manual photo taking - Take the photo by pressing the shutter release button (1). You can also do this when it is in full automatic
mode and you think you have it lined up well enough to take the photo.
All images from the Canon CR-2 AF manual
Provision of Eye Health Equipment and Training — funded by the Australian Government.RETINAL PHOTOGRAPHY 4a.2
PATIENT INSTRUCTIONS
RETINAL PHOTOGRAPHY
PATIENT INSTRUCTIONS
1. “We’re going to take photos of the inside of your eyes, at the back.”
2. “Just relax for a moment, while I clean the chin rest and set up your details in the system.”
Clean/Sterilize chin rest and forehead rest with alcohol wipe
ADD new/FIND existing patient file on camera database & click RC Capture
3. “Please place your chin on the chin rest for me, and press your forehead against the
forehead bar.”
ADJUST height as needed.
4. “I’m just going to turn off the lights so that we can get a really good photo. Is that okay?”
SWITCH off the lights.
5. “ I’m going to photograph the right eye first. Please look straight ahead with both eyes open.”
START lining up and zooming in.
6. “Can you see a green light inside the camera? Just keep looking at that spot while I zoom
in, and then try not to blink.”
7. “ When the camera takes the picture, there will be a bright flash for a second. Don’t worry,
it doesn’t hurt. It’s just bright.”
PROCEED to take photo of right eye.
8. “ Just close your eyes for a minute, so that your pupils can adjust after that flash. Then
we’ll swap around and do the left eye.
REPEAT process for left eye.
9. “Just close your again eyes for a minute, then I’ll show you the pictures.”
Click ‘REPORT’ & click on “Both Eyes” view, ready to show the patient. Select Output or Print
as relevant to download report to Patient Management System.
Developed by Chris Rektsinis, Eye Health Project Officer, Aboriginal Health Council of South Australia
Provision of Eye Health Equipment and Training — funded by the Australian Government.REVIEWING RETINAL PHOTOGRAPHS 4a.3
Reviewing retinal photographs on RX Capture software
• Accessing all photographs
• Viewing both eyes
• Selecting different photographs
• Using filters
• Comparing 2 photographs of the same eye
• Comparing photographs of the same eye over time
Provision of Eye Health Equipment and Training — funded by the Australian Government.REVIEWING RETINAL PHOTOGRAPHS 4a.3
Accessing all photographs
• Go to the Report tab
• All photographs taken can be accessed in the tabs on the left (green box)
Viewing both eyes
• Go to Both Eyes
Provision of Eye Health Equipment and Training — funded by the Australian Government.REVIEWING RETINAL PHOTOGRAPHS 4a.3
Selecting different photographs
• Click on the photograph to change – there will be a yellow bar (green box) – and click Select
• Select the photograph you want to use and click OK
Provision of Eye Health Equipment and Training — funded by the Australian Government.REVIEWING RETINAL PHOTOGRAPHS 4a.3
Using filters
Using a red-free filter will show the colour red more prominently. This makes it easier to detect changes, such as
•
microaneurysm and haemorrhages.
• Double-click photograph you want to review to see the following screen
• Click Green for the red-free filter
• You can also zoom in and out with the trackpad or by using the magnifying glasses (green box)
• To exit, click Close
Provision of Eye Health Equipment and Training — funded by the Australian Government.REVIEWING RETINAL PHOTOGRAPHS 4a.3
Comparing 2 photographs of the same eye
• Go to Comparison
• You can then select any previous photograph
Previous photograph
automatically loads
here, or you can select
any previous photograph
Comparing photographs of the same eye over time
• Go to Progression
Previous photographs automatically load here
Provision of Eye Health Equipment and Training — funded by the Australian Government.RETINAL CAMERA TRAINING LOG 4a.4
Retinal Camera Training for Primary Health Care Workers
Location: ............................................................................................................................................................
Participant: ........................................................................................................................................................
Thank you for attending the Retinal Camera Training for Primary Health Care Workers course.
............................................................ will be returning to your health service in approximately 6 weeks’ time to provide further
support and opportunities for revision.
Please take 15 photographs before our next visit. This will allow you to familiarise yourself with the camera and identify any
issues you may be having, so that we are able to help you troubleshoot these at our next visit.
Look forward to seeing you all soon. Keep practicing!
Photograph Any issues with taking
If yes, please comment on the issues you had taking the image
taken (tick) the photo? (Y/N)
1
2
3
4
5
6
7
8
9
10
11
12
13
14
15
How many photos did you need to take to feel confident using the camera? ....................................................................................
Provision of Eye Health Equipment and Training — funded by the Australian Government.COVID-19 PROTOCOL 4a.5
FOR RETINAL CAMERAS
COVID-19 protocol for retinal cameras
TAKING RETINAL PHOTOS
• Minimize contact time by entering patient details into the camera software prior to patient entering the room.
• B
efore every patient be sure to clean any equipment or parts that come in direct contact with patient with 70% isopropyl
alcohol and allow to air dry - occluders, pens, pen torches, table, retinal camera forehead rest and chin rest, etc. This is best
done in front of the patient for their added reassurance.
• P
lease be aware of parts of the retinal camera which may accidentally come in contact with the patient - e.g. nose touching
parts of the camera, patient resting their hands on different parts of the camera.
• I mplement infection control measures including hand hygiene, respiratory and cough etiquette (handwashing, covering
mouth and nose with elbow when coughing/sneezing, avoiding touching eyes, mouth, nose) and other COVID-19 clinical
protocols as recommended by local Health Department (e.g. PPE wear)
• Keep 1.5m away from patient when possible (stay near the vision chart and behind the camera)
• L
imit what the patient touches (e.g. patient to stay in designated chair, not to touch Diabetic Retinopathy charts and
model eye, etc.)
AFTER PATIENT HAS LEFT CONSULTATION ROOM
Repeat the cleaning procedures outlined above before and after a patient leaves and routinely at the end of the day.
Surfaces that do not come into direct contact with the patient but is within droplet distance should also be disinfected at least
after each clinic day (e.g. laptop, table, camera lens, etc.) and as needed.
To disinfect the camera lens, use 70% isopropyl alcohol using circular motions from the centre outwards and allow to air dry.
The alcohol will leave a residue on the lens that will need to be cleaned with a microfibre cloth using circular motions from the
centre outwards. Ensure all residue has been cleaned off the lens before using the camera. Residue on the lens may cause an
artefact on the resulting photos.
Figure 1. Example of artefact caused by a smudge on the camera lens
If you need any further information, please do not hesitate to contact:
State Contact Person Email Phone Number
NSW/ACT Colina Waddell c.waddell@brienholdenfoundation.org 02 9065 0708
NT Sarah Nicholls s.nicholls@brienholdenfoundation.org 08 8981 9880
QLD Colina Waddell c.waddell@brienholdenfoundation.org 02 9065 0708
SA Chris Rektsinis chris.rektsinis@ahcsa.org.au 08 8273 7200
TAS Colette Davis cdavis@aco.org.au 03 9349 7419
VIC Colette Davis cdavis@aco.org.au 03 9349 7419
WA Helen Wright addismob@gmail.com
Provision of Eye Health Equipment and Training — funded by the Australian Government.RETINAL
CAMERA
TOOLKIT
Section 4b
Uploading photos
to practice software
Provision of Eye Health Equipment and Training — funded by the Australian Government.UPLOADING PHOTOS TO 4b
PRACTICE SOFTWARE
The following are examples of how to upload retinal photographs onto your medical
practice software. Please note that there are options that may not have been listed here.
4b.1 UPLOADING PHOTOS TO PRACTICE SOFTWARE - BEST PRACTICE
4b.2 UPLOADING PHOTOS TO PRACTICE SOFTWARE - COMMUNICARE
4b.3 UPLOADING PHOTOS TO PRACTICE SOFTWARE - MEDICAL DIRECTOR
4b.4 UPLOADING PHOTOS TO PRACTICE SOFTWARE - MMEx
Provision of Eye Health Equipment and Training — funded by the Australian Government.UPLOADING PHOTOS TO BEST PRACTICE 4b.1
PRACTICE SOFTWARE
1. Upload PDF report/JPEG to patient file on Best Practice
• Go to the Patient file
• Press ‘Add Documents’ button
• Press ‘Add File’ Button
TECHNICAL
SUPPORT:
1300 657 720
Provision of Eye Health Equipment and Training — funded by the Australian Government.UPLOADING PHOTOS TO BEST PRACTICE 4b.1
PRACTICE SOFTWARE
• Navigate to where the retinal images are located
• Select the file. Press ‘Open’
• Give the PDF report/jpeg image a name.
• Press the ‘Save and Close’ button
TECHNICAL
SUPPORT:
1300 657 720
Provision of Eye Health Equipment and Training — funded by the Australian Government.UPLOADING PHOTOS TO BEST PRACTICE 4b.1
PRACTICE SOFTWARE
• PDF reports and images can also be dragged and dropped.
TECHNICAL
SUPPORT:
1300 657 720
Provision of Eye Health Equipment and Training — funded by the Australian Government.UPLOADING PHOTOS TO COMMUNICARE 4b.2
PRACTICE SOFTWARE
Importing retinal photographs into Communicare
Please note, there are multiple options for uploading retinal photos on Communicare either by a clinical item (option 1) or as a
document (option 2). You can also create a photo assessment clinical item (12325/12326), detailed in option 3.
For another method of uploading retinal photos and billing, please see page 9 of Deadly Sights document in Section 8.
Option 1: Clinical Item
• Click ‘Clinical Item’
• Search “photo” and select ‘Photography;retinal’
TECHNICAL
SUPPORT:
1300 657 720
Provision of Eye Health Equipment and Training — funded by the Australian Government.UPLOADING PHOTOS TO COMMUNICARE 4b.2
PRACTICE SOFTWARE
• Input relevant data and click ‘Save’
• The details will appear in the patient’s Progress Notes
TECHNICAL
SUPPORT:
1300 657 720
Provision of Eye Health Equipment and Training — funded by the Australian Government.UPLOADING PHOTOS TO COMMUNICARE 4b.2
PRACTICE SOFTWARE
Option 2: Document
• Under Detail > Document, either:
o Drag PDF report into the green box OR
o Click ‘Attachment’ in the blue box and select PDF to upload
TECHNICAL
SUPPORT:
1300 657 720
Provision of Eye Health Equipment and Training — funded by the Australian Government.UPLOADING PHOTOS TO COMMUNICARE 4b.2
PRACTICE SOFTWARE
• Select staff member to review photographs in red box
• Select date photographs taken in blue box
• Select Topic > Eye in green box
• Input “Retinal photos” in comments in orange box
• Click ‘Save’
• The document will appear unreviewed
TECHNICAL
SUPPORT:
1300 657 720
Provision of Eye Health Equipment and Training — funded by the Australian Government.UPLOADING PHOTOS TO COMMUNICARE 4b.2
PRACTICE SOFTWARE
Option 3: Creating a photo assessment clinical item.
Note: this option needs to be set up individually as it is not part of the Communicare package. The following example is used by
NT government sites.
• T
he Retinal Photo Grading and Signoff clinical item will have been created on the completion of the Retinal Photography
clinical item and will be located in the To Do list (recalls).
• Open the item and review the right and left photographs (either by accessing the JPEG files that were uploaded
via the Retinal Photography service item, or by directly viewing the photographs on the camera laptop – RxCapture
software – if you are based in the clinic where the camera is located).
• C
omplete each of the tabs, indicating your grading (via the drop-down options) of the retinal photos
for R and L eyes, including any comments that may be relevant.
TECHNICAL
• O
n the next tab – Grading summary and referral decision – provide any relevant comments supporting SUPPORT:
your referral (triaging) decision. 1300 657 720
Provision of Eye Health Equipment and Training — funded by the Australian Government.UPLOADING PHOTOS TO COMMUNICARE 4b.2
PRACTICE SOFTWARE
• O
n the next tab – Referral decision – select the drop-down referral option chosen, ensure you set the
referrals/recalls as required (for Optometry and/or Retinal Photography) and created a referral letter where
required (when referring to Ophthalmology), and click ‘Save’.
• O
n completion of the Retinal Photo Grading and Signoff service item, MBS Items 12325 and 12326 will
automatically default onto the Medicare billing section of the consultation form. If this is a claimable case (i.e.
exclusion criteria as per the item descriptors do not apply), proceed to billing one of the following items:
o MBS 12325 for Aboriginal and/or Torres Strait Islander clients
o MBS 12326 for non-Indigenous clients
TECHNICAL
SUPPORT:
1300 657 720
Provision of Eye Health Equipment and Training — funded by the Australian Government.UPLOADING PHOTOS TO MEDICAL DIRECTOR 4b.3
PRACTICE SOFTWARE
Importing retinal photographs into Medical Director
1. Go to File > Scan/Import Correspondence...
2. Click ‘Import’ and select file
3. Input the following fields and click ‘OK’
TECHNICAL
SUPPORT:
1300 657 720
Provision of Eye Health Equipment and Training — funded by the Australian Government.UPLOADING PHOTOS TO MMEx 4b.4
PRACTICE SOFTWARE
Upload of retinal images/reports to the patient file- MMEx
1. Upload pdf report or jpeg images to patient file on MMEx
• Select patient
• Select ‘Documents’ from the Clinical Column
• Click on the ‘Upload File’ button. Type in descriptor in the ‘Subject’ field
• Click on the ‘Choose File’ button in the pop-up box and select the file from a location on your computer
• Click on the ‘Upload’ button
TECHNICAL
SUPPORT:
1300 657 720
Provision of Eye Health Equipment and Training — funded by the Australian Government.You can also read


