Illumio Edge Version 20.1.3 - Usage Guide - Illumio Technical Documentation
←
→
Page content transcription
If your browser does not render page correctly, please read the page content below

Illumio Edge®
Version 20.1.3

                   Usage Guide

February 2021
27000-100-20.1.3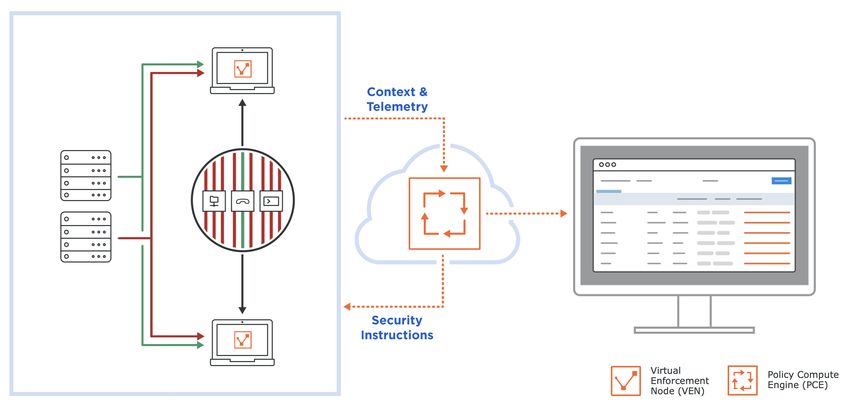
Legal Notices

     Copyright © 2020 Illumio 920 De Guigne Drive, Sunnyvale, CA 94085. All rights
     reserved.
     The content in this documentation is provided for informational purposes only and is
     provided "as is," without warranty of any kind, expressed or implied of Illumio. The
     content in this documentation is subject to change without notice.
     Product Versions
     PCE Version: 20.1.3
     UI Version: 20.1.3.UI1
     VEN Version: 20.1.3
     Resources
     Product information, see https://www.illumio.com/products/edge
     Legal information, see https://www.illumio.com/legal-information
     Trademarks statements, see https://www.illumio.com/trademarks
     Patent statements, see https://www.illumio.com/patents
     License statements, see https://www.illumio.com/eula
     Open source software utilized by Illumio ASP and their licenses, see Open Source
     Licensing Disclosures
     Contact Information
     To contact Illumio, go to https://www.illumio.com/contact-us
     To contact the Illumio legal team, email us at legal@illumio.com
     To contact the Illumio documentation team, email us at doc-feedback@illumio.com

Usage Guide 20.1.3                                                                          2
Contents

        Chapter 1 About Illumio Edge            5

          Overview                              5
           Features                             5
           Recommended Skills                   6
           Limitations                          6
           Interoperability                     7
          Policy Writing                        7
           Inbound White Listing Policy         7
           Services with Dynamic Ports          8
           Concepts                             8
        Chapter 2 Deployment                    9

          Deploy Illumio Edge                   9
           Requirements                         9
           Prerequisites                       10
           Install and Activate                10
           VEN Connections via Proxy Servers   10
          Getting Started                      11
          Select Incoming Services             13
          Configure IP Ranges                  15
          Agent Installation                   19
        Chapter 3 Edge Groups                  21

          About Edge Groups                    21
          Explorer                             22
          Workloads and VENs                   27
           Workload Policy States              28
           Workload Summary                    29
           Workload Processes                  30
           Rules                               31
           Blocked Traffic                     31
           VEN Library                         32
           Upgrade VENs                        32
          Policy Objects                       33
        Chapter 4 Management                   36

Usage Guide 20.1.3                                  3
Access Management   36
           Global Roles       36
           External Groups    38
           External Users     38
           Local Users        38
           User Activity      39
           Authentication     39
          Provision           40
           Draft Changes      40
           Policy Versions    41
          Settings            41
           Event Settings     41
           Provisioning       42
           Offline Timers     43
          Troubleshooting     44
           Blocked Traffic    44
           Events             46
           Export Reports     46
           Support Reports    47

Usage Guide 20.1.3                 4
Chapter 1

     About Illumio Edge
     This chapter contains the following topics:

        Overview                                                                            5
        Policy Writing                                                                      7

     This section provides an overview of Illumio® Edge®, policy writing concepts, and lists
     a few limitations of the 20.1.3 generally available (GA) release.

     Overview
     Endpoint segmentation is a very important security control and it is as important as
     data center segmentation. Illumio Edge gives you that security control by providing
     visibility and segmentation to the endpoint. Malware can spread when endpoints com-
     municate with each other. Illumio Edge delivers endpoint protection that eliminates
     malicious lateral connections by effectively blocking the east-west traffic. It pro-
     actively prevents the spread of breaches even before they are detected.
     The outbound connections from your machine will work, however, inbound con-
     nections will not work unless you write rules to allow them. So if an endpoint is com-
     promised, it will not be able to spread the breach to other endpoints. Illumio Edge can
     be easily deployed and consumed thereby enabling you to quickly get the security
     benefits.

     Features
     The main features of Illumio Edge are:

         l   Blocks inbound traffic, by default.
         l   Inbound rules allow traffic from subnets or core services to specific ports.

Usage Guide 20.1.3                                                                              5
Chapter 1 About Illumio Edge
                                                                                             Overview

         l   Outbound traffic is always allowed.
         l   Policies are applied only in the domain-connected profile (not public).
         l   Works remotely on Wi-Fi.
         l   Ability to model policy in Test and Enforced modes.
         l   Firewall coexistence mode is enabled by default.

                IMPORTANT:
                This is a SaaS-only release and the VEN is supported only on Windows
                machines.

     Workflow Diagram:

     Recommended Skills
     Illumio recommends that you be familiar with:

         l   Your organization's security goals
         l   User endpoint applications

     Limitations
     The known limitations of this release of Illumio Edge are:

         l   A separate SaaS PCE is required.
         l   Only on-premises Active Directory (AD) is supported.

Usage Guide 20.1.3                                                                                6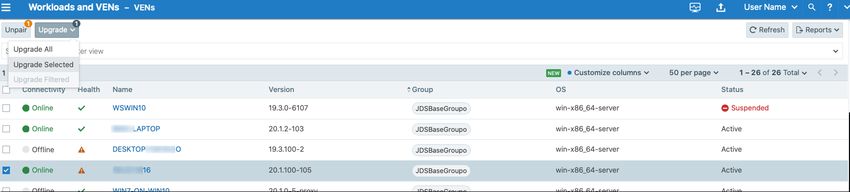
Chapter 1 About Illumio Edge
                                                                                         Policy Writing

         l   Laptops joined with Azure AD only are not supported. They must be on-
             premises domain joined or on-premises Azure AD-hybrid joined.
         l   Edge is not compatible with hypervisors such as, Windows Hyper-V. The con-
             nectivity to or from virtual machines may be blocked in the Enforced mode.
         l   HTTP proxy is not supported.

     Interoperability
     Illumio Edge works with the following software without the need to do any special
     configurations:

         l   Symantec
         l   TrendMicro
         l   Cisco AnyConnect

     Illumio Edge agent software uses Windows Powershell to implement functionalities
     such as, activation script, agent installer download and installation, agent software
     upgrade, and support report generation. Your anti-virus software may block the use
     of Powershell because it may classify a legitimate use, such as "thread", even if the
     scripts were signed with Windows authenticode.
     It is recommended that you configure your anti-virus software to exempt the Illumio
     Edge agent from scanning and behavioral analysis. If the above mentioned func-
     tionalities are not working properly, examine the anti-virus software logs and alerts to
     determine if it is interfering with the functions of Illumio Edge agent.

     Policy Writing
     At a high level, security policies are configurable sets of rules that protect network
     assets from threats and disruptions. Illumio Edge uses security policies to secure com-
     munications.

     Inbound White Listing Policy
     In most cases, you need to consider inbound service rules. The core services that com-
     municate inbound to the endpoints such as, McAfee EPO, Qualys, SNMP, or other man-
     agement services should be explicitly whitelisted to be allowed in. If you have
     inbound services that are unique to your organization, you will have to create a policy
     to suit your needs.
     Inbound Services Communication:

Usage Guide 20.1.3                                                                                7
Chapter 1 About Illumio Edge
                                                                                          Policy Writing

     Services with Dynamic Ports
     If case of services with dynamic ports, consider creating a policy that is tied to the pro-
     cess or Windows service and allow all ports. In this way the host firewall will control
     access only on those ports on which that application is listening.

     Concepts
     The concepts listed below are specific to Illumio Edge:

         l   Workload/VEN
             Are individual endpoints in your environment.
         l   Groups
             Is a logical grouping of endpoints. A group can be a department (Finance, HR,
             Engineering, and so on), a phase (Phase1), or any other way to organize your end-
             points.
         l   Services
             Are the incoming (inbound or peer-to-peer) services that you want to include in
             your policy.
         l   IP Ranges
             Is a range of IPs that is permitted to communicate for any given inbound service.
         l   Rules
             Are policies allowing inbound services from specified IP ranges.

Usage Guide 20.1.3                                                                                 8
Chapter 2

     Deployment
     This section describes how to deploy Illumio Edge, install the VEN, and start writing
     policies.

     Deploy Illumio Edge
     As an Illumio Edge Administrator for your organization you can easily get an endpoint
     policy up and running in your environment while considering your critical applications
     in use. You can deploy Illumio Edge in several ways, for example:

         l   Use it in SCCM.
         l   Use group policy to push out an executable.
         l   Systems manager or MDM.
         l   EXE bundle.
         l   Any software deployment tool that you currently use.

                IMPORTANT:
                You need to be a member of your organizations' desktop administration
                team with the required permissions to deploy Illumio Edge.

     Requirements
     In order to deploy Illumio Edge, you require:

         l   Illumio SaaS PCE login credentials
         l   Windows 7 or Windows 10 machines

Usage Guide 20.1.3                                                                            9
Chapter 2 Deployment
                                                                                    Deploy Illumio Edge

     Prerequisites
     Illumio Edge requires Visual C++ runtime libraries, which is provided by Microsoft as a
     redistributable package. If the Visual C++ runtime is not available on your system, Illu-
     mio Edge will pre-install it during the installation process. The Visual C++ runtime is a
     system component, so you may choose to install it separately from Illumio Edge.
     You may download the latest Visual C++ runtime from:
     https://support.microsoft.com/en-us/help/2977003/the-latest-supported-visual-c-
     downloads

     Install and Activate
     Run the following command to install and activate the VEN in a single command:

       illumio-edge-20.1.3-4.win.x64.exe /install /quiet /norestart /log
       C:\Windows\temp\IllumioEdgeInstall.log MANAGEMENT_SERVER=sca1.illum.io ACTIVATION_
       CODE=

                NOTE:
                The above command is only applicable if you are using the EXE bundle.
                The quiet, norestart, and log commands are all optional.

     For information on locating the Activation Code value, see the Agent Installation sec-
     tion.

     VEN Connections via Proxy Servers
     From the 20.1.2 release onwards, Illumio Edge supports a VEN to PCE connection
     through proxy servers:

         l   The default proxy configuration on the OS is used and proxy configuration may
             or may not be required or available on the VEN. See configuration details below.
         l   Only non-authenticated proxy is supported, which may require you to add an
             exception for the PCE address.
         l   Only HTTP proxy is supported. The VEN will detect the proxy automatically and
             configuration or mode change will not be required.

     The configuration details are as follows:

         l   If the network environment supports WPAD protocol, the Edge VEN will auto-
             matically use WPAD to discovery proxies and no special configuration is

Usage Guide 20.1.3                                                                                10
Chapter 2 Deployment
Getting Started
required.
l If proxy configuration is done via a PAC file, you will have to import Internet
Explorer's (IE) proxy setting with the PAC file URL to the LocalSystem user (S-1-
5-8). The VEN only supports http:// PAC file URL. It does not support file://
URLs.
l If proxies are statistically configured, you can configure using one of the fol-
lowing two methods:
o Using netsh winhttp set proxy command. This method takes precedence.
For netsh winhttp usage, refer to https://docs.microsoft.com/en-us/-
previous-versions/windows/it-pro/windows-server-2008-R2-and-
2008/cc731131(v=ws.10).
o Importing IE setting with static proxies setting to the LocalSystem user.
For importing IE settings for the VEN, refer to https://server-
fault.com/questions/34940/how-do-i-configure-proxy-settings-for-local-
system.
NOTE:
Both IE-based proxy setting and netsh winhttp can be pushed to the
endpoints (PCs) using Group Policy.
Getting Started
When you sign-up with Illumio Edge, you will receive an email invitation to create
your account and access Illumio Edge. The invitation link is valid for 7 days after which
it expires. After creating your account, you can log in to the Illumio Edge web console.
When you log in for the first time, the 'Welcome to Illumio Edge' page is displayed.
The wizard opens on clicking Get Started, which walks you through the Illumio Edge
setup steps that are described in the following sections. When you log in the next
time, the Illumio Edge dashboard (Groups) is displayed with traffic alerts you have
configured.
First time login: Welcome page
Usage Guide 20.1.3 11Chapter 2 Deployment
Getting Started
Subsequent logins: Illumio Edge Groups page example (after configuring policy and
pairing the VENs)
The following sections describe how to get started by selecting the incoming services
and configuring IP Ranges to define security rules for a set of workloads in a Group.
Usage Guide 20.1.3 12Chapter 2 Deployment
Select Incoming Services
Select Incoming Services
This section describes how to select the Incoming Services to allow for peer-to-peer
communication.
1. You define a group and select your desired incoming services. Illumio Edge
provides a list of common applications and you can select which items you want.
2. You can add a new Group by clicking Add new Group on the Groups page.
3. Enter a name for the new group in the Name of Group field, for example HR. The
group you have selected is the group of endpoints that the policy will be
applied to.
4. Select your desired incoming services. By default, Illumio Edge provides approx-
imately 30 services in the 'All Services' list. Start entering a service name in the
'Type to show matching services' field to filter service in the All Services list.
You can select the service you want and use right/left arrows to add or remove
them from the Incoming Services to allow list.
For example, you can add Skype and Microsoft Teams to be allowed for this HR
group.
Usage Guide 20.1.3 13Chapter 2 Deployment
Select Incoming Services
Previously, you could add only one IPList to a service. Without nested IPLists or
the ability to add more than one IPList to a service, you would need to create
IPLists per services. From the Edge 20.1.3 release onwards, you can add more
than one IPList to a service. As multiple IP Ranges for the same service is now
allowed, you may define multiple IP ranges with smaller CIDR blocks or IP
Range.
5. Click on the Service name to view or edit it.
6. If you are using a custom peer-to-peer application that is not in the provided 'All
Services' list, click +Add New to define that service.
Enter a Name, Description, and Service Definitions (Port and/or Protocol, Pro-
cess, and Windows Service) and click Save. The new service is added to the list.
From the Illumio Edge 20.1.2 release onwards, you have the option to select the
Usage Guide 20.1.3 14Chapter 2 Deployment
Configure IP Ranges
'All Operating Systems: Port-Based' Operating System in addition to the 'Win-
dows: Process/Service-Based' option.
You have now defined your incoming services, which means you have confirmed the
selected services to be authorized for the specified group. Click Next to continue.
Configure IP Ranges
You will now configure the authorized IP Ranges that are allowed to communicate on
the services you have defined in the Select Incoming Services section. For example, in
the case of Skype the IP range can be Any because you want all the laptops of employ-
ees that belong to the HR group to communicate via Skype with each other. By
default, Illumio Edge provides a few IP range options, such as Any and RFC 1918,
which you cannot edit.
1. Select Permitted IP Range from the dropdown to select an incoming IP Range
that is permitted to communicate for any given incoming service.
Usage Guide 20.1.3 15Chapter 2 Deployment
Configure IP Ranges
2. You can also click Apply IP Range to apply an IP range to one or more of the ser-
vices.
Usage Guide 20.1.3 16Chapter 2 Deployment
Configure IP Ranges
3. Click +Add New, if you want to create a new custom IP range. Click the 'i' icon to
see the examples.
4. After choosing the IP Ranges, click Next to view the summary of your Rules,
which displays the list of incoming services and permitted IP ranges.
5. Click Done to Provision the Rules or Save as a Draft.
6. Verify the information in the pop-up and click Confirm & Provision to provision
the rule to the associated workloads.
Usage Guide 20.1.3 17Chapter 2 Deployment
Configure IP Ranges
If you select Save as Draft, see the Draft Changes section.
7. After successful provisioning, the Illumio Edge Groups is displayed, with the
groups, their provision status, and the number of VENs that are associated with
that group (number of paired workloads) displayed in the left panel. If you want
to add additional workloads, click the '+' button located next to the number of
VENs as described in the Agent Installation section.
The inbound traffic configured for that group is displayed in the right panel. For
information, see the Explorer section.
Usage Guide 20.1.3 18Chapter 2 Deployment
Agent Installation
Agent Installation
An agent installation script is generated for every Group. You can install additional
agents (VENs) by clicking the '+' button next to your Group on the Illumio Edge
Groups page. You may use any of the deployment options (mentioned in the Deploy
Illumio Edge section) to deploy the agent on your endpoints. Click the up arrow [ ]
on the Install Script page to view the Workloads and VENs page.
Usage Guide 20.1.3 19Chapter 2 Deployment
Agent Installation
After you pair the workload, it will be displayed as an additional [+] on the Illumio
Edge Groups page under that group's VEN column.
Usage Guide 20.1.3 20Chapter 3
Edge Groups
This chapter contains the following topics:
About Edge Groups 21
Explorer 22
Workloads and VENs 27
Policy Objects 33
This section describes the Illumio Edge Groups page (or it's main dashboard), the
Explorer feature, and Workloads and VENs.
About Edge Groups
The Illumio Edge Groups page offers a quick insight into all active inbound services
seen across your groups. In “test mode,” you can confirm policies by reviewing poten-
tially blocked traffic before enforcement. You can quickly understand the policy
decision on all traffic via the green, yellow, and red traffic lines. You can also sort the
data based on incoming service, port, or workload. Clicking on any of the lines under
the Policy column, opens the Explorer page.
The color of the traffic lines indicates the following status:
l Green: Allowed
l Yellow: Potentially Blocked (in the Test mode, the traffic that does not conform
to policy is displayed as potentially blocked)
l Red: Blocked
Usage Guide 20.1.3 21Chapter 3 Edge Groups
Explorer
Explorer
Explorer allows you to analyze traffic flows for auditing, reporting, and troubleshoot-
ing purposes. You can access Explorer from:
l Top-left main menu [ ] > Explorer
l Clicking on the traffic flow on the Groups page
l Clicking the View All Traffic button located on the Groups page
Usage Guide 20.1.3 22Chapter 3 Edge Groups
Explorer
From the Edge 20.1.2 release onwards, you have the ability to Refresh the Groups
page to see new traffic, add filters, and view policies. The 'Inbound Traffic for Group'
on the Groups page displays the traffic flow of workloads in the Group along with the
port and protocol, process name, and Windows service name.
Usage Guide 20.1.3 23Chapter 3 Edge Groups
Explorer
l Source: The origin IP address or endpoint for the selected flow.
l Destination: The destination IP address or endpoint for the selected flow.
l Source Group: The origin endpoint group for the selected flow.
l Destination Group: The destination endpoint group for the selected flow.
You can filter either Global (all groups) or per Group, Time, and Transmission mode.
The transmission mode defaults to Unicast. You can select Broadcast or Multicast.
You can also sort based on Reported or Draft (All, Blocked, or Allowed) Views and
Export the data.
l Draft View: View policies without provisioning them.
l Reported View: View policies by actually provisioning them.
Usage Guide 20.1.3 24Chapter 3 Edge Groups
Explorer
For more in-depth and targeted filtering, you can select specific traffic criteria dis-
played on clicking in the Select Traffic... field.
Usage Guide 20.1.3 25Chapter 3 Edge Groups
Explorer
Usage Guide 20.1.3 26Chapter 3 Edge Groups
Workloads and VENs
On selecting the Parallel Coordinates format, the Explorer displays traffic flows as a
vertical list of Source and Destination applications, and the port being used in the
flows. You can also sort the results to view based on port number or number of traffic
flows and also by process name or number of flows.
Previously, Explorer would only filter based on Transmission type or Exclude Servers
or IP Ranges. From the Edge 20.1.3 release onwards, the Explorer feature has been
enhanced to include its full functionality with filtering options. You can now use
Explorer to find data about a certain port and protocol or find information for a spe-
cific flow over a certain period.
Workloads and VENs
After you pair workloads, you can view details by clicking a single workload. Only
groups that the workload is in are displayed. Each workload, last received, group. You
can Edit the Workload description, policy state and managed interfaces. The VENs
page displays a list of all the VENs. If you click on a VEN it opens the corresponding
Workload. You can unpair, generate support reports, and suspend a VEN. Clicking the
Add button located next to the Policy State button, displays the Group's Install Script
page.
Workloads page:
Usage Guide 20.1.3 27Chapter 3 Edge Groups
Workloads and VENs
VENs page:
Workload Policy States
After installing a VEN on a workload, you can place the workload in one of the four
policy states:
Usage Guide 20.1.3 28Chapter 3 Edge Groups
Workloads and VENs
l Idle: Used for installing and activating the VEN without changing the workload's
firewall. The VEN uses the workload's network analysis to provide relevant
details to Edge.
l Build: Used for creating and testing policies without affecting the workload. The
VEN inspects all open ports on the workload and reports traffic flows to the PCE.
The PCE does not log this information.
l Test: Used to refine the polices. The VEN sends potentially blocked traffic inform-
ation to the PCE. The PCE logs this information, which is useful in refining
policies before they are enforced.
l Enforced: Used to enforce the policies. The policies written are now active.
l In the enforced state, you can select any of three detail levels to define how
much data the VEN collects from the workload and sends to the PCE:
o High detail: Provides all connection details but requires more system
resources from the workload.
o Low detail: Provides only blocked connection details and requires fewer
system resources from the workload.
o No detail: VEN does not collect any information about the traffic.
The recommended flow is of policy state cycle is to start with the Idle mode, next
move to the Build mode to provision your policies, and then move to the Test mode
to refine your policies. After confirming that the policies suit your organization needs,
move to the Enforced mode and select the detail level based on the amount of traffic
details you want the VEN to report to the PCE.
Workload Summary
Workload attributes provide detailed information such as the hostname, the VEN soft-
ware version, and other attributes. If a workload belongs to a particular group, it will
receive the rules defined for that group after the ruleset is provisioned.
Usage Guide 20.1.3 29Chapter 3 Edge Groups
Workloads and VENs
Workload Processes
In the Workload Processes tab, you can view the processes currently running on the
workload. For each process running on the workload, the following information is lis-
ted:
l Process name
l Server path
l Ports used by the process
l Protocol (for example, TCP or UDP)
Usage Guide 20.1.3 30Chapter 3 Edge Groups
Workloads and VENs
Rules
Inbound rules are those that you define to allow services in to your workloads. The out-
bound rules are built by default to allow all traffic outbound.
Blocked Traffic
It displays all the blocked inbound traffic for the selected workload.
Usage Guide 20.1.3 31Chapter 3 Edge Groups
Workloads and VENs
VEN Library
The PCE can act as a repository for distributing, installing, and upgrading the VEN soft-
ware. The PCE can host multiple VEN versions, allowing you to evaluate and certify
new versions of the VEN while continuing to deploy older versions in production. The
VEN Library page is available after you have loaded a VEN software bundle. From this
page, you can download individual VEN packages and also view the dependencies
and supported OS versions.
Upgrade VENs
From the 20.1.2 release onwards, you can upgrade one or more VENs from the Work-
loads and VENs > VENs page in the UI. You can upgrade all VENs, upgrade a selected
subset of VENs, or upgrade all VENs that match a set of filters. After you confirm an
upgrade from the UI, the VEN will download the new VEN image from the PCE and
upgrade itself. If the VEN does not successfully upgrade within a certain amount of
time (approximately 24 hours), the upgrade will time out and the PCE will put the
VEN in a warning state. To clear this warning, just start another upgrade on the VEN.
The VEN versions available in the UI will be uploaded by Illumio.
Usage Guide 20.1.3 32Chapter 3 Edge Groups
Policy Objects
Policy Objects
The policy objects supported in this release of Illumio Edge are Services and IP
Ranges, which have been described in the Concepts section. Your policy now has only
two criteria: inbound services and IP ranges.
From the main menu, navigate to Policy Objects > Services to view all the inbound ser-
vices you have previously defined. You can also create a custom service from the Ser-
vices page by clicking the +Add button.
Similarly for IP ranges, you can navigate to Policy Objects > IP Ranges to view all the
IP ranges you have previously defined. You can also add custom IP range from the IP
Ranges page by clicking the +Add button.
Usage Guide 20.1.3 33Chapter 3 Edge Groups
Policy Objects
If you want to edit the policy of a group, for example, you want to add a service to the
Finance group:
1. From the Edge Groups page, click Finance (the name of the group). The Group
page opens, which displays the current policy for that group.
Usage Guide 20.1.3 34Chapter 3 Edge Groups
Policy Objects
2. On the Group page, click Edit to open the Getting Started Wizard.
3. Edit the Group to modify the Incoming Services and IP Ranges as described in
the initial section of this guide.
Usage Guide 20.1.3 35Chapter 4
Management
This chapter contains the following topics:
Access Management 36
Provision 40
Settings 41
Troubleshooting 44
This section describes how to manage the various roles provided with Illumio Edge
and how to manage policies and settings as well as troubleshooting steps.
Access Management
Illumio Edge includes four built-in Global Roles that grant users access to perform
operations as required within your organization. You can assign multiple roles to one
user and by mixing and matching the different roles, you can achieve different levels
of granularity of permissions.
Global Roles
To view the Global Roles, navigate to Access Management > Global Roles.
Usage Guide 20.1.3 36Chapter 4 Management
Access Management
The following tables describes the access permissions for each role:
Role Granted Access
Global Organ- Perform all actions: add, edit, or delete any resource, security set-
ization Owner tings, or user account.
Global Admin- Perform all actions except user management: add, edit, or delete
istrator any resource or setting.
Global Read View any resource or organization setting: cannot perform any
Only operations.
Global Policy Provision rules containing IP ranges, services, and groups: cannot
Object Pro- provision rules, or add, modify, or delete existing policy objects.
visioner
Usage Guide 20.1.3 37Chapter 4 Management
Access Management
External Groups
Illumio Edge integrates with the user groups maintained in your corporate IdP so that
you can manage user authentication centrally. When a user who is a member of an
external group logs into Illumio Edge, the corporate IdP authenticates the user and
returns the list of groups the user belongs to.
External Users
When you use an external corporate Identity Provider (IdP) to authenticate users but
your IdP usernames do not use email addresses, email invitations cannot be sent to
those users. When you add this type of user, send them a login URL that they can use
to set up their Edge accounts and log into the web console. Removing an external
user removes the user from the External Users tab and all the user's role mem-
berships. The user's authentication is still managed by your corporate IdP.
Local Users
Local users are created in the PCE (they are not managed by an IdP). You can view
the list of local users under this tab. You can create additional local users as a backup
in case your external IdP goes offline or the SAML server is not accessible. You can
delete a user by selecting their name and clicking Remove.
To add a local user:
Usage Guide 20.1.3 38Chapter 4 Management
Access Management
1. From the Edge main menu, choose Access Management > Local Users.
2. Click Add.
3. Enter a name and an email address. The email address must use the format
xxxx@yyyy.zzzz and be 255 characters or less. You can have duplicate names for
local users but you cannot have duplicate email addresses.
4. Select a role for the user:
o None (Users without a role have Read Only access when this access is
enabled.)
o Global Organization Owner
o Global Administrator
o Global Read Only
User Activity
This page displays a list of all the users in your organization along with details such as,
name, email address, status (online, offline, or invited), and their last login date and
timestamp.
Authentication
When you use a third-party SAML-based IdP to manage user authentication in your
organization, you can configure that IdP to work with the PCE.
Usage Guide 20.1.3 39Chapter 4 Management
Provision
Provision
Provisioning means the policies you have defined are sent to the VENs that are
installed on the endpoints.
Draft Changes
Any changes you make to groups, IP ranges, services, or policy need to be pro-
visioned. When your PCE has changes that need to be provisioned, the orange badge
on the Provision button [ ] indicates the number of changes that need to be pro-
visioned. When you select the check-box and click Provision, the PCE recalculates the
changes and transmits those changes to the VENs installed on your workloads. All of
the changes you make to those items are considered to be in a "draft" state (un-ver-
sioned) until you provision them. After the provisioning is complete your changes,
those changes become "active" and current.
When you confirm provisioning by clicking Confirm & Provision, the Provisioning pro-
gress indicator displays the number of workloads that need to be synchronized with
the latest provisioned policy changes and the progress for applying the policy
changes to those workloads.
On the Provisioning page, you can:
l View the previous policy change by clicking View the last commit.
l View the list of policy versions by clicking View Policy Versions.
Usage Guide 20.1.3 40Chapter 4 Management
Settings
Policy Versions
Select Provision > Policy Versions from the top-left main menu [ ] on the left or from
the top-right provision menu [ ]. The policy versions are displayed under the Ver-
sion column.
Settings
This section describes how to configure event settings in the Illumio Edge web con-
sole.
Event Settings
By default, the auditable events are enabled in the PCE and cannot be disabled, in
accordance with Common Criteria compliance.
You can change the following event-related settings by navigating to the Settings >
Event Settings page:
l Event Severity: Set the severity level (Error, Warning, or Informational) of
events to record. Only messages at the set severity level and higher are recor-
ded. The default severity is 'Informational'.
l Retention Period: The system retains event records for a specified number of
days - from 1 day to 200 days, the default period is 30 days.
l Event Format: Set the message output to one of the three formats, JavaScript
Object Notation (JSON), Common Event Format (CEF), or Log Event Extended
Format (LEEF).
Usage Guide 20.1.3 41Chapter 4 Management
Settings
Provisioning
You have the option to make a provision note mandatory before you provision rules. It
is disabled by default, but you can enable it to make it mandatory. This feature sup-
ports the need to describe context before provisioning and can support your organ-
ization's internal workflow. When it is enabled, you have to populate the note field
before provisioning changes.
When enabled, you cannot provision updates until you enter text in the Provision
Note field. The Confirm & Provision button is grayed out. After you enter appropriate
text in the field the Confirm & Provision button is enabled and you can provision the
update.
Usage Guide 20.1.3 42Chapter 4 Management
Settings
Offline Timers
The default settings are displayed for the 'PCE to Workloads Global Offline Timers:
l Disconnect and Quarantine Timer: Sets the time period to wait with no heartbeat
before a workload is marked offline. The default High Security setting is ‘Wait
One Hour before Timeout’.
l Decommission and IP Cleanup Timer: Sets the time period to wait after a work-
load sends a goodbye message to mark it offline. The default High Security set-
ting is 'Wait 15 minutes before IP Cleanup'.
WARNING:
Turning the offline timer setting off degrades the security posture because
the PCE will not remove IP addresses that belonged to workloads that have
been disconnected from those that were allowed to communicate with the
disconnected workloads. You will need to remove the disconnected work-
loads from the PCE to ensure that its IPs are removed from the policy.
Usage Guide 20.1.3 43Chapter 4 Management
Troubleshooting
Troubleshooting
This section describes how to troubleshoot common issues while using Illumio Edge.
Blocked Traffic
The Blocked Traffic page shows you all traffic that attempted to communicate with
your workload but was blocked due to policy. Blocked traffic alerts provide inform-
ation such as the source and destination IP, source and destination group, the total
number of flows, and the time last detected.
Usage Guide 20.1.3 44Chapter 4 Management
Troubleshooting
You can narrow down the view by filtering based on Group name, Traffic Status
(Blocked or Potentially Blocked), name of the Workload, and time filter (last hour, day,
week, or month). You can sort the Source and Destination columns and choose to view
Names or IP Addresses.
Usage Guide 20.1.3 45Chapter 4 Management
Troubleshooting
Events
The Events page displays a list of events based on the activities performed. You can
export all events or export a filtered list of organization events to a CSV file. You can
also do faster filtering via the browser.
Export Reports
You can generate reports for Workloads, VENs, Services, and IP Ranges in JSON or
CSV formats from the Reports dropdown option on the corresponding page and then
download the report from the Troubleshooting > Export Reports page.
Usage Guide 20.1.3 46Chapter 4 Management
Troubleshooting
Support Reports
If you need to troubleshoot any issue with your VENs, click Generate Support Report
on the VEN's summary page. It may take up to 10 minutes to generate the report.
After the report is generated, you can download it from the Troubleshooting > Sup-
port Reports page and send it to Illumio support for any assistance.
Usage Guide 20.1.3 47Chapter 4 Management
Troubleshooting
Usage Guide 20.1.3 48You can also read