Creating Online Tests - Blackboard 9.1 Niagara College Blackboard Support
←
→
Page content transcription
If your browser does not render page correctly, please read the page content below

Creating Online Tests
      Blackboard 9.1

Niagara College Blackboard Support
Blackboard Staff/Faculty Support                                                                                               Creating Online Tests

                                                             Table of Contents
Creating an Assessment ............................................................................................................................... 3
Test Creation Settings ................................................................................................................................... 7
Creating Individual Questions ....................................................................................................................... 9
  Basic Question Types ............................................................................................................................. 11
     Essay Questions................................................................................................................................. 11
     Fill in the Blank Questions .................................................................................................................. 11
     Matching Questions ............................................................................................................................ 12
     Multiple Choice Questions .................................................................................................................. 14
     Multiple Answer Questions ................................................................................................................. 15
     Ordering Questions ............................................................................................................................ 16
     True/False Questions ......................................................................................................................... 17
     Random Block Questions ................................................................................................................... 17
     From a Question Pool or Assessment................................................................................................ 19
  Advanced Question Types ..................................................................................................................... 21
     Calculated Formula Questions ........................................................................................................... 21
     Calculated Numeric Questions ........................................................................................................... 23
     Either/Or Questions ............................................................................................................................ 23
     File Response Questions ................................................................................................................... 24
     Fill in Multiple Blanks Questions ......................................................................................................... 24
     Hot Spot Questions ............................................................................................................................ 26
     Jumbled Sentence Questions ............................................................................................................ 27
     Opinion Scale/Likert Questions .......................................................................................................... 29
     Quiz Bowl Questions .......................................................................................................................... 30
     Short Answer Questions ..................................................................................................................... 31
Making a Test Available .............................................................................................................................. 33
Modifying or Removing an Assessment ...................................................................................................... 39
  Changing the Order of Test Questions ................................................................................................... 40
  Exporting a Test...................................................................................................................................... 41
  Importing a Test ...................................................................................................................................... 43
  Removing a Test..................................................................................................................................... 44
Using the Pool Manager .............................................................................................................................. 44
  Differences between a Test and a Question Pool .................................................................................. 45
  Exporting a Pool ..................................................................................................................................... 46
  Importing a Pool...................................................................................................................................... 47
Resetting Student Assessments ................................................................................................................. 49
Grading Essay Questions ........................................................................................................................... 50

Niagara College Blackboard Support / September 2012                                                                                                Page 2
Blackboard Staff/Faculty Support Creating Online Tests
Creating Online Tests
Blackboard has a sophisticated assessment method where you can determine the level of your student’s
learning and progress through the course. A variety of question types such as multiple choice, short-
answer, or matching questions are available. You assign the point values for each question, and can also
include multimedia clips and randomize the assessment questions, if appropriate.
Once the student submits the assessment, Blackboard grades the items it can (such as multiple choice or
matching) and leaves an indicator in the Grade Center that a test is available for you to grade. Once you
evaluate the assessment, the grade is automatically recorded in the Grade Center.
Creating an Assessment
Before creating an assessment for your course, you should ask yourself several questions to ensure that
a test is appropriate. You must consider both basic test issues as well as more complex, long-range
course implication issues.
Some of the more basic questions include:
How many questions will be on the test?
Do I need to include instructions for answering each question or specific questions?
What will the point value be for each question? Of the entire test?
Does each question have one clear answer?
Are the assessment questions easy to understand?
Other, more long-range questions include:
What type of questions will be on the assessment? Are they appropriate for the level of the
course?
Is a test the best way to measure student learning on this topic(s)?
When should the students take the assessment? Does the timing make sense when considering
the rest of the course activities?
Be sure that your assessment is appropriate in both tone and content, and that the assessment is
available at the proper time in the course schedule. You should try to review your questions from a
student’s point of view, to reduce student confusion and misunderstandings.
Be sure that each question in the assessment is focused on one topic and has one clear answer. Finally,
you may want to consider whether the students have the appropriate knowledge and skills to complete
the assessment successfully. Remember, the purpose of the assessment is to measure student progress.
Follow the steps below to begin creating an assessment:
1. Ensure that you are in Edit Mode
2. Enter your Blackboard course and access the Control Panel on the left hand side of the screen.
3. Under the Course Tools section click on the Test, Surveys and Pools link.
Niagara College Blackboard Support / September 2012 Page 3
Blackboard Staff/Faculty Support                            Creating Online Tests

    4. The Test, Surveys and Pools page will then appear.

    5. Click on the Test link to display the Tests page.

Niagara College Blackboard Support / September 2012                       Page 4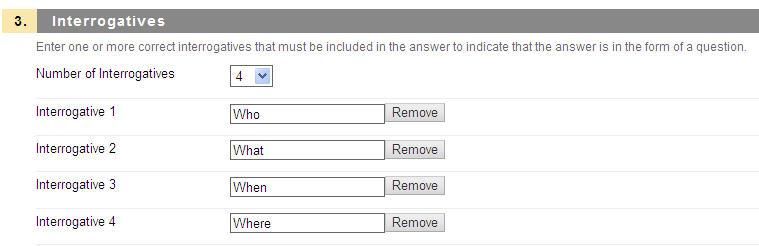
Blackboard Staff/Faculty Support                                                          Creating Online Tests

    6. If you would like to create a test, click on the Build Test button. If you would like to Import a Test
       from a pool of questions, you will click on the Import Test button.

    7. If you click on the Build Test icon, you will need to enter a description of the assessment in the
        Name field.
    8. Any descriptions regarding the test can be inputted into the Description field text box.
    9. Enter any instructions for the test in the Instructions field.
    10. Click on the Submit button to display the next page of the Test Canvas screen.

Niagara College Blackboard Support / September 2012                                                      Page 5
Blackboard Staff/Faculty Support                                                     Creating Online Tests

    11. Before creating and adding any questions to your assessment you should first specify your test
        settings by clicking the Question Settings link on the Test Canvas page. For more detailed
        information on the available options, refer to the Test Creations Settings section on the next
        page.
    12. Select the appropriate question type from the Create Question drop-down box.
    13. Complete the steps to create the selected question type. Detailed instructions on adding each
        available question type are available under the Creating Individual Questions section of this
        tutorial.
    14. Repeat steps 11-12 until you add all of the questions to the test.
    15. Click OK to complete the test.

Niagara College Blackboard Support / September 2012                                                Page 6
Blackboard Staff/Faculty Support                                                               Creating Online Tests

Test Creation Settings
You can make changes to the operation of the test at any time on the Test Creations page. You access
this page by clicking on the Question Settings button on the Test Canvas page.
The table below identifies the options available to you on this page:

   Option                                             Description
   Provide feedback for individual answers            Allows you to provide feedback for individual answers,
                                                      rather than just one set of feedback for
                                                      correct/incorrect answers.
   Add images, files, and external links to           Allows you to attach graphics or other files to the
   questions                                          questions in the test.
   Add images, files, and external links to           Allows you to attach graphics or other files to the
   answers                                            answers.
   Add categories, topics, levels of difficulty,      Allows you to create categories for the questions you
   and keywords to questions                          create. This feature makes searching for questions
                                                      from Pools or other Tests easier as you can search by
                                                      keyword or category.
   Specify default point value for questions          Allows you to set the default point value for all of the
     Use current assigned points                      questions on the test, although you can change the
                                                      point value for individual questions.
     Use default points
   Specify partial credit options for answers         Allows you to have the option to allow Blackboard to
                                                      assign partial credit for certain types of test questions.
   Specify extra credit options for questions         Allows you to have the option to turn questions into
                                                      extra credit questions as opposed to regular questions.
                                                      If this option is selected points are added to the score
                                                      of the question is answered correctly; no points are
                                                      taken away is the answer is answered incorrectly.
   Specify random ordering of answers                 Allows you to have answers randomized for certain
                                                      types of test questions.
   Specify the horizontal or vertical display of      Allows you to specify the orientation of answers for
   answers                                            certain types of test questions.
   Specify numbering options for answers              Allows you to specify how answers are numbered for
                                                      certain types of test questions.

  Note: Instructors must set the Default Point Value before creating questions for it to be effective. If the
  default point value is changed, only questions created after it is modified will have the new point value.
  Questions created before the modification will have the old point value. For example, initially the
  Default Point Value is set to 10 by Blackboard. If you do not change this, all of the questions you
  create in the Assessment will have a default point value of 10. If you then change the Default Point
  Value to 1, and create additional questions in the Assessment, only the new questions will have a
  default point value of 1. The questions created initially will still have a point value of 10.

Niagara College Blackboard Support / September 2012                                                           Page 7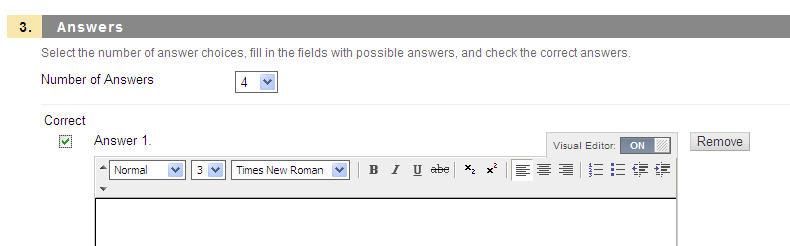
Blackboard Staff/Faculty Support                                                   Creating Online Tests

Follow the steps below to enable any Test Creation settings for your test:

    1. Click on the Question Settings button to display the Test Creation Settings screen, pictured
       below.

    2. Select the appropriate checkboxes to enable/disable the desired options.
    3. Click on the Submit button to return to the Test Canvas screen and begin adding questions to
       your assessment.

Niagara College Blackboard Support / September 2012                                              Page 8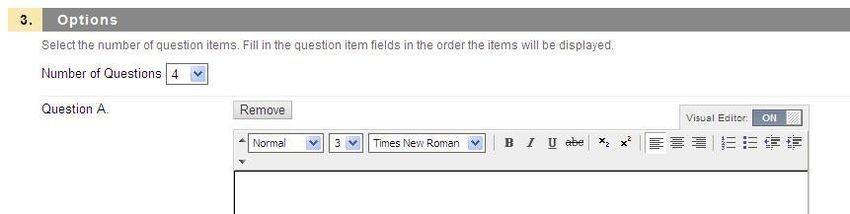
Blackboard Staff/Faculty Support                                                          Creating Online Tests

Creating Individual Questions
One of the nicest features of Blackboard testing is the ability to select from a variety of question types so
that you can assess the students in many different ways. You will spend more time creating the test the
first time, but after that, you can reuse questions or even entire tests for later assessments.
The general procedure to begin to create a question is:
    1. On the Test Canvas page, click on the drop-down arrow in the Create Question field and select
       the question type.

    2. Click the appropriate question type to display the Create/Edit Question screen for the selected
       question type – see below for an example.

Niagara College Blackboard Support / September 2012                                                     Page 9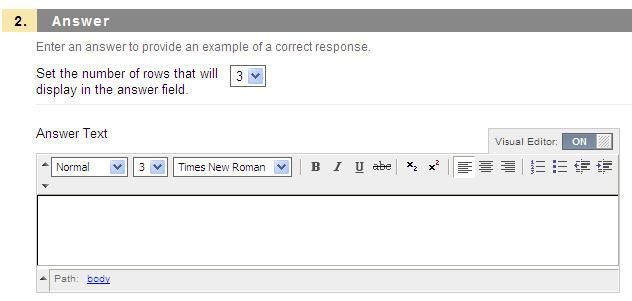
Blackboard Staff/Faculty Support                                                             Creating Online Tests

    3.   Enter the question in the Question Text field.
    4.   If desired, chose the Answer Orientation.
    5.   Enter the question answers in the Answers section.
    6.   Click the Submit button at the bottom of the page.

  Extra Credit: When creating test questions they may now be marked as extra credit only. This means
  that the points possible for the entire test will not include the points for that question. If the question is
  answered correctly, the question points will be added to the points correct, but if the question is
  answered incorrectly, there is no score penalty.

  To mark a question as Extra Credit, locate the question in the Test Canvas click on the points in the
  upper right of the question to be presented with a pop up like this:

  Click the Extra Credit checkbox and Click Submit.

Niagara College Blackboard Support / September 2012                                                        Page 10
Blackboard Staff/Faculty Support Creating Online Tests
Basic Question Types
Essay Questions
Essay questions in Blackboard work the same as essay questions on any test. You must provide the
question text, and the student answers it in the space provided. Students are allowed to cut and paste
from a word processing application to ensure correct spelling and grammar. Students can also use the
Math and Science Notation tool in answering essay questions.
You must manually grade each essay question and assign the appropriate number of points in the Grade
Center. The sample answers will not be used by Blackboard to grade the question. These fields are
meant for classes where teaching assistants perform grading duties.
Follow the steps below to add an essay question to the assessment:
1. Click on the drop-down arrow in the Create Question field to select Essay.
2. The Create/Edit Essay Question screen will appear.
3. Enter the question in the Question Text field.
4. Scroll down to the Answer section of the screen.
5. Enter a sample answer that graders can use to help grade the test if necessary.
Note: Essay questions are not graded automatically by Blackboard. Once a student has
completed a test with an essay question the instructor can review the student’s response and
enter the appropriate grade.
6. Scroll down to the bottom of the screen and click on the Submit button to add the question to the
assessment and return to the Test Canvas screen.
7. If desired, enter the total points possible for that question in the Point Value field and click
Submit.
Fill in the Blank Questions
Fill in the Blank questions are excellent questions for use in assessments because they force the
students to think of their own answer to the question. One caution about using these types of questions is
that the answer is based on an exact text match. This means that if the student misspells the answer, it
will be marked wrong. The answers are not case-sensitive, but are order-sensitive. If the correct answer is
supposed to be “Excel and Access” and the student answers “Access and Excel”, the question is marked
wrong.
The fix for the spelling problem is to list the most common spelling errors in the “right” answer list. That
way you don’t have to manually review each Fill in the Blank question to check for a spelling error.
Another solution for this problem is to be sure to limit the number of words in the answer and make
allowances for different word orders in the answer. You may also want to tell your students about the
spelling issues so they can be more careful in their responses.
Follow the steps below to add or modify a Fill in the Blank question:
1. Click on the drop-down arrow in the Create Question field to select Fill in the Blank.
2. The Create/Edit Fill in the Blank Question screen will appear.
3. Enter the question in the Question Text field.
4. Scroll down to the Answers section to display that portion of the screen.
5. Use the drop-down arrow to select the number of variations of the correct answers you are willing
to accept for the question.
Niagara College Blackboard Support / September 2012 Page 11Blackboard Staff/Faculty Support Creating Online Tests
Note: Remember to take spelling errors into account when selecting the number of answers.
6. Enter all possible correct answers in the Answer fields, using only one field per answer.
Note: If you need additional fields, change the number of answers using the drop-down arrow.
7. If you have chosen to provide feedback, scroll down to the Feedback portion of the screen and
enter the text to be displayed to the student for the correct and incorrect answers.
8. Scroll down to the bottom of the screen and click on the Submit button to add the question to the
assessment and return to the Test Canvas screen.
9. If desired, enter the total points possible for that question in the Point Value field.
Matching Questions
Matching questions are useful in testing student understanding of terminology and conceptual information
in a class. For instance, you could have a student match the terminology with its definition to verify that
the student can recognize appropriate terminology for the course.
Follow the steps below to add a matching question to your test:
1. Click on the drop-down arrow in the Create Question field to select Matching.
2. The Create/Edit Matching Question screen will appear.
3. Enter the question in the Question Text field.
4. Under the Options sections you can choose how you want your answers to be numbered. From
the Answer Numbering drop-down you can choose Arabic Numerals, Roman Numerals,
Uppercase Letters, and Lowercase Letters.
5. If you wish, you can choose to allow partial credit by placing a check beside Allow Partial Credit.
6. You can also choose to have Blackboard display these answers in a random order, by placing a
check beside the Show Answers in Random Order option.
7. Scroll down to the Question Items section of the page.
8. Use the drop-down arrow to select the number of items to be matched.
Niagara College Blackboard Support / September 2012 Page 12Blackboard Staff/Faculty Support Creating Online Tests
9. Enter all possible items to be matched in the Question fields, using only one field per question.
10. Scroll down to the Answer Items section to display that portion of the screen.
11. Use the drop-down arrow to select the number of answers students will be given for matching.
12. Enter all possible correct answers in the Answer fields, using only one field per answer.
13. Scroll down to the bottom of the page and click the Next button.
14. A new page will display showing you your items to be matched. You need to tell Blackboard what
the correct answers are. Click on the pull-down lists and choose the correct answers for each of
your questions.
15. If you have chosen to provide feedback, scroll down to the Feedback portion of the screen and
enter the text to be displayed to the student for the correct and incorrect answers.
16. Scroll down to the bottom of the screen and click on the Submit button to add the question to the
assessment and return to the Test Canvas screen.
17. If desired, enter the total points possible for that question in the Point Value field and click
Submit.
Niagara College Blackboard Support / September 2012 Page 13Blackboard Staff/Faculty Support Creating Online Tests
Multiple Choice Questions
Multiple-choice questions are commonly used in Blackboard assessments because they allow the student
to select the correct answer from a list and are much easier for Blackboard to grade. You are limited to 20
options (potential answers) for a single multiple-choice question.
Follow the directions below to create a multiple-choice question:
1. Click on the drop-down arrow in the Create Question field to select Multiple Choice.
2. The Create/Edit Multiple Choice Question screen will appear.
3. Enter the question in the Question Text field.
4. Under the Options sections you can choose how you want your answers to be numbered. From
the Answer Numbering drop-down you can choose None, Arabic Numerals, Roman
Numerals, Uppercase Letters, and Lowercase Letters.
5. From the Answer Orientation drop-down you can change whether you want this question’s
answers to appear on one flat horizontal row underneath the question text or in a vertical column.
6. If you wish, you can choose to allow partial credit by placing a check beside Allow Partial Credit.
7. You can also choose to have Blackboard display these answers in a random order, by placing a
check beside the Show Answers in Random Order option.
8. Scroll down to the Answers section to display that portion of the screen.
9. Use the drop-down arrow to select the number of answers for the question.
10. Enter all of the possible answers in the appropriate Answer field.
11. Select the correct answer by clicking in the radio button next to the appropriate answer number.
Niagara College Blackboard Support / September 2012 Page 14Blackboard Staff/Faculty Support Creating Online Tests
12. If you have chosen to provide feedback, scroll down to the Feedback portion of the screen and
enter the text to be displayed to the student for the correct and incorrect answers.
13. Scroll down to the bottom of the screen and click on the Submit button to add the question to the
assessment and return to the Test Canvas screen.
14. If desired, enter the total points possible for that question in the Point Value field and click
Submit.
Multiple Answer Questions
Multiple answer questions are similar to the multiple-choice questions in appearance, but differ because
the student can select more than one answer for the question, as opposed to the multiple-choice question
where only one answer can be selected. You can use these types of questions for scenario or case-
based tests, where you want the student to consider and select several appropriate methods or answers.
Follow the steps below to create a multiple answer question:
1. Click on the drop-down arrow in the Create Question field to select Multiple Answer.
2. The Create/Edit Multiple Answer Question screen will appear.
3. Enter the question in the Question Text field.
4. Under the Options sections you can choose how you want your answers to be numbered. From
the Answer Numbering drop-down you can choose None, Arabic Numerals, Roman
Numerals, Uppercase Letters, and Lowercase Letters.
5. From the Answer Orientation drop-down you can change whether you want this question’s
answers to appear on one flat horizontal row underneath the question text or in a vertical column.
6. If you wish, you can choose to allow partial credit by placing a check beside Allow Partial Credit.
7. You can also choose to have Blackboard display these answers in a random order, by placing a
check beside the Show Answers in Random Order option.
8. Scroll down to the Answers section to display that portion of the screen.
9. Use the drop-down arrow to select the number of answers for the question.
10. Enter all of the possible answers in the appropriate Answer field.
11. Select the correct answers by clicking in the checkbox next to the appropriate answers for the
question.
12. If you have chosen to provide feedback, scroll down to the Feedback portion of the screen and
enter the text to be displayed to the student for the correct and incorrect answers.
13. Scroll down to the bottom of the screen and click on the Submit button to add the question to the
assessment and return to the Test Canvas screen.
14. If desired, enter the total points possible for that question in the Point Value field and click
Submit.
Niagara College Blackboard Support / September 2012 Page 15Blackboard Staff/Faculty Support Creating Online Tests
Ordering Questions
Ordering questions allow you to have students place a series of items in the correct order. You can use
this question type to test student understanding of the importance of sequencing in processes and flows.
Students will receive partial credit if even one of the steps is placed in the correct location, so you may
want to advise them of that fact before they begin the test. If the total question is worth 4 points and 2 of
the steps are in the correct order, the student will receive 2 points.
Follow the steps below to add an ordering question to a test:
1. Click on the drop-down arrow in the Create Question field to select Ordering.
2. The Create/Edit Ordering Question screen will appear.
3. Enter the question in the Question Text field.
4. Under the Options sections you can choose how you want your answers to be numbered. From
the Answer Numbering drop-down you can choose Arabic Numerals, Roman Numerals,
Uppercase Letters, and Lowercase Letters.
5. If you wish you can choose to allow partial credit by placing a check beside Allow Partial Credit.
6. Scroll down to the Answers section to display that portion of the screen.
7. Use the drop-down arrow to select the number of correct answers for the question.
8. Enter the answers in the correct order in the available Answer field.
9. Scroll down to the bottom of the page and click the Next button.
10. A new page will display showing you your items to be ordered. You need to tell Blackboard what
order you want your answer to appear to your students. You can drag and drop to choose the
order number in which you want them to appear. The double ended arrow will allow you to drag
and drop.
11. If you have chosen to provide feedback, scroll down to the Feedback portion of the screen and
enter the text to be displayed to the student for the correct and incorrect answers.
Niagara College Blackboard Support / September 2012 Page 16Blackboard Staff/Faculty Support Creating Online Tests
12. Scroll down to the bottom of the screen and click on the Submit button to add the question to the
assessment and return to the Test Canvas screen.
13. If desired, enter the total points possible for that question in the Point Value field.
True/False Questions
True/False questions are easy to write and grade; however you should limit their use in your assessments
as a general rule because they tend to be low complexity by nature. If you choose to add True/False
questions to your test, be aware that you are limited to the words True and False. You do not have the
option to change these designators.
Follow the steps below to add True/False questions to a test:
1. Click on the drop-down arrow in the Create Question field to select True/False.
2. The Create/Edit True/False Question screen will appear.
3. Enter the question in the Question Text field.
4. Under the Options section you can change whether you want this question’s answers to appear
on one flat horizontal row underneath the question text or in a vertical column. From the Answer
Orientation drop-down choose either Vertical or Horizontal.
5. Scroll down to the Answers section to display that portion of the screen and select the correct
answer.
6. If you have chosen to provide feedback, enter the text to be displayed to the student for the
correct and incorrect answers.
7. Scroll down to the bottom of the screen and click on the Submit button to add the question to the
assessment and return to the Test Canvas screen.
8. If desired, enter the total points possible for that question in the Point Value field.
Random Block Questions
Random Block questions are questions that you already created for another test or that exist in a question
pool. You can choose to use the Random Block and then select the criteria for the questions that will go
into the block (e.g. question type). This way, you can create a new test, reusing some of the best
questions from previous tests.
Follow the steps below to include a Random Block question in your test:
1. Click on the drop-down arrow in the Reuse Question field to select Create Random Block.
2. The Create Random Block screen will appear.
Niagara College Blackboard Support / September 2012 Page 17Blackboard Staff/Faculty Support Creating Online Tests
3. Select the appropriate pool(s) from the Pool list in the upper left.
4. Select the desired question type(s) from the list.
5. Click the Submit button to add the question(s) to the assessment and return to the Test Canvas
screen.
6. Your question will now look something like this:
7. Click on Preview questions that match criteria to expand and view the questions.
Niagara College Blackboard Support / September 2012 Page 18Blackboard Staff/Faculty Support Creating Online Tests
8. If you would like to remove some questions, place a checkmark next to them and click the Delete
button. You will be prompted if this is OK. Click OK and the question(s) will be removed.
9. If you would like to change the Point Value for some questions, simply place a checkmark next to
the question(s), fill in a value in the Points box and click Update.
From a Question Pool or Assessment
Another option for adding questions to your test is to search pre-existing questions available to you in
previous assessments or in Question Pools. Again, this timesaving feature allows you to include
questions that you have already created into a test in process.
Follow the steps below to search a pool or assessment for a question:
1. Click on the drop-down arrow in the Reuse Question field to select Find Questions.
2. The Find Question Mode pop-up will appear.
3. Choose either to copy the questions or Link to them. Linking merely means that if a change is
made to the question, it also changes the original and any others that may be linked in other
Tests, pools or Surveys.
4. Click Continue.
5. The Find Questions screen will appear.
Niagara College Blackboard Support / September 2012 Page 19Blackboard Staff/Faculty Support Creating Online Tests
6. Using the Browse Criteria on the left, you can narrow your search by Pools, Tests, Question
Types, Categories, Topics, Levels of Difficulty and Keywords.
Note: By default, All items are selected and will display every question from all Tests and Pools
within your course.
7. Once your search has been refined, place a checkmark next to each question that you would like
to add and click the Submit button to add the question(s) to the assessment and return to the
Test Canvas screen.
8. If desired, enter the total points possible for the question(s) in the Point Value field(s) and click
Submit.
Niagara College Blackboard Support / September 2012 Page 20Blackboard Staff/Faculty Support Creating Online Tests
Advanced Question Types
Calculated Formula Questions
One of the best ways to minimize student cheating on an online assessment is to randomize both the
order of your questions and, if it’s a multiple choice assessment, the order of your answers. If your
assessments use math word problems, you can take that one step further by randomizing the numbers
used in your word problems. A Calculated Formula question contains a formula that the instructor defines,
as well as the variables that can be set to change for each user. The variable range is created by
specifying a minimum value and a maximum value for each variable. From this variable range Blackboard
will automatically create randomly generated answer sets. The option to make the correct answer a
specific value or a range of values is available. Partial credit may also be granted for answers falling
within a defined range.
Follow the steps below to add a calculated formula question to the assessment:
1. Click on the drop-down arrow in the Create Question field to select Calculated Formula.
2. The Create/Edit Calculated Formula Question screen will appear.
3. Enter your formula based question in the Question Text field. For example, say you wish to
create a simple word problem like “What is the area of a rectangle of length 25 and width 10?”.
But you also want to randomize the integers 25 and 10 in the question so that each student sees
a completely different set of numbers. To do that, in the question text box, key in your word
problem putting your variables – the integers you want to randomize – in square brackets – see
below.
4. In the Answer Formula box, enter in the formula that Blackboard will use to calculate the
numeric result to your word problem. In the case of our example, the formula would be: lw.
Niagara College Blackboard Support / September 2012 Page 21Blackboard Staff/Faculty Support Creating Online Tests
5. Under the Options section enter how exact your students’ numeric answers must be in the
Answer Range +/- box. You can enter in the numeric or percentage variation from the exact
answer you are willing to accept. For example plus or minus one, plus or minus 10 percent, and
so on. In the case of our example, we are doing simple multiplication and we want our students’
answers to be exact so we will leave the Answer Range at zero meaning the students’ answers
will be either right or wrong.
6. If you wish to allow partial credit, click on the Partial Credit check box.
7. If you require your students to key in not only the correct numeric answer but also the units, click
on the Units Required box.
8. Scroll down to the bottom of the page and click the Next button.
9. Key in the Minimum and Maximum values for each of the variables in your word problem. When
Blackboard randomizes the variables in your word problem, the lowest value it will display for [x]
will be whatever you enter in the Minimum Value box and the highest value will be whatever you
enter in the Maximum Value box. If you set your minimum to 1 and your maximum to 5, some
students will see a question saying that the length is 1, some will see that it is 2, and so on.
10. Select how many decimal places you require for the answer in the Decimal Places drop-down.
11. Enter the number of answer sets you want Blackboard to generate based on the formula and
minimum and maximum values you defined in the Number of Answer Sets text box.
12. Scroll down to the bottom of the page and click the Calculate button to begin generating your
answer sets.
13. A set of randomly generated answer sets will appear that Blackboard will randomly choose from
when student take the assessment, as well as the correct answer for each answer set. You may
modify or remove any of the answer sets if necessary at this point.
Niagara College Blackboard Support / September 2012 Page 22Blackboard Staff/Faculty Support Creating Online Tests
14. If you have chosen to provide feedback, enter the text to be displayed to the student for the
correct and incorrect answers.
15. Scroll down to the bottom of the screen and click on the Submit button to add the question to the
assessment and return to the Test Canvas screen.
16. If desired, enter the total points possible for that question in the Point Value field and click
Submit.
Calculated Numeric Questions
Besides giving you the ability to ask True/False and Multiple Choice questions in your online
assessments, Blackboard also gives you the ability to ask questions with numeric answers. These
questions are automatically graded by Blackboard, and you can even specify a margin of error. This
question is very similar to a Fill in the Blank question where the student is asked to enter a value to
complete a particular statement. The option to make the correct answer a specific value or a range of
values is available. Partial credit may also be granted for answers falling within a defined range.
Follow the steps below to add a calculated numeric question to the assessment:
1. Click on the drop-down arrow in the Create Question field to select Calculated Numeric.
2. The Create/Edit Numeric Answer Question screen will appear.
3. Enter your question in the Question Text field. For example, say your question was “John has 5
cookies and Sandra takes away 3 cookies. How many cookies does John have left? ”
4. Scroll down to the Answers section and enter the correct numeric value for your question in the
Correct Answer text box – in our example 2.
5. If you wish to accept a numeric variation from the exact answer you may enter it into the Answer
Range +/- text box. For example plus or minus 1.
6. If you have chosen to provide feedback, enter the text to be displayed to the student for the
correct and incorrect answers.
7. Scroll down to the bottom of the screen and click on the Submit button to add the question to the
assessment and return to the Test Canvas screen.
8. If desired, enter the total points possible for that question in the Point Value field and click
Submit.
Either/Or Questions
In addition to True/False questions, Blackboard also lets you create Either/Or questions in your online
assessments. When an Either/Or question is created students are presented with a statement and asked
to respond using a selection of pre-defined two-choice answers, such as:
Yes/No
Agree/Disagree
Right/Wrong
True/False
Follow the steps below to add an either/or question to the assessment:
1. Click on the drop-down arrow in the Create Question field to select Either/Or.
Niagara College Blackboard Support / September 2012 Page 23Blackboard Staff/Faculty Support Creating Online Tests
2. The Create/Edit Either/Or Question screen will appear.
3. Enter your question in the Question Text field. For example, “Is Ottawa the Capital of Canada?”
4. Under the Options section you can select from the Answer Orientation drop-down whether you
want this question’s answers to appear on one flat horizontal row underneath the question text or
in a vertical column.
5. Scroll down to the Answers section and select the answer type for your question from the
Answer Choices drop-down. You can choose between Yes/No, Agree/Disagree, Right/Wrong,
or True/False.
6. Under Correct Answer, click on the button next to the correct answer.
7. If you have chosen to provide feedback, enter the text to be displayed to the student for the
correct and incorrect answers.
8. Scroll down to the bottom of the screen and click on the Submit button to add the question to the
assessment and return to the Test Canvas screen.
9. If desired, enter the total points possible for that question in the Point Value field and click
Submit.
File Response Questions
Just like the Assignment Manager, a File Response question allows a student to submit a file in answer to
a question. When using this type of question you must manually grade each file and assign the
appropriate number of points in the Grade Center.
Follow the steps below to add a File Response question to the assessment:
1. Click on the drop-down arrow in the Create Question field to select File Response.
2. The Create/Edit File Response Question screen will appear.
3. Enter your question in the Question Text field. For example, “Write a 500 word essay in
Microsoft Word on what you like most about the Niagara Region and attach the file below.”
4. Scroll down to the bottom of the screen and click on the Submit button to add the question to the
assessment and return to the Test Canvas screen.
5. If desired, enter the total points possible for that question in the Point Value field and click
Submit.
Fill in Multiple Blanks Questions
Fill in the Blank questions are excellent questions for use in assessments because they force the
students to think of their own answer to the question. This question type builds on Fill in the Blank
questions with multiple fill in the blank responses that can be inserted into a sentence or paragraph.
Separate sets of answers are defined for each blank. One caution about using these types of questions is
that the answer is based on an exact text match. This means that if the student misspells the answer, it
will be marked wrong. The answers are not case-sensitive, but are order-sensitive. If the correct answer is
supposed to be “Excel and Access” and the student answers “Access and Excel”, the question is marked
wrong.
The fix for the spelling problem is to list the most common spelling errors in the “right” answer list. That
way you don’t have to manually review each Fill in the Blank question to check for a spelling error.
Niagara College Blackboard Support / September 2012 Page 24Blackboard Staff/Faculty Support Creating Online Tests
Another solution for this problem is to be sure to limit the number of words in the answer and make
allowances for different word orders in the answer. You may also want to tell your students about the
spelling issues so they can be more careful in their responses.
Follow the steps below to add a Fill in Multiple Blanks question to the assessment:
1. Click on the drop-down arrow in the Create Question field to select Fill in Multiple Blanks.
2. The Create/Edit Fill in Multiple Blanks Question screen will appear.
3. Enter your question in the Question Text field. Instead of typing in blanks, though, you need to
use variables in square brackets, and each variable can only be used once. For example, if the
question is “The capital of Canada is _____ and the capital of Ontario is _____,” you’d key in the
text shown below:
4. Under the Options section, choose if you want to give partial credit. Unless you check Allow
Partial Credit, your students will have to answer every blank in this question correctly to obtain
any credit.
5. Scroll down to the bottom of the page and click the Next button.
6. A new page will appear, showing you your question’s text and asking you to key in one or more
correct answers for each variable in your question. By default, each variable will have one correct
answer. If you know your students might misspell an answer, you can change the number of
answers for each variable and then enter in all variations of the answer you are willing to accept.
Niagara College Blackboard Support / September 2012 Page 25Blackboard Staff/Faculty Support Creating Online Tests
7. Scroll down to the bottom of the page and click the Next button.
8. If you have chosen to provide feedback, scroll down to the Feedback portion of the screen and
enter the text to be displayed to the student for the correct and incorrect answers.
9. Scroll down to the bottom of the screen and click on the Submit button to add the question to the
assessment and return to the Test Canvas screen.
10. If desired, enter the total points possible for that question in the Point Value field and click
Submit.
Hot Spot Questions
From time to time you may want to use images in your Blackboard assessments. For example, let’s say
you want to assess your students’ understanding of which province Niagara College is located in. Instead
of creating a text-based, multiple-choice question—“The province Niagara College is located in is a)
British Columbia, b) Ontario,” and so on—you can have your students click on an image, in this case a
map of Canada, and Blackboard will grade your students on whether they click on the correct part of the
image.
Follow the steps below to add a Hot Spot question to the assessment:
1. Click on the drop-down arrow in the Create Question field to select Hot Spot.
2. The Create/Edit Hot Spot Question screen will appear.
3. Enter your question in the Question Text field.
4. Under the Upload Image section click the Browse My Computer or Browse Course button
beside the Attach File field.
5. Locate and select the image on your computer (or in your course) that you want to use in the
question.
6. Scroll down to the bottom of the page and click the Next button.
Niagara College Blackboard Support / September 2012 Page 26Blackboard Staff/Faculty Support Creating Online Tests
7. Blackboard will upload your image and display it to you. Click and drag your mouse over an area
in the image to specify the hot spot area for the correct answer. You need to start dragging in the
upper left corner of the area and drag down to the lower right of the area. You should then see a
box appear on your image outlining the area of the image which is correct. If you make a mistake,
or if you just want to try again, click on the Clear button.
8. Once you have drawn a Hot Spot over the correct area of your image, scroll down to the bottom
of the screen and click on the Submit button to add the question to the assessment and return to
the Test Canvas screen.
9. If desired, enter the total points possible for that question in the Point Value field and click
Submit.
Jumbled Sentence Questions
Jumbled Sentence questions are similar to Fill in Multiple Blanks questions, but instead of blanks, the
students see pull-down lists with choices defined by the instructor from which they can choose the
appropriate answer. This can be a big advantage over Fill in Multiple Blanks questions, because it
eliminates the problem of Blackboard grading student responses based on an exact text match. With
Jumbled Sentence questions students simply choose the correct answer instead of typing it in.
Follow the steps below to add a jumbled sentence question to the assessment:
1. Click on the drop-down arrow in the Create Question field to select Jumbled Sentence.
2. The Create/Edit Jumbled Sentence Question screen will appear.
3. Enter your question in the Question Text field. Instead of typing in blanks, though, you need to
use variables in square brackets, and each variable can only be used once. For example, if the
question is “The capital of Canada is _____ and the capital of Ontario is _____,” you’d key in the
text shown below:
Niagara College Blackboard Support / September 2012 Page 27Blackboard Staff/Faculty Support Creating Online Tests
4. Under the Options section, choose if you want to give partial credit. Unless you check Allow
Partial Credit, your students will have to answer every blank in this question correctly to get any
credit.
5. Under the Answers section, enter in the correct answers to your question as well as a few
distracters - answers that seem legitimate but are wrong. By default you can key in four answers,
but you can bump that number up anywhere from 5 to 20 answers if you want.
6. Scroll down to the bottom of the page and click the Next button.
7. A new page will display showing you your question’s text as it is going to appear to your students.
You need to tell Blackboard what the correct answers are. Click on the pull-down lists and choose
the correct answers for each of your variables.
8. If you have chosen to provide feedback, enter the text to be displayed to the student for the
correct and incorrect answers.
9. Scroll down to the bottom of the screen and click on the Submit button to add the question to the
assessment and return to the Test Canvas screen.
Niagara College Blackboard Support / September 2012 Page 28Blackboard Staff/Faculty Support Creating Online Tests
10. If desired, enter the total points possible for that question in the Point Value field and click
Submit.
Opinion Scale/Likert Questions
Likert type questions are designed to measure the attitudes or reactions of your students, by having them
read a statement and then specify their level of agreement with that statement. The Likert scale
responses that a student chooses from are: “Strongly Agree,” “Agree,” “Neither Agree nor Disagree,” and
so on. Likert scale questions are very rarely used within an assessment, but are better suited within a
survey instead.
Follow the steps below to add an opinion scale/likert question to the assessment:
1. Click on the drop-down arrow in the Create Question field to select Opinion Scale/Likert.
2. The Create/Edit Opinion Scale/Likert Question screen will appear.
3. Enter your question in the Question Text field.
4. Under the Options sections you can choose how you want your answers to be numbered. From
the Answer Numbering drop-down you can choose Arabic Numerals, Roman Numerals,
Uppercase Letters, and Lowercase Letters.
5. From the Answer Orientation drop-down you can change whether you want this question’s
answers to appear on one flat horizontal row underneath the question text or in a vertical column.
6. If you wish you can choose to allow partial credit by placing a check beside Allow Partial Credit.
You can also choose to have Blackboard display these answers in a random order, by placing a
check beside the Show Answers in Random Order option.
7. Under the Answers section, Blackboard automatically sets up a six point Likert scale for you:
Strongly Agree, Agree, Neither Agree nor Disagree, Disagree, Strongly Disagree, and Not
Applicable. If you want to remove the Not Applicable and turn this back into a five point Likert
scale, just click on the Remove button to the right of Answer 6.
8. Scroll down to the bottom of the screen and click on the Submit button to add the question to the
assessment and return to the Test Canvas screen.
Niagara College Blackboard Support / September 2012 Page 29Blackboard Staff/Faculty Support Creating Online Tests
9. If desired, enter the total points possible for that question in the Point Value field and click
Submit.
Quiz Bowl Questions
This type of question allows you to add Jeopardy-style questions to an assessment. Students are given a
clue in the form of an answer. They must then respond by entering the correct question into a text box. A
response must include both a phrase and a question word, such as Who, What, or Where, to be marked
as correct. Partial credit may be given if the question word is not included in the answer.
Follow the steps below to add a Quiz Bowl question to the assessment:
1. Click on the drop-down arrow in the Create Question field to select Quiz Bowl.
2. The Create/Edit Quiz Bowl Question screen will appear.
3. Enter your question in the Question Text field. Remember, just like Jeopardy, you are keying in
the answer, not the question.
4. Under the Options section you can choose to allow partial credit for those students who forget to
phrase their response in the form of a question. To allow partial credit, click on the Allow Partial
Credit check box and then, in the Partial Credit Percent text box, key how much partial credit
you’re going to allow. In this case, key in “50” [leave out the percent character] so that students
who forget to phrase their responses in the form of a question will only get 50% of the points
possible for this question.
5. Under the Interrogatives section, you need to choose which words must appear in your students’
responses in order for your students to receive full credit. By default, Blackboard recognizes four
interrogatives: “Who,” “What,” “When,” and “Where.” To add more interrogatives, click on the
Niagara College Blackboard Support / September 2012 Page 30Blackboard Staff/Faculty Support Creating Online Tests
Number of Interrogatives drop-down list and then key in any additional interrogative you want
Blackboard to recognize. To remove interrogatives, just click on the appropriate Remove button.
6. Under the Answer Phrases section, key in every possible correct answer phrase. Blackboard
grades your students’ answers on an exact text match. If your students make even minor spelling
mistakes, the answer will be marked wrong. Therefore, you need to key in every possible spelling
permutation your students might think of.
7. If you have chosen to provide feedback, enter the text to be displayed to the student for the
correct and incorrect answers.
8. Scroll down to the bottom of the screen and click on the Submit button to add the question to the
assessment and return to the Test Canvas screen.
9. If desired, enter the total points possible for that question in the Point Value field and click
Submit.
Short Answer Questions
Short Answer questions are very similar to the Essay question type in Blackboard. You provide the
question text, and the student types the answer in the space provided. The main difference between
Essay and Short Answer questions in Blackboard is that you can specify the length of the answer by
limiting it to a specified number of rows in the text box. Instructors must manually grade each Short
Answer question and assign the appropriate number of points in the Grade Center.
Note: The number of rows is meant as a guideline only when entering an answer; it does not impose
an absolute limit on answer length.
Follow the steps below to add a short answer question to the assessment:
1. Click on the drop-down arrow in the Create Question field to select Short Answer.
2. The Create/Edit Short Answer Question screen will appear.
3. Enter your question in the Question Text field. For example, “Define eLearning.”
4. Under the Answer section choose how many rows should be in the answer box. By default, your
students will see an answer box with space for three rows of text. You can change that by clicking
Niagara College Blackboard Support / September 2012 Page 31Blackboard Staff/Faculty Support Creating Online Tests
on the Set the number of rows that will display in the answer field drop-down list and
choosing a larger number.
5. Enter a sample answer in the space provided that graders can use to help grade the test if
necessary.
Note: Short Answer questions are not graded automatically by Blackboard. Once a student has
completed a test with a Short Answer question the instructor can review the student’s response
and enter the appropriate grade.
6. Scroll down to the bottom of the screen and click on the Submit button to add the question to the
assessment and return to the Test Canvas screen.
7. If desired, enter the total points possible for that question in the Point Value field and click
Submit.
Niagara College Blackboard Support / September 2012 Page 32Blackboard Staff/Faculty Support Creating Online Tests
Making a Test Available
After creating the test, you need to make the test available to the students through one of the Course
Content Areas. The students will not be able to take the test until you complete this step.
Follow the steps below to make the test available:
1. Enter your Blackboard course and access the content area in which you would like to place the
test in.
2. Click on the appropriate Content Area link (such as Assignments or Course Documents).
3. Click on the Add Interactive Tool button and then select Test from the drop down.
Niagara College Blackboard Support / September 2012 Page 33Blackboard Staff/Faculty Support Creating Online Tests
4. This will display the Create Test screen.
5. Select the appropriate test from the list.
6. Click on the Submit button to display the Test Added screen.
7. The Test Options screen will now appear.
Niagara College Blackboard Support / September 2012 Page 34Blackboard Staff/Faculty Support Creating Online Tests
8. If you want the test to appear in a new window, select the Yes radio button beside the Open Test
in new window option.
Note: If you choose to launch the test in a new window, students who have a pop-up blocker
installed may have problems accessing the test. It is advised that if you choose this option, you
remind students to disable any pop-up blockers before taking the test.
9. Scroll down the page to the Test Availability section.
Niagara College Blackboard Support / September 2012 Page 35Blackboard Staff/Faculty Support Creating Online Tests
10. Select the desired options for this assessment:
Make the link available: Allows you, the instructor, to control whether a test is available
to students. Tests are usually made “unavailable” when you do not want students to
access them yet. You can make a test “available” or “unavailable” at any time. Instructors
may make the link available, and then use the Display After and Display Until fields to
limit the amount of time the link appears.
Add a new announcement for this Test: Allows Blackboard to automatically create an
announcement telling students a new assessment has been posted.
Multiple attempts: This option allows students to take the test multiple times. The status
of multiple attempts is displayed to students at the top of the Assessment. Select Allow
unlimited attempts for the students to take the test as many times as they wish. Select
Number of attempts to indicate a specific number of attempts that is allowed. Fill in the
applicable number in the field provided.
Force Completion: Students must complete the Assessment the first time it is launched
if Force Completion is selected. Students may not exit the Assessment and continue
working on it at a later date. The Save button is available for Students to save the
Assessment as they work through it, but they may not exit and re-enter the Assessment.
If the Force Completion option is enabled, it is noted and explained to Students at the top
of the Assessment. If Force Completion is not enabled, Students may save their progress
and complete the Assessment at another time.
Set Timer: Select this option to set a time limit for finishing the Assessment. If this option
is selected, enter the amount of time to allow for the Test in the hours and minutes boxes
below. The time elapsed is displayed to the student during the Assessment. A one-
minute warning is also displayed as students approach the time limit.
Display After/Display Until: Select the date and time when the Test will become
available or become unavailable to Students. This field is optional; the Instructor may
control availability through the Make the link available option without setting specific
dates.
Password: Select this check box to require a password for students to access this
Assessment. If this check box is selected, enter a password in the field below. Passwords
Niagara College Blackboard Support / September 2012 Page 36You can also read