Building A Very Simple Website - Sitecore CMS 6.5 - Sitecore Documentation
←
→
Page content transcription
If your browser does not render page correctly, please read the page content below

Sitecore CMS 6.5
Building A Very Simple Web Site
Rev 110715

Sitecore CMS 6.5
Building A Very Simple
Website
A Self-Study Guide for Developers

Sitecore® is a registered trademark. All other brand and product names are the property of their respective holders. The
contents of this document are the property of Sitecore. Copyright © 2001-2011 Sitecore. All rights reserved.

Building A Very Simple Web Site

Table of Contents

Chapter 1 Introduction ................................................................................................................... 3
Chapter 2 Creating the Sitecore Web Application Project in Visual Studio 2010 .......................... 4
  2.1    Creating a blank Web Application Project ........................................................................ 5
  2.2    Creating the Sitecore Web Application Project ................................................................. 6
Chapter 3 Building A Very Simple Website ................................................................................. 10
  3.1    Create Data Templates ................................................................................................... 11
    3.1.1 Using Template Builder ............................................................................................... 12
    3.1.2 Create Template Standard Values .............................................................................. 15
    3.1.3 Assign Insert Options .................................................................................................. 17
    3.1.4 Delete the Home Item ................................................................................................. 18
  3.2    Create Content Items ...................................................................................................... 20
  3.3    Create Presentation Components ................................................................................... 23
    3.3.1 Create the Side Menu XSLT Rendering ..................................................................... 23
    3.3.2 Create the Product Display XSLT Rendering ............................................................. 25
    3.3.3 Create the Generic Display Sublayout ........................................................................ 26
  3.4    Create the Browser Layout ............................................................................................. 29
  3.5    Bind Content to Presentation .......................................................................................... 32
  3.6    Publish and View the Website ........................................................................................ 37
  3.7    Working with Page Editor ................................................................................................ 38
    3.7.1 Editing Content with Page Editor ................................................................................ 38
    3.7.2 Designing Content with Page Editor ........................................................................... 39
Chapter 4 Optional Placeholders and Nested Sublayouts .......................................................... 44
  4.1    Create the Two Columns Sublayout ............................................................................... 45
  4.2    Dynamically Bind the Two Columns Sublayout .............................................................. 49
  4.3    Add Placeholder Settings to the Left Column ................................................................. 51
  4.4    Edit Placeholder Settings Configuration ......................................................................... 55
Chapter 5 Conclusion .................................................................................................................. 59
Chapter 6 Next Steps ................................................................................................................... 60
Chapter 7 Official Sitecore Training ............................................................................................. 61

Sitecore® is a registered trademark. All other brand and product names are the property of their respective holders. The
contents of this document are the property of Sitecore. Copyright © 2001-2011 Sitecore. All rights reserved.
                                                                                                                             Page 2 of 61
Building A Very Simple Web Site
Chapter 1
Introduction
The steps in this document illustrate how to create a basic Website with Sitecore
CMS 6.5. The goal is to help you learn Sitecore interfaces, tools, concepts, and
terminology.
The chapters in this Self-Study Guide include:
Chapter 1: Introduction
Chapter 2: Building A Very Simple Website
Chapter 3: Conclusion
Chapter 4: Optional Placeholders and Nested Sublayouts
Chapter 5: Conclusion
Chapter 6: Next Steps
Chapter 7: Official Sitecore Training
Sitecore® is a registered trademark. All other brand and product names are the property of their respective holders. The
contents of this document are the property of Sitecore. Copyright © 2001-2011 Sitecore. All rights reserved.
Page 3 of 61
Building A Very Simple Web Site

Chapter 2

     Creating the Sitecore Web Application Project in

     Visual Studio 2010

          As a Sitecore Developer, you need to create a Web Application Project to modify
          project files for customization such as Xslt Renderings and Sublayouts. You
          should already have your website installed and configured properly for this
          exercise. You can find installation instructions on the Sitecore Developer Network
          http://sdn.sitecore.net.

          To create the Sitecore Web Application Project in Visual Studio 2010, you will first
          create a blank Web Application Project. This will create the files necessary to turn
          your Sitecore CMS Installation into a Visual Studio 2010 Web Application Project.
          Next, you will copy key files from your blank Web Application Project to your
          Sitecore webroot. You will configure your website and delete unnecessary files.
          Finally, you will save your Sitecore Web Application Project Solution and build
          your website.

Sitecore® is a registered trademark. All other brand and product names are the property of their respective holders. The
contents of this document are the property of Sitecore. Copyright © 2001-2011 Sitecore. All rights reserved.
                                                                                                              Page 4 of 61
Building A Very Simple Web Site
2.1 Creating a blank Web Application Project
Sitecore extension projects should use the ASP.NET Web Application Project, supported by
Visual Studio 2010 2005 SP1 and later.
Create a blank Web Application Project
Start Visual Studio 2010.
In Visual Studio 2010, in the Menu Bar, select File.
In the Context Menu, select New, and then select
Project.
In the New Project dialog box, in the left side pane, select
Installed Templates. Click to expand the Visual C# Node and
select Web.
In the right side pane, select ASP.NET Web Application and
.NET Framework 4.
Provide a Solution Name, for
example: Sample Project. When you
click OK, Visual Studio 2010 creates
a project folder with the name you specified and some related files as well as some
additional files that the Sitecore Web Application Project does not need.
Write It Down!
What is the location of your blank Sample Project? In the space below, write it down.
___________________________________________________________________________
Sitecore® is a registered trademark. All other brand and product names are the property of their respective holders. The
contents of this document are the property of Sitecore. Copyright © 2001-2011 Sitecore. All rights reserved.
Page 5 of 61
Building A Very Simple Web Site
2.2 Creating the Sitecore Web Application Project
In the last exercise, you created a blank Web Application Project in Visual Studio 2010. In this
exercise, you will copy key application files to the Sitecore webroot. This exercise will turn your
Sitecore CMS installation into a Web Application Project.
Copy Web Application Project files to the Sitecore webroot
Locate the blank Sample Project folder in Windows. This will
probably be in a folder under Documents\Visual Studio
2010 2010\Projects.
Move or copy the Properties folder, the *.csproj, and
*.csproj.user files to the Sitecore webroot.
In the Sitecore webroot, double-click the *.csproj file to open
the project in Visual Studio 2010.
In Visual Studio 2010, in the Solution Explorer, click the
arrow next to the project name to expand the file list.
Right click the Default.aspx page located in the
webroot. In the Context Menu, select Exclude From
Project.
In the Solution Explorer, right click the
References folder located in the
webroot. In the Context Menu, select
Add Reference.
In the Add Reference dialog box, select
the Browse tab. Select the
Sitecore.Kernel.dll file located
Sitecore® is a registered trademark. All other brand and product names are the property of their respective holders. The
contents of this document are the property of Sitecore. Copyright © 2001-2011 Sitecore. All rights reserved.
Page 6 of 61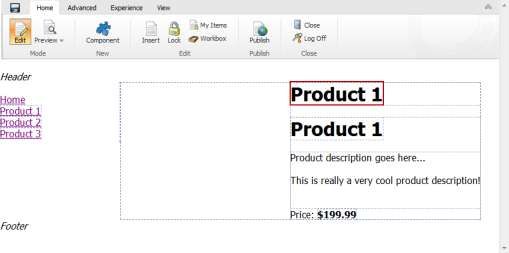
Building A Very Simple Web Site
in the /bin folder of your Sitecore website, and then click
OK.
In the Solution Explorer, click the arrow next to the
References folder located in the webroot to expand the
file list.
Right click the Sitecore.Kernel.dll file. In the
Context Menu, select Properties. In the Properties
pane, set the Copy Local property to false.
Save the Sitecore Web Application Project Solution
In Visual Studio 2010, in the Menu Bar, select File. In the context menu, select Save All.
Save the specified
items in the default
location.
In the future, you can
open this project by
opening the
corresponding
*.sln file in the
Sitecore CMS
webroot.
Sitecore® is a registered trademark. All other brand and product names are the property of their respective holders. The
contents of this document are the property of Sitecore. Copyright © 2001-2011 Sitecore. All rights reserved.
Page 7 of 61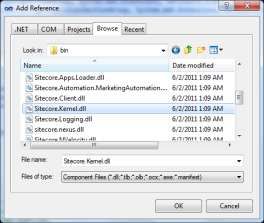
Building A Very Simple Web Site
Include all files in the Sitecore Web Application Project
To edit files in Visual Studio 2010, you must make them
visible and include them in the project.
To make the files visible, in Visual Studio 2010, in the
Solution Explorer, select Show All Files.
Include the Sitecore CMS files and folders.
For example, right click the XSL folder
located in the webroot. In the Context
Menu, select Include in Project.
Delete unnecessary files
Visual Studio 2010 may automatically add files from the blank *.csproj file. If the following
files are present in Visual Studio 2010 Solution Explorer, you need to delete (or exclude)
them:
About.aspx & .aspx.cs
Default.aspx & .aspx.cs
Global.asax.cs
/Account folder
Web.Debug.config & Web.Release.config
Build your Web Application Project
In Visual Studio 2010, in the Menu Bar, select
Build. In the Context Menu, select Build
Solution.
Make sure your Web Application Project Solution
builds successfully. For troubleshooting assistance,
visit the Sitecore Developer Network
http://sdn.sitecore.net.
Sitecore® is a registered trademark. All other brand and product names are the property of their respective holders. The
contents of this document are the property of Sitecore. Copyright © 2001-2011 Sitecore. All rights reserved.
Page 8 of 61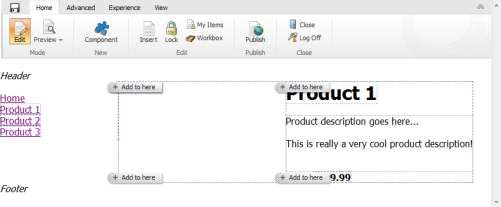
Building A Very Simple Web Site

         Find it!

Related Reading:

http://msdn2.microsoft.com/en-us/asp.net/aa336618.aspx
http://webproject.scottgu.com/
http://webproject.scottgu.com/CSharp/Default.aspx
http://webproject.scottgu.com/CSharp/HelloWorld/Helloworld.aspx

Troubleshooting Assistance:

http://sdn.sitecore.net

          Important!

If you are using Internet Explorer 9, you will need to turn on Compatibility Mode to be able to use
Page Editor. You can also add a Meta tag in the page header to Emulate IE7:

You should place this Meta tag right after the Head tag in all .aspx files included in your website.
The Head tag should be similar to:

Sitecore® is a registered trademark. All other brand and product names are the property of their respective holders. The
contents of this document are the property of Sitecore. Copyright © 2001-2011 Sitecore. All rights reserved.
                                                                                                              Page 9 of 61
Building A Very Simple Web Site

Chapter 3

     Building A Very Simple Website

          Working as a Developer, you will first create the data infrastructure for your basic
          Website. In Sitecore, creating the data infrastructure means creating data
          templates, creating template standard values, assigning insert options, specifying
          default values, and creating content items.

          Next, you will create Sitecore presentation components. You will create three
          types of Sitecore presentation components: XSLT Rendering, Sublayout, and
          Layout. Presentation components are both definition items in the Sitecore content
          tree and files in the file system.

          Then, you will bind content to presentation. As a Developer, you do this by
          defining the instructions for how to present specific content on items template
          standard values.

          Finally, you will publish, view, and edit the Website.

Sitecore® is a registered trademark. All other brand and product names are the property of their respective holders. The
contents of this document are the property of Sitecore. Copyright © 2001-2011 Sitecore. All rights reserved.
                                                                                                            Page 10 of 61
Building A Very Simple Web Site
3.1 Create Data Templates
A Very Simple Website features just two types of content: content of the type Product and content
of the type Home Page.
The steps outlined will guide your successful completion of this exercise.
Login to the Sitecore Desktop
Login to the Sitecore Desktop using
the Administrator username and
password.
Username: Admin
Password: b
Select Options.
Next, select Desktop.
Click Login.
Open Template Manager
From the Start Menu, select Template
Manager.
Template Manager is your tool for
creating new data templates and editing
existing data templates.
In addition, Template Manager is the tool
that lets you create Template Standard
Values and to assign base templates.
Sitecore® is a registered trademark. All other brand and product names are the property of their respective holders. The
contents of this document are the property of Sitecore. Copyright © 2001-2011 Sitecore. All rights reserved.
Page 11 of 61Building A Very Simple Web Site
Explain This!
Why create new Data Templates?
There are two scenarios for when Developers create data templates.
1) Create a new data template when new items require fields not defined in existing data
templates.
2) Create a new data template when new items require unique default values and default settings.
Examples of default values are field values. Examples of default settings include workflows,
presentation layout details settings, and insert options.
3.1.1 Using Template Builder
In Sitecore, you define types of content type with the construct of a data template. A data
template defines content by specifying fields and field types. Field types determine the user
interface for how to enter data.
You will create two data templates using Template Manager’s Template Builder Editor tab. In this
exercise, you will create the Home Page and Product templates as described in the following
table:
Data Template Field Fields Field Type Standard Insert
Sections Values Options
Home Page Data Title Single-Line Home Page Product
Text
Description Rich Text “Website
description goes
here...”
Product Data Title Single-Line $name none
Text
Description Rich Text “Product
description goes
here...”
Price Single-Line $99.99
Text
Find it!
To learn more about how to create data templates, visit the Sitecore Developer Network (SDN) at
http://sdn.sitecore.net.
Review the Data Definition Reference for Sitecore CMS 6.5.
Sitecore® is a registered trademark. All other brand and product names are the property of their respective holders. The
contents of this document are the property of Sitecore. Copyright © 2001-2011 Sitecore. All rights reserved.
Page 12 of 61Building A Very Simple Web Site
Create the Home Page data template
In Template Manager, in the Content Tree, select the User
Defined folder.
In the Folder Editor tab, select New Template.
This opens the New Template Wizard’s
dialogs.
In the Select name dialog, enter Home Page.
Leave the Base Template set to the default.
Click Next.
In the Location dialog, click Next.
To close the wizard, click Finish.
In the Template Builder, in Add a new
section, enter Data.
In the first Add a field, enter Title. As the
field type, select Single-Line Text.
In the second Add a field, enter Description.
Select Rich Text as the field type.
In the Ribbon, in the Home tab, in the Write
group, select Save.
Keyboard Shortcut
To save without using the Save command, consider a Sitecore Keyboard Shortcut. Save your
changes with Ctrl+S. Try it!
Sitecore® is a registered trademark. All other brand and product names are the property of their respective holders. The
contents of this document are the property of Sitecore. Copyright © 2001-2011 Sitecore. All rights reserved.
Page 13 of 61Building A Very Simple Web Site
Create the Product data template
In Template Manager, in the Content Tree, select the User
Defined folder.
In the Folder Editor tab, select New Template.
This opens the New Template
Wizard’s dialogs.
In the Select name dialog, enter
Product.
Leave the Base Template set to the
default.
Click Next.
In the Location dialog, click Next.
To close the wizard, click Finish.
In the Template Builder, in Add a new
section, enter Data.
In the first Add a field, enter Title. As the
field type, select Single-Line Text.
In the second Add a field, enter Description.
Select Rich Text as the field type.
In the third Add a field, enter Price. As the
field type, select Single-Line Text.
Save.
Sitecore® is a registered trademark. All other brand and product names are the property of their respective holders. The
contents of this document are the property of Sitecore. Copyright © 2001-2011 Sitecore. All rights reserved.
Page 14 of 61Building A Very Simple Web Site
3.1.2 Create Template Standard Values
For a given data template, Developers often want to create default values. Template Standard
Values define not only default values, but also default settings. In Sitecore, this construct serves
as a way to define both default values and default settings for a given data template.
In this exercise, you will first create Template Standard Values for both the Home Page and
Product data templates.
To complete this exercise, use the following checklist:
For the Home Page data template, create Standard Values
In the Template Manager, in the Content Tree, in the User Defined template folder, select
the Home Page data template.
In the Ribbon, in the Builder Options tab, in the Template group, select Standard Values.
If not selected, select the standard values item in the Content Tree.
In the item field editor, for the Title field, enter the token, $name.
For the Description field, click Show Editor.
In the Rich Text Editor, enter Website
description goes here...
Click Accept.
Save.
Sitecore® is a registered trademark. All other brand and product names are the property of their respective holders. The
contents of this document are the property of Sitecore. Copyright © 2001-2011 Sitecore. All rights reserved.
Page 15 of 61Building A Very Simple Web Site
Explain This!
What are tokens?
When Business Users create items, Developers sometimes want to assign field values for the
newly created items. Tokens allow Developers to assign field values to a newly created item.
For example, the $name token copies the name of the newly created item. This value comes
from the Enter a new item name dialog. Other token examples include $date, $id, $time, and
$now.
For the Product data template, create Standard Values
In the content tree, under the User Defined template folder,
select the Product template.
In the Ribbon, in the Builder Options tab, in the Template group,
select Standard Values.
Select the standard values item in the Content Tree.
In the item field editor, for the Title field, enter the token, $name.
For the Description field, click Show Editor.
In the Rich Text Editor, enter Product description goes here...
Click Accept.
For the Price field, enter $99.99.
Save.
Sitecore® is a registered trademark. All other brand and product names are the property of their respective holders. The
contents of this document are the property of Sitecore. Copyright © 2001-2011 Sitecore. All rights reserved.
Page 16 of 61Building A Very Simple Web Site
3.1.3 Assign Insert Options
In this exercise, you will define the structure of the Content Tree. Often, this structure relates
directly to Information Architecture of your Website. A Very Simple Website will have the
following Information Architecture:
Home
Home
--- Product 1
--- Product 2
--- Product 3
Product 1 Product 2 Product 3
In order to define how content types exist in the Content Tree hierarchy, Developers assign Insert
Options. By selecting an Insert Option, a Business User can create an item. For example,
beneath the Home item, Business Users will only be able to create Product items.
To complete this exercise, use the following checklist:
Open Template Manager
From the Sitecore Start Menu, open Template Manger.
Select the __Standard Values item
In the Content Tree, in User Defined, in the Home Page data
template, select the __Standard Values item.
Assign an Insert Option
In the Ribbon, in the Configure tab, in the Insert Options group,
select Assign.
Sitecore® is a registered trademark. All other brand and product names are the property of their respective holders. The
contents of this document are the property of Sitecore. Copyright © 2001-2011 Sitecore. All rights reserved.
Page 17 of 61Building A Very Simple Web Site
In the Insert Options dialog, remove the Folder
template if it exists.
In the Insert Options dialog, select the Product
template.
Click OK.
Save.
Explain This!
What are Insert Options?
Imagine that your Website has two site sections: a Products section featuring Product
Descriptions and a News section with News Articles.
Using Insert Options, Sitecore Developers define what types of content Business Users can
create and where they can create it in the Content Tree. In other words, Insert Options let
Developers mandate where and what Business Users can create.
For the Product section, a Developer assigns the Product Description data template as the single
Insert Option. For the News section, a Developer assigns the News Article data template as the
single Insert Option.
In this manner, Business Users can only create items of the type Product Description in the
Products section and only items of the type News Article in the News section.
3.1.4 Delete the Home Item
Sitecore has already created a Home item for you. In this exercise, you will delete the Home
item.
To complete this exercise, use the following checklist:
Open Content Editor
In the Sitecore Desktop Start Menu, select
Content Editor.
Sitecore® is a registered trademark. All other brand and product names are the property of their respective holders. The
contents of this document are the property of Sitecore. Copyright © 2001-2011 Sitecore. All rights reserved.
Page 18 of 61Building A Very Simple Web Site
Delete the Home Item
In the Content Tree, select the Home
item.
In the Ribbon, in the Home tab, in the
Operations group, select Delete.
Important!
By default, deleting the Home item deletes your Website.
If the Breaking Links dialog appears, select Remove Links and click Continue.
Publish your changes
In the Content Tree, select the Content
item.
In the Ribbon, in the Publish tab, in the
Publish group, select Publish.
Sitecore® is a registered trademark. All other brand and product names are the property of their respective holders. The
contents of this document are the property of Sitecore. Copyright © 2001-2011 Sitecore. All rights reserved.
Page 19 of 61Building A Very Simple Web Site
3.2 Create Content Items
In this exercise, you will begin by creating a new Home Item. Next, you will create several
Product Items.
To complete this exercise, use the following checklist:
Open Content Editor
In the Sitecore Desktop Start Menu, select Content Editor.
Select the Content item.
In the Ribbon, in the Home tab, in the Insert
group, select Insert from Template.
In the Insert from Template dialog,
select the Home Page template.
In the Item Name field, enter Home.
Click Insert.
Sitecore® is a registered trademark. All other brand and product names are the property of their respective holders. The
contents of this document are the property of Sitecore. Copyright © 2001-2011 Sitecore. All rights reserved.
Page 20 of 61Building A Very Simple Web Site
Create a Product Item
In the Content Tree, right click the Home item.
Select Insert and then Product.
In the Enter the name of the new item dialog,
enter Product 1.
Click OK.
Edit the Products Item
Review the field values of the Product 1 item.
Explain This!
Where did these field values come from?
Notice that the name that you entered appears
in the Title field.
Also, observe that the default text you entered
into the Product template’s standard values
appears in the Description field.
The $name token captures the value typed into the
Enter the Item Name dialog. It copies this captured value
into the Title field of the newly created item.
In contrast, the Description field inherits the __Standard Values item’s Description field value. This
is why you see [standard value] next to the Description field title in the Content Editor.
Sitecore® is a registered trademark. All other brand and product names are the property of their respective holders. The
contents of this document are the property of Sitecore. Copyright © 2001-2011 Sitecore. All rights reserved.
Page 21 of 61Building A Very Simple Web Site
Click the Show Editor link above the
Description field.
This opens the Rich Text Editor.
Use the Rich Text Editor to change the
text in the Description field.
Click Accept.
Save.
Create at least two more Product
items
Repeat these steps to add a more product items. You should
have at least three products when done.
Find it!
To learn these exercises using the Sitecore Rocks Visual Studio 2010 Extension, please refer to
the Self Study Guide for Building A Very Simple Website in your Student CD.
Also find the following related Sitecore Rocks resources:
http://vsplugins.sitecore.net/
http://www.sitecore.net/Community/Technical-Blogs/John-West-Sitecore-Blog.aspx
Verify your work with your Instructor
Sitecore® is a registered trademark. All other brand and product names are the property of their respective holders. The
contents of this document are the property of Sitecore. Copyright © 2001-2011 Sitecore. All rights reserved.
Page 22 of 61Building A Very Simple Web Site
3.3 Create Presentation Components
Presentation Components are both definition items (an item defined by a specific data template)
and a file in the file system. For this exercise, you will create three “building block” Presentation
Components:
1. Side Menu XSLT Rendering
2. Product Display XSLT Rendering
3. Generic Display Sublayout
You will create both the Side Menu and
Product Display XSLT Renderings using
Developer Center.
The following checklist will help you get
started.
Open Developer Center
From the Sitecore Start Menu,
select Development Tools, in the
Context Menu, select Developer
Center.
3.3.1 Create the Side Menu XSLT Rendering
In this exercise, you will use Developer Center to create an XSLT Rendering that displays links to
the Home item and all Product items.
To complete this exercise, use the following checklist:
Create the XSLT Rendering
From the Start Page of Developer Center, in the Getting
Started Pane, select Create a New XSLT Rendering.
In the Create XSLT File Wizard, in the Name dialog, enter
Side Menu.
Click Next.
In the Location dialog, select the Renderings item.
Click Next.
In the File Location dialog, select the xsl file folder.
Click Create.
Click Finish.
Sitecore® is a registered trademark. All other brand and product names are the property of their respective holders. The
contents of this document are the property of Sitecore. Copyright © 2001-2011 Sitecore. All rights reserved.
Page 23 of 61Building A Very Simple Web Site
Edit the Side Menu XSLT file
Uncomment the first variable line.
After the main comment section, replace the
Save!
Click the Save Icon or use the Ctrl+S keystroke.
Preview the Side Menu XSLT Rendering
After saving, in the Preview pane, you will see hyperlinks for the
Home item and Product child items.
If you are unable to view the Preview pane, in the Side Menu.xslt
tab, select the Preview command. This command toggles the
display of the Preview pane.
To refresh the Preview Pane, click the Refresh button.
Sitecore® is a registered trademark. All other brand and product names are the property of their respective holders. The
contents of this document are the property of Sitecore. Copyright © 2001-2011 Sitecore. All rights reserved.
Page 24 of 61Building A Very Simple Web Site
Find it!
To learn more about XSL and XPath constructs and functions as well as Sitecore Xsl Extension
controls and functions, visit the Sitecore Developer Network (SDN) at http://sdn.sitecore.net.
Review the Presentation Component XSL Reference for Sitecore CMS 6.5.
3.3.2 Create the Product Display XSLT Rendering
In this exercise, you will use Developer Center to create an XSLT Rendering that shows details
about a given Product item.
To complete this exercise, use the following checklist:
Create the XSLT Rendering
From the Start Page of Developer Center, in the Getting Started Pane, select Create a
New XSLT Rendering.
In the Create XSLT File Wizard, in the Name dialog, enter Product Display.
Click Next.
In the Location dialog, select the Renderings item.
Click Next.
In the File Location dialog, select the xsl file folder.
Click Create.
Click Finish.
Edit the Product Display XSLT file
After the main comment section, replace the
Price:
Sitecore® is a registered trademark. All other brand and product names are the property of their respective holders. The
contents of this document are the property of Sitecore. Copyright © 2001-2011 Sitecore. All rights reserved.
Page 25 of 61Building A Very Simple Web Site
Save!
Click the Save Icon or use the Ctrl+S keystroke.
Preview the Product Display XSLT Rendering
In the Preview pane, in the path field drop tree, select
Product 1.
The item path is:
content/Home/Product 1
To view the product details, in the Preview pane, click the
Refresh command.
3.3.3 Create the Generic Display Sublayout
In this exercise, you will use the Sitecore Sublayout wizard to create both the Sublayout definition
item and the Web User Control file.
To complete this exercise, use the following checklist:
Create the Sublayout
From the Start Page of Developer Center, in the Getting
Started Pane, select Create a New Sublayout.
In the Create Sublayout Wizard, in the Name dialog, enter
Generic Display.
Click Next.
In the Location dialog, select Sublayouts.
Click Next.
In the File Location dialog, select the layouts folder.
Click Create.
To close the wizard, click Finish.
Sitecore® is a registered trademark. All other brand and product names are the property of their respective holders. The
contents of this document are the property of Sitecore. Copyright © 2001-2011 Sitecore. All rights reserved.
Page 26 of 61Building A Very Simple Web Site
Edit the Generic Display Sublayout with Grid Designer
In the Ribbon, in the Add group, select Control.
In the Insert Control dialog, in the Content
Tree, expand Renderings, expand System,
and select FieldRenderer.
Click OK.
In the Ribbon, in the Properties group, select Properties.
In the Rendering dialog, in the Attributes tab, set the ID to MyTitle.
Set the Field Name to Title.
Click OK.
In the Ribbon, in the Add group, select Control.
In the Insert Control dialog, in the Content Tree, expand Renderings, expand System, and
select FieldRenderer.
Click OK.
In the Ribbon, in the Properties group, select Properties.
In the Rendering dialog, in the Attributes tab, set the ID to MyDescription
Set the Field Name to Description.
Click OK.
Save your changes!
Click the Save command.
If you do not save, you will lose your work.
Sitecore® is a registered trademark. All other brand and product names are the property of their respective holders. The
contents of this document are the property of Sitecore. Copyright © 2001-2011 Sitecore. All rights reserved.
Page 27 of 61Building A Very Simple Web Site
Edit the Generic Display.ascx Markup
In Developer Center, in Grid Designer, switch to
HTML view.
In the Application tab, click HTML.
.
Enclose the first tag with
Your final markup should be similar to:
Save! Use the Ctrl+S keystroke.
Sitecore® is a registered trademark. All other brand and product names are the property of their respective holders. The
contents of this document are the property of Sitecore. Copyright © 2001-2011 Sitecore. All rights reserved.
Page 28 of 61Building A Very Simple Web Site
3.4 Create the Browser Layout
Presentation Components are both definition items (an item defined by a specific data template)
and a file in the file system. For this exercise, you will create a Layout Presentation Component
named Browser Layout. You will use the Sitecore Layout wizard to create both the Layout
definition item and the Web Form file.
To complete this exercise, use the following checklist:
Create the Sublayout
From the Start Page of Developer Center, in the Getting
Started Pane, select Create a New Layout.
In the Create Layout Wizard, in the Name dialog, enter Browser Layout.
Click Next.
In the Location dialog, select Layouts.
Click Next.
In the File Location dialog, select the layouts folder.
Click Create.
To close the wizard, click Finish.
Edit the Browser Layout with Grid Designer
In the Ribbon, in the Add group, click the Div command.
In the Ribbon, in the Properties group, select Properties.
In the Properties dialog, set ID to leftcolumn.
Set width to 200px.
Set Float to left.
Click OK.
Sitecore® is a registered trademark. All other brand and product names are the property of their respective holders. The
contents of this document are the property of Sitecore. Copyright © 2001-2011 Sitecore. All rights reserved.
Page 29 of 61Building A Very Simple Web Site
In the Ribbon, in the Rows & Columns group, select Right.
In the Ribbon, in the Properties group, select Properties.
In the Properties dialog, set ID to rightcolumn.
Set width to 600px.
Set float to right if no value exists.
Click OK.
In the Grid Designer, select placeholder1.
In the Ribbon, in the Edit group, select Delete.
In the Grid Designer, select the remaining
Div.
In the Ribbon, in the Add group, select Control.
In the Insert Control dialog, in the Content
Tree, select Side Menu.
Click OK.
In the Grid Designer, select placeholder 2.
In the Ribbon, in the Properties group,
select Properties.
In the Rendering dialog, in the Attributes
tab, seth the key field value to content.
Click OK.
Save!
Sitecore® is a registered trademark. All other brand and product names are the property of their respective holders. The
contents of this document are the property of Sitecore. Copyright © 2001-2011 Sitecore. All rights reserved.
Page 30 of 61Building A Very Simple Web Site
Edit the Browser Layout.aspx Markup
In Developer Center, in Grid Designer, switch to
HTML view.
In the Application tab, click HTML.
.
After the tag, replace the text
Insert your controls here.
with
Header
Before the closing , add a footer.
Footer
Your final markup should read like:
Header
Footer
Save! Use the Ctrl+S keystroke.
Verify your changes
In the Application tab, select Grid.
In the Grid Designer, verify that you see Header, Side Menu, Content, and Footer.
Sitecore® is a registered trademark. All other brand and product names are the property of their respective holders. The
contents of this document are the property of Sitecore. Copyright © 2001-2011 Sitecore. All rights reserved.
Page 31 of 61Building A Very Simple Web Site
3.5 Bind Content to Presentation
Consider the following wireframes for both the Home Page and Product Pages:
As a Sitecore Developer, you define the instructions for how to present specific content using
Layout Details settings. This instruction set is how Sitecore binds content to presentation.
When Sitecore receives a runtime request for content, Sitecore interprets the Layout Details
settings and processes these instructions through the Sitecore rendering engine and pipeline. To
the requesting device, Sitecore then returns outputs a data stream. Usually, this is HTML,
XHTML, XML, or RSS.
There are two places where you can define Layout Details settings. The first place is on the item.
The second, and most ideal, is on Template Standard Values. In this exercise, you will define the
presentation instructions for both the Home Page and all Product items.
Using template standard values, you will specify layout, sublayout, and renderings to use. The
Home item will feature the Browser Layout with the Generic Display sublayout.
Product items will use the Browser Layout with the Product Display XSLT rendering. The diagram
illustrates both static and dynamic binding of presentation components.
Sitecore® is a registered trademark. All other brand and product names are the property of their respective holders. The
contents of this document are the property of Sitecore. Copyright © 2001-2011 Sitecore. All rights reserved.
Page 32 of 61Building A Very Simple Web Site
To complete this exercise, use the following checklist:
Assign Layout Details to the Home Page template
standard values
From the Sitecore Start menu, open Template Manager.
In the Content Tree, for the Home Page data template, select
the __Standard Values item.
In the Ribbon, in the Presentation tab,
in the Layout group, select Details.
In the Layout Details dialog, for Default device, select
Edit.
In the Device Editor dialog, in the drop-down list, select Browser
Layout.
In the Device Editor dialog, select Controls.
To add the Generic Display sublayout, click Add.
Sitecore® is a registered trademark. All other brand and product names are the property of their respective holders. The
contents of this document are the property of Sitecore. Copyright © 2001-2011 Sitecore. All rights reserved.
Page 33 of 61Building A Very Simple Web Site
In the Select a rendering dialog, select
Generic Display.
In the Add to Placeholder, enter content.
Click Select.
In the Device Editor dialog, click OK.
In the Layout Details dialog, click OK.
Best Practice
A Sitecore Developer best practice is to inherit presentation Layout Details settings from template
standard values. On an item, you can always override the default settings and likewise reset back
the template standard values default settings.
Imagine tens of thousands of items of the type Product. It would take days to update the Layout
Details for each product item individually. With template standard values, it takes only minutes.
Update the Layout Details on the Product data template’s standard values item. All the Product
items inherit the change.
Sitecore® is a registered trademark. All other brand and product names are the property of their respective holders. The
contents of this document are the property of Sitecore. Copyright © 2001-2011 Sitecore. All rights reserved.
Page 34 of 61Building A Very Simple Web Site
Assign Layout Details to the Product template standard values
From the Sitecore Start menu, open Template Manager.
In the Content Tree, for the Product data template, select the
__Standard Values item.
In the Ribbon, in the Presentation tab, in the
Layout group, select Details.
In the Layout Details dialog, for Default device, select Edit.
In the Device Editor dialog, in the drop-down list, select Browser
Layout.
In the Device Editor dialog, select Controls.
To add the Generic Display sublayout, click Add.
In the Select a rendering dialog, select Product Display.
Sitecore® is a registered trademark. All other brand and product names are the property of their respective holders. The
contents of this document are the property of Sitecore. Copyright © 2001-2011 Sitecore. All rights reserved.
Page 35 of 61Building A Very Simple Web Site
In the Add to Placeholder field, enter
content.
Click Select.
In the Device Editor dialog, click OK.
In the Layout Details dialog, click OK.
Sitecore® is a registered trademark. All other brand and product names are the property of their respective holders. The
contents of this document are the property of Sitecore. Copyright © 2001-2011 Sitecore. All rights reserved.
Page 36 of 61Building A Very Simple Web Site
3.6 Publish and View the Website
For this exercise, publish and view the live Website.
The following checklist will help guide you.
Publish the Site.
From the Sitecore Start menu, select Publish Site.
In the dialog box, select Incremental
Publish.
Click Publish.
View the live Website
Open a new browser
window.
Navigate to http://localhost
Use the links on the side
menu to view all of your
product pages.
Sitecore® is a registered trademark. All other brand and product names are the property of their respective holders. The
contents of this document are the property of Sitecore. Copyright © 2001-2011 Sitecore. All rights reserved.
Page 37 of 61Building A Very Simple Web Site
3.7 Working with Page Editor
For this exercise, edit the website just like a Business User.
The following checklist will help you get started.
Login using Page Editor
To leave the Sitecore Desktop, on the Sitecore Start menu, select Log Off.
Login into Page Editor
Login to the Sitecore Page Editor
using the Administrator username and
password:
Username: Admin
Password: b
Select Options.
In the User Interface pane, select
Page Editor.
Click Login.
Explain This!
Why use Page Editor?
Page Editor allows Business Users to edit content in the “work in progress” site. The Website that
you can see in the Page Editor looks the same as the live site except for the ribbon on the top of
the page. Any changes that you make here must be published before they are visible on the live
website.
3.7.1 Editing Content with Page Editor
For this exercise, your will design the website just like a designer. The following checklist will help
you get started.
Edit the Home Page
Edit the Description of the Home item.
Hover the mouse over the Description field. You
will see a Floating Toolbar for the field.
In the Floating Toolbar, select the Edit Text
command.
Sitecore® is a registered trademark. All other brand and product names are the property of their respective holders. The
contents of this document are the property of Sitecore. Copyright © 2001-2011 Sitecore. All rights reserved.
Page 38 of 61Building A Very Simple Web Site
In the Rich Text Editor, make some
edits.
Click Accept.
At the top of the page, click the Save icon. Or, use the Ctrl+S keystroke.
Publish the Website
In the Ribbon, in the Home tab, in the
Publish group, click Publish.
If prompted to save your changes,
click Yes.
In the Publish Item wizard, click Next.
In the Settings dialog, click Publish.
Click Finish.
3.7.2 Designing Content with Page Editor
For this exercise, explore design changes to the website.
The following checklist will help you get started.
Select the Content placeholder
In the Ribbon, in the View tab, in the
Show group, check the Controls
checkbox.
If Designing is not checked, then
check this checkbox, too.
Select the outline of the Control that borders the Title field and Description field. The
Floating Toolbar will read Generic Display.
Sitecore® is a registered trademark. All other brand and product names are the property of their respective holders. The
contents of this document are the property of Sitecore. Copyright © 2001-2011 Sitecore. All rights reserved.
Page 39 of 61Building A Very Simple Web Site
Generic Display is a Sublayout that dynamically
binds to the Content Placeholder.
In the Floating Toolbar, click Show Parent.
Edit the Allowed Controls
In the Floating Toolbar, click More, in the Context
Menu, click Edit Page Editor Options.
In the dialog, in the
Compatible Renderings
field, add the Product
Display Layout and the
Generic Display
Sublayout.
In the Layout Tree, in the
All Pane, in Renderings,
select Product Display.
To move the Product
Display item to the
Selected pane, use the left
arrow or double click.
In the Layout Tree, in the
All Pane, in Sublayouts, select
Generic Display.
To move the Generic Display item to the Selected pane, use the left arrow or double click.
Click OK.
Save.
Select again the out Control that borders the Title
field and Description field. The Floating Toolbar will
read Generic Display.
Generic Display is a Sublayout that dynamically
binds to the Content Placeholder.
In the Floating Toolbar, click Show Parent.
Sitecore® is a registered trademark. All other brand and product names are the property of their respective holders. The
contents of this document are the property of Sitecore. Copyright © 2001-2011 Sitecore. All rights reserved.
Page 40 of 61Building A Very Simple Web Site
In the Floating Toolbar,
click Edit The Placeholder Settings.
In the Select the Placeholder Settings dialog
box,
Select Edit.
In the Select Items dialog
box, select the Product
Display Layout and the
Generic Display Sublayout.
Remove Sample Rendering
if it exists.
Click OK.
In the Select the
Placeholder Settings dialog
box, click OK.
In the Floating Toolbar, click Add to here.
Sitecore® is a registered trademark. All other brand and product names are the property of their respective holders. The
contents of this document are the property of Sitecore. Copyright © 2001-2011 Sitecore. All rights reserved.
Page 41 of 61Building A Very Simple Web Site
In the Select a Rendering dialog box, select
Product Display.
Next check the Open the Properties dialog
box immediately.
Click Select.
In the Control Properties dialog,
in the Data Source field, click
the Insert Link Command.
In the Item browser dialog, select a Product
Item.
Click Open.
In the Control Properties dialog, verify that
the Data Source filed shows an item path.
For example, the item path is:
/sitecore/content/Home/Product 3
Click OK.
Sitecore® is a registered trademark. All other brand and product names are the property of their respective holders. The
contents of this document are the property of Sitecore. Copyright © 2001-2011 Sitecore. All rights reserved.
Page 42 of 61Building A Very Simple Web Site
Verify that Product 3 details display on
the Home item.
In the Floating Toolbar for the Product
Display control, click the Delete
Command.
Verify the removal of the Product Display
XSLT Rendering from the content
placeholder.
Save.
Find it!
To learn these exercises using the Sitecore Rocks Visual Studio 2010 Extension, please refer to
the Self Study Guide for Building A Very Simple Website in your Student CD.
Also find the following related Sitecore Rocks resources:
http://vsplugins.sitecore.net/MainPage.ashx
http://www.sitecore.net/Community/Technical-Blogs/John-West-Sitecore-Blog.aspx
Verify your work with your Instructor
Sitecore® is a registered trademark. All other brand and product names are the property of their respective holders. The
contents of this document are the property of Sitecore. Copyright © 2001-2011 Sitecore. All rights reserved.
Page 43 of 61Building A Very Simple Web Site
Chapter 4
Optional Placeholders and Nested Sublayouts
The exercises in this chapter offer you the opportunity to create nested
sublayouts.
This chapter includes the following exercises:
Create the Two Columns Sublayout
Assign the Two Columns Sublayout to the Home Item
Sitecore® is a registered trademark. All other brand and product names are the property of their respective holders. The
contents of this document are the property of Sitecore. Copyright © 2001-2011 Sitecore. All rights reserved.
Page 44 of 61Building A Very Simple Web Site
4.1 Create the Two Columns Sublayout
In this exercise, you will create a more complex sublayout containing two columns to which we
can add placeholder settings and controls.
The following checklist will help you get started:
Create the Two Column Sublayout
Using the Content Editor, in the Content Tree, expand
Layout, and then select Sublayouts.
In the Folder Editor tab, select Sublayout.
In the Welcome to the Create Sublayout wizard, click Next.
In the Name dialog box, enter Two Columns
as a sublayout name in the Name textbox.
Click Next.
In the Location dialog box, select a location
for the definition item in the Content Tree.
Click Next.
Sitecore® is a registered trademark. All other brand and product names are the property of their respective holders. The
contents of this document are the property of Sitecore. Copyright © 2001-2011 Sitecore. All rights reserved.
Page 45 of 61Building A Very Simple Web Site
In the File Location dialog, select a location for
the file in your website file system. Click to
place a check mark to Create Associated C#
Code Files. Click Create.
In the final dialog, click Finish.
To close the wizard, click Finish.
Explain This!
What about creating a Sublayout with Developer Center?
Creating a Sublayout with Content Editor calls a command that opens the Create Sublayout
Wizard. This is the same wizard used by Developer Center.
Edit the Two Column Sublayout with Grid Designer
In the Ribbon, in the Grid
Designer tab, select Layout.
In the Add group, click the Div command.
Sitecore® is a registered trademark. All other brand and product names are the property of their respective holders. The
contents of this document are the property of Sitecore. Copyright © 2001-2011 Sitecore. All rights reserved.
Page 46 of 61Building A Very Simple Web Site
In the Ribbon, in the Properties group, select
Properties.
In the Properties dialog, set the width of the Div
tag to 300 and the Float to left.
Click OK.
Select placeholder1. In the Properties group,
click the Properties command.
In the Rendering dialog, for the attribute
named key, change the value of
placeholder1 to left. To close the dialog,
click OK.
Select the div surrounding the left
placeholder.
In the Ribbon, in the Rows &
Columns group, select Right.
Sitecore® is a registered trademark. All other brand and product names are the property of their respective holders. The
contents of this document are the property of Sitecore. Copyright © 2001-2011 Sitecore. All rights reserved.
Page 47 of 61Building A Very Simple Web Site
In the Ribbon, in the Properties group, select
Properties.
In the Properties dialog, set width to 300 and float to right.
To close the Properties dialog, click OK.
Select
placeholder1.
In the
Properties group, click the Properties command.
In the Rendering dialog, for the attribute named key, change the value of placeholder1 to
right.
To close the dialog, click OK.
Save.
Sitecore® is a registered trademark. All other brand and product names are the property of their respective holders. The
contents of this document are the property of Sitecore. Copyright © 2001-2011 Sitecore. All rights reserved.
Page 48 of 61Building A Very Simple Web Site
4.2 Dynamically Bind the Two Columns Sublayout
In this exercise, you will dynamically bind the Two Columns sublayout by assigning the sublayout
to the Home item.
The following checklist will help you get started:
Select the Product1 Item
Using the Content Editor, in the Content
Tree, select the Product1 item. The path is
/Home/Product1.
Click the Presentation tab. in the Layout
group, click the Details command.
Assign the Two Columns
sublayout to the Product1 item
Click “Edit” by the Default device.
Add the Two Columns sublayout to
the placeholder name “content”.
Click Select.
Edit the Product Display sublayout.
Update the placeholder from
Placeholder name from “content” to
“right”.
Click OK.
Sitecore® is a registered trademark. All other brand and product names are the property of their respective holders. The
contents of this document are the property of Sitecore. Copyright © 2001-2011 Sitecore. All rights reserved.
Page 49 of 61Building A Very Simple Web Site
Select the Two Columns
sublayout and click the Move Up
button, so that Two Columns is
the first control listed.
Click OK to close the Device
Editor dialog.
Click OK to close the Layout
Details dialog.
Preview the changes to the Product1 item
Select the Product1 item in the content tree. The path is /Home/Product1. Click the Publish
tab. Under the Publish group, click the Preview command.
Verify that your Two Columns sublayout is displayed on the Product1 page and that the
Title and Description fields (from the Product Display) are displayed in the right table cell.
Close the Preview browser.
Explain This!
Layout Delta
Layout deltas allow items to inherit partial layout details from a cloned item or standard values
from the data template.
When you update layout details on an item that inherits layout details the field that contains layout
details stores only the differences from the inherited layout details. Changes to layout details in
the base item dynamically apply to items that contain layout deltas.
Layout details are cumulative. A layout delta in a clone applies to a layout delta in the cloned item
that applies to standard values.
In the Content Editor, you can edit the layout details for standard items on the template or
customize the layout details on individual content items. The setting is stored as XML in the
Renderings property of the item.
Sitecore® is a registered trademark. All other brand and product names are the property of their respective holders. The
contents of this document are the property of Sitecore. Copyright © 2001-2011 Sitecore. All rights reserved.
Page 50 of 61Building A Very Simple Web Site
4.3 Add Placeholder Settings to the Left Column
In this exercise, you will create the Left Column Placeholder Settings Item and then apply it to the
Two Column Sublayout.
The following checklist will help you get started:
Create the Left Column Placeholder Settings Item
Using the Content Editor, in the Content Tree, select Layout
and then select Placeholder Settings.
Select Placeholder.
In the Name dialog box, enter Left Column as a Placeholder Settings
name in the textbox.
In the Placeholder Key property,
enter left.
Click the Edit button in the
Allowed Controls property.
In the Select Items dialog
box, expand the
Renderings node. Select
Sample Rendering in the
Sample folder.
Click OK.
Save.
Sitecore® is a registered trademark. All other brand and product names are the property of their respective holders. The
contents of this document are the property of Sitecore. Copyright © 2001-2011 Sitecore. All rights reserved.
Page 51 of 61Building A Very Simple Web Site
Select the Product1 Item
Using the Content Editor, in the Content
Tree, select the Product1 item. The path is
/Home/Product1.
Click the Presentation tab. in the Layout
group, click the Details command.
Assign the Left Column Placeholder Setting to the Two Columns Sublayout
Click Edit by the default device.
In the Device Editor dialog box, click Placeholder Settings.
Click Add.
In the Placeholder Settings Dialog box, enter left
as the Key name.
Click Browse next to Settings Item.
In the Select a placeholder meta data item dialog
box, select the Left Column placeholder setting
and click Select.
You should see /Left Column in the Settings Item
textbox.
Click OK.
In the Device Editor dialog box, click OK.
In the Layout Details dialog box, you
should see the Left Column Placeholder
Setting applied to the Default Layout.
Click OK to close the Layout Details
dialog box.
Save.
Sitecore® is a registered trademark. All other brand and product names are the property of their respective holders. The
contents of this document are the property of Sitecore. Copyright © 2001-2011 Sitecore. All rights reserved.
Page 52 of 61You can also read