Basic ICT Training Materials Computer Fundamentals Windows XP Microsoft Word Microsoft Excel Computer Virus - Training Materials on MS Windows XP ...
←
→
Page content transcription
If your browser does not render page correctly, please read the page content below
Basic ICT Training Materials

                  Computer Fundamentals
                      Windows XP
                     Microsoft Word
                     Microsoft Excel
                     Computer Virus

Training Materials on MS Windows XP, MS Office XP and AnitVirus   1
Training Materials on MS Windows XP, MS Office XP and AnitVirus

Table of Contents

1     Computer Fundamentals ....................................................................5
    1.1     Introduction to Computers .............................................................................5
    1.2     How works are done with computers?...........................................................5
    1.3     What is an Operating System (OS)? ..............................................................5
    1.4     Functions of an OS.........................................................................................5
    1.5     Primary OS functions.....................................................................................5
2     Windows XP ........................................................................................5
    2.1     Files, Folders and Icons .................................................................................6
    2.2     Start Menu Program.......................................................................................7
    2.3     My Computer .................................................................................................7
    2.4     Recycle Bin....................................................................................................8
3     Windows File Management................................................................8
    3.1     Exploring Windows Explorer ........................................................................8
    3.2     Cut, Copy, Paste, Rename and Delete a File/Folder......................................9
4     Introduction and Creating Word Document .....................................9
    4.1     Introduction....................................................................................................9
    4.2     Using the Start Menu to Open Word .............................................................9
    4.3     Opening Files ...............................................................................................12
    4.4     Selecting Text ..............................................................................................13
    4.5     Deleting Text ...............................................................................................13
    4.6     Undoing, Redoing, and Repeating Changes ................................................13
5     Formatting Text and Paragraph ......................................................14
    5.1     Formatting Characters..................................................................................14
    5.2     Cutting, Copying, and Pasting .....................................................................14
    5.3     Finding and Replacing Text.........................................................................15
    5.4     Replacing .....................................................................................................15
    5.5     Using AutoText............................................................................................15
    5.6     Inserting AutoText .......................................................................................15
    5.7     Insert a comment..........................................................................................16
    5.8     Changing the Case .......................................................................................16
    5.9     Creating Bulleted and Numbered Lists........................................................16
    5.10      Creating Bulleted or Numbered Lists ......................................................17
    5.11      Using the Bullets And Numbering Dialog Box .......................................17
6     Formatting Paragraph & Document ...............................................18
    6.1     Using the Indent and Alignment Buttons.....................................................18
    6.2     Using the Paragraph Dialog Box .................................................................18
    6.3     About Styles and Themes ............................................................................19
    6.4     Formatting Pages .........................................................................................19
    6.5     Insert a Section Break ..................................................................................19
    6.6     Correcting Spelling Errors ...........................................................................19
    6.7     Using the Spelling and Grammar Dialog Box .............................................20
    6.8     Using the Thesaurus.....................................................................................20
    6.9     Hyphenating Text.........................................................................................20

           Training Materials on MS Windows XP, MS Office XP and AnitVirus                                                 2
6.10         Page Setup................................................................................................20
7      Print & Manage Document ..............................................................21
    7.1      Previewing Documents ................................................................................21
    7.2      Using Print Preview Toolbar .......................................................................21
    7.3      Printing Documents .....................................................................................22
    7.4      Setting Printing Options...............................................................................22
    7.5      Setting Printer Properties .............................................................................22
    7.6      Using Advanced Printing Options ...............................................................23
8      Formatting Documents Linking & Protect Document....................23
    8.l      Using Headers and Footers ..........................................................................23
    8.2      Adding Header & Footer Text .....................................................................23
    8.3      Using Bookmarks.........................................................................................24
    8.4      Adding Bookmarks ......................................................................................24
9      Tables & Borders ..............................................................................25
    9.l      Creating a Table...........................................................................................25
    9.2      The Tables And Borders Toolbar ................................................................25
    9.3      Drawing a Table...........................................................................................25
    9.4      To draw a table, do the following: ...............................................................25
    9.5      Aligning Text Inside Cells ...........................................................................26
    9.6      Adding a Row or Column ............................................................................26
    9.7      Splitting or Merging Cells ...........................................................................27
    9.8      Merging Cells...............................................................................................27
    9.9      Using the Borders And Shading Dialog Box...............................................27
10 Starting Excel and Getting Comfortable..........................................29
    10.1    Navigating a Worksheet...........................................................................30
    10.2    Entering Information................................................................................31
      10.2.1 Entering Numeric Values.....................................................................32
      10.2.2 Entering Text Values ...........................................................................33
      10.2.3 Entering Dates and Times....................................................................34
      10.2.4 Entering Comments .............................................................................35
      10.2.5 Entering Formulas................................................................................35
11 Essential Editing Techniques ...........................................................37
    11.1         Selecting Cells and Ranges......................................................................38
      11.1.1       Selecting a Range Using the Mouse ....................................................38
      11.1.2       Selecting a Range Using the Keyboard ...............................................39
    11.2         Clearing Cells and Deleting Cells............................................................39
    11.3         Using Cut and Paste to Move Data ..........................................................41
    11.4         Using Copy and Paste to Duplicate Data.................................................42
    11.5         Adding Rows and Columns to the Worksheet.........................................43
    11.6         Entering a Series of Labels, Numbers, and Dates....................................44
    11.7         Using AutoFill to Create a Series ............................................................44
12 Formatting Cells ...............................................................................47
    12.1         Changing Alignment................................................................................47
    12.2         Adjusting Horizontal Alignment..............................................................47
    12.3         Adjusting Vertical Alignment..................................................................48
    12.4         Adjusting Text Orientation ......................................................................48
    12.5         Changing Number Formats......................................................................50
    12.6         Creating a Custom Number Format.........................................................51
    12.7         Changing Text Font and Text Color ........................................................53

           Training Materials on MS Windows XP, MS Office XP and AnitVirus                                                 3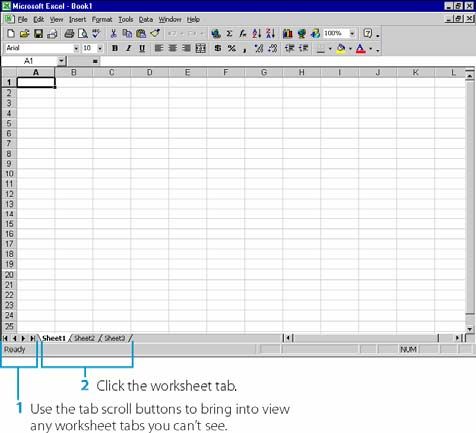
12.8 Adding Borders to Cells...........................................................................54
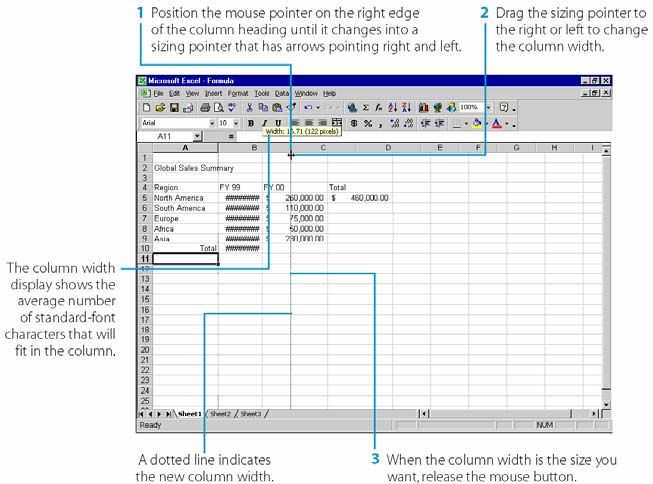
13 Managing Worksheets ......................................................................58
13.1 Naming Worksheets.................................................................................59
13.2 Deleting Worksheets................................................................................59
13.3 Inserting Worksheets ...............................................................................60
13.4 Moving Worksheets .................................................................................61
14 Setting Printing Options ...................................................................61
14.1 Controlling Page Orientation ...................................................................61
14.2 Adjusting the Margins..............................................................................62
14.3 Adding Headers and Footers....................................................................62
14.4 Delete All Headers and Footers ...............................................................64
14.5 Adding Gridlines and Other Options .......................................................65
15 Introduction to MS Power Point ......................................................67
15.1 Creating presentations..............................................................................69
15.2 Starting the Presentation ..........................................................................69
15.3 Creating a Presentation ............................................................................70
15.4 Creating the Text Framework ..................................................................71
15.5 Save a new or existing presentation.........................................................71
15.6 Apply a different design to a presentation ...............................................72
15.7 Objects & Color, Transitions & Layout...................................................73
15.8 The Drawing Toolbar...............................................................................73
15.9 To draw a curve or freeform, follow these steps .....................................74
15.10 Getting Art from the Clip Gallery............................................................75
15.11 Give a slide a different background than the master................................76
15.12 Delete a slide............................................................................................76
15.13 Create a custom show ..............................................................................77
15.14 Hide a slide in a slide show......................................................................77
15.15 Change a color-scheme color...................................................................78
15.16 Create a new slide from titles of other slides...........................................78
15.17 Tables, Organizational Charts, Linking & Publishing.............................79
15.18 Creating a Table Slide..............................................................................80
15.19 Chart.........................................................................................................80
15.20 Create a chart ...........................................................................................80
16 Organization chart........................................................................................81
16.1 Insert an organization chart......................................................................81
16.2 About hyperlinks and action buttons in a presentation............................82
16.3 To add an Action button to a slide, follow these steps: ...........................82
16.4 Saving a Portion of a Presentation as a Web Presentation.......................84
17 Computer Virus .................................................................................84
17.1 What is a Computer Virus?......................................................................84
17.2 How Many Viruses Exist? .......................................................................84
17.3 How Viruses Spread?...............................................................................85
17.4 Virus Types..............................................................................................85
17.5 Running Norton AntiVirus Program & Scanning Viruses ......................86
Training Materials on MS Windows XP, MS Office XP and AnitVirus 4
1        Computer Fundamentals
1.1      Introduction to Computers
The term Computer is used to describe a device, a combination of electronic and
electromechanical components. Computers can process data under control set of instructions
called computer programs. By itself computer has no intelligence. The computer programs
guide the computer through orderly set of actions designed by people called computer
Programmers.

1.2      How works are done with computers?
Computer makes our works done with a combination of two things. Hardware and Software.
The components that can be gripped with hands are called Hardware and the components that
cannot be done so area called Software. A special kind of software called Operating System
(OS) makes the environment to do our jobs.

1.3      What is an Operating System (OS)?
Every computer needs an Operating System. At the most basic level an OS is the interface
between you, your software application and your computer hardware. There are many
companies designed and developed OS such as Microsoft DOS, Windows, Linux, UNIX etc.

1.4      Functions of an OS
OS interpret user commands and instructions (like typing on the keyboard or clicking with the
mouse) and send requests to the proper application or device. An OS not only provides a user
interface (text or graphic) to access/organize/manipulate/store dat, but can also provide
security and multitasking capabilities. Generally the OS is made up of a few core files with
additional files for extended functionality and backward capability.

1.5      Primary OS functions
o     Communications (methods of communication) with hardware/software
o     User Interface
o     Input/Output (standard devices)
o     Add, delete, move, store programs and data

2        Windows XP
Now we are ready to learn the most powerful Desktop OS Windows XP. In this section we
will learn some basic terminology that we mostly use while working or talking about
Windows.

When the computer starts, it presents a visual appearance on the monitor before you. This is
called Windows Desktop. According to settings your desktop may be different. A sample
Desktop is shown below:

          Training Materials on MS Windows XP, MS Office XP and AnitVirus                  5
Sample Desktop

2.1       Files, Folders and Icons
Files

A File is a place in the computer system where we write our documents. Every software has
it’s own file type. Such as Documents or File types of MS Office is MS Word, Excel. To
recognize a file a name is given with one to three letter extensions. With extension a program
and we can understand the file types. A dot is put between the file name and the extension. A
file name typically has the structure like
File_Name.extension.

Folders

A Folder is place in the computer where files are grouped and put into it. Folders are also
called Directories.

Icons

An Icon is a pictorial representation of a File or Folder. It may represent a Drive. Some Icons
are given below.

Sample Icons

          Training Materials on MS Windows XP, MS Office XP and AnitVirus                    6
2.2    Start Menu Program
“Start” button is the starting point of Windows. Clicking on the Start button you will be
represented with a popup menu called “Start Menu”.

Windows XP Start Menu

2.3    My Computer
My Computer is the place from where you can browse the whole computer. You can browse
through all Hard Drives, Floppy Drive, CD-ROM etc. To get in to “My Computer” double
click on the “My Computer” icon on the desktop and will get a window similar to the
following.

        Training Materials on MS Windows XP, MS Office XP and AnitVirus                7
My Computer
Double click on any drive icon to browse through it. From this window, you can find the
drive type, size of that drive, amount of free space on any drive, list of files and folders etc.
2.4 Recycle Bin
When files or folders are deleted or removed from the drive they are marked as deleted items
and placed into the Recycle Bin Folder.
When you delete a file or folder, a confirmation dialog box will appear.
To get into the “Recycle Bin” folder, double click on the “Recycle Bin” icon on the Desktop.
List of items marked as deleted will be shown in the window. If you want to undelete an item,
just “Right Click” on the item and choose Restore. If you want to clear the “Recycle Bin” just
click File > Empty Recycle Bin.
3 Windows File Management
3.1 Exploring Windows Explorer
Windows Explorer is the window from where you can manage your files, documents, drives
etc. very easily. There are many ways to open Windows Explorer. Some of the ways are
shown below:
1. Start > Programs > Accessories > Windows Explorer.
2. Start > Run > Type “Explorer” then press Enter.
3. Press Microsoft Window Key (if present) + E on the keyboard.
Windows Explorer
Training Materials on MS Windows XP, MS Office XP and AnitVirus 83.2 Cut, Copy, Paste, Rename and Delete a File/Folder
The basic action for Cut, Copy, Paste, Rename and Delete is same. Just “Right Click” on the
file or folder to be acted upon and choose the action (Cut, Copy, Paste etc.). You need to
understand the following terminologies:
Copy : Copy means the item will remain in its place, but a new same item will be
created.
Cut : Cut means the item will change its place or to erase or remove from its place.
Paste : In either case (Cut/Copy) the file or folder is assigned to take place.
Rename : To change the name of file or folder.
Delete : To make the item permanently remove from its place.
When you right click on a file or folder a popup menu will appear with a list of actions to
choose from.
4 Introduction and Creating Word Document
4.1 Introduction
The best way to begin learning a new program is to start it up and poke around in it. You
might open up menus to see what kinds of commands Microsoft Word has to offer and how
they're organized; you might check out the features of its document window and you'll
probably want to try a few commands to see what they do. In this chapter, you'll learn how to
start Word creating and saving a document, select text, margin setup, undo, redo and find
your way around the Word document window.
4.2 Using the Start Menu to Open Word
You will have more than one option for starting MS Word. You can do at least one of
the following:
• Choose Programs from the Start menu and then choose Microsoft Word.
• Click the Word icon on the Office toolbar
• Double-click a shortcut for Word on your desktop.
When you open Word without selecting a particular file to open, Word automatically
opens a new document as
Training Materials on MS Windows XP, MS Office XP and AnitVirus 9The Title Bar
The title bar at the top of the screen identifies the program as well as the document name.
The Menu Bar
Expand button
The menu bar contains the menus and commands you'll use to work with Word.
Toolbars
Move handle Style and
Format Formatting
E-mail Cut painter Column
Microsoft Center NumberIncrease
Open Search Copy Redo Font Font Size Underline List Indent
Word Help
Zoom Move
Bold AlignRigh Bullet Font
Print Past Undo
Handle Left Justifys DecreaseColor
New Blank Preview Insert Move Italic
Print Indent
Document Table Buttons
Toolbars enclose buttons and menus that you can apply to select common commands.
Training Materials on MS Windows XP, MS Office XP and AnitVirus 10The Standard and Formatting toolbars are docked at the top of the document windowpane.
Click the More Buttons button at a toolbar's right edge to see more tools.
The Status Bar and Taskbar
Current page/ Extend
total pages Selection Spelling and
Page Number Record Macro grammar
ti
Section Insertion point Track
Number location changes
Overtype
Mode
The status bar below the horizontal scroll bar shows you information about the document
you're viewing and your position within it. It contains buttons that make active various text
entry styles. There is also a book icon that starts up Word's spelling and grammar checker.
Entering Text
You can enter text into any document open on your screen.
Type the following paragraph without pressing the Enter key:
Displays document in a formal that is easy to read on the screen, ideal for previewing Web
pages or for reading regular Word documents online. The text is shown without page breaks
and with only minimal margins. Lines of text extend across the whole window, and any
background color or image assigned to the document is visible.
Saving a New File
To save a document
• Choose Save from the File menu or press Ctrl+S. or click the Save button on the
Standard toolbar. You'll see the Save As dialog box as shown in
Training Materials on MS Windows XP, MS Office XP and AnitVirus 11• Type the file name and location of the folder where you save the file.
• Click save button.
Saving an Existing Document
When you change anything in the document, just press Ctrl+S or choose Save from the File
menu or save button.
Changing Documents View
Word provides many options that affect the way it displays documents. You can change the
basic document view. Table:- lists the different document views, briefly describes each and
identifies the chapters where you can find fuller discussions on each one.
To switch to any view except Print Preview, choose the appropriate option from the View
menu:
Normal
Print
Outline
Web
View Description
Normal Shows document in a general-purpose format, for efficient editing and
formatting. Does not display margins, headers or footers.
Web layout Displays document in a format that is easy to read on the screen. Ideal
for previewing Web pages or for reading regular Word documents
online. The text is shown without page breaks and with only minimal
margins. Lines of text extend across the whole window, and any
background color or image assigned to the document is visible.
Print Layout Displays text and graphics exactly as they will appear on the printed
page, showing all margins, headers and footers. All editing and
formatting commands are available, but Word runs somewhat more
slowly than in Normal view, and scrolling is not as smooth.
Outline Shows the organization of the document. Lets you view various levels
of detail and rapidly rearrange document text.
Print Preview Displays an image of one (or more) entire printed page and lets you
adjust the page setup
4.3 Opening Files
Word can open native Word files as well as text files in various formats, including
WordPerfect files. Microsoft Excel files, HTML files, Microsoft Works files. When
Training Materials on MS Windows XP, MS Office XP and AnitVirus 12you're open Word, you use the Open command, follow these steps:
Press Ctrl+O or choose Open from the File menu or click open button
on the standard toolbar to display the Open dialog box:
The File list shows the contents of the current folder
• Use the Open dialog box to navigate lo disk location, and select files to open
• Click open button
You can have as many files open on your screen as your computer's available
memory allows.
4.4 Selecting Text
After you enter text in your document, you might want to edit it or change it’s
formatting. Either wav, the first step is to select the text you want to change. By
selecting, you inform Word which text you want to build up. There are some ways to
select text.
After you enter text in your document, you
might want to edit it or change it’s formatting. Either
wav, the first step is to select the text you want to
change. By selecting, you inform Word which text
you want to build up. There are some ways to select
text.
By Dragging Pointing and dragging is the most intuitive way to select text. Hold
down the mouse button, drag across the line to the space to the right of acceleration
and then free the mouse button.
Shift-clicking is mostly handy when you want to make bigger an existing selection
By Clicking You can click inside your document's text or select whole lines,
paragraphs, or the document by clicking in the left margin.
Selecting with the Keyboard If you prefer not to use the mouse. To select with the
keyboard:
• Use the arrow keys to move the pointer to the start of the selection.
• Hold down the Shift key while using the arrow keys to move the pointer to the
end of the range.
4.5 Deleting Text
You can use either the Backspace or Delete key to delete text or you can remove text
by cutting it to the Clipboard. For a definition and clarification of the Clipboard.
To delete text immediately to the left of the insertion point, press the Backspace key.
The insertion point will back up and remove text as it goes.
4.6 Undoing, Redoing, and Repeating Changes
From time to time you'll create a change to your text and then regret it. Word
remembers it only if you don't exit the program. You can Undo or Redo command
Training Materials on MS Windows XP, MS Office XP and AnitVirus 13typing as well as formatting changes. You'll locate an Undo command at the top of
the Edit menu (Ctrl+Z is the keyboard shortcut), and there are also Undo and Redo
buttons on the Standard toolbar
Undo Redo
Undo Redo
List List
Use the Undo or Redo buttons to cancel or redo previous changes.
5 Formatting Text and Paragraph
Microsoft Word has powerful features for formatting and document publishing, but
most people use it for entering and editing text. Once you enter text in a document,
you can add to it, rearrange it, delete it, or copy it. In this chapter, you'll learn how to
Moving & copying, search & replace, autoText, comments, adding bullets or
paragraphs numbers.
5.1 Formatting Characters
Character formatting options include the font used. the font size, the style of type,
such as bold, italic, or underline and character spacing or position. You can set
character formats with keyboard commands, with the Font dialog box or by applying
a style. Most of the formatting options you'll use frequently are also located on the
Formatting toolbar, as shown in
Italic Numbering Font Color
Paragraph
Style Bold Alignment Paragraph
Font Font Size Underline Line Indent
Spacing
Bullets Borders
Highlight
Plain text Bold Text Italic Text
Underline Text Strikethrough Text
5.2 Cutting, Copying, and Pasting
With Cut, Copy, and Paste you can shift text or graphics large distances between
documents or create copies of text rather than moving the original copy.
Put on show the Clipboard toolbar in the screen
• Select an item you want to copy.
• On the Clipboard toolbar, click Copy
• In an Office program, click where you want to paste the item.
• If you want to paste all the items, click Paste All on the Clipboard toolbar.
Training Materials on MS Windows XP, MS Office XP and AnitVirus 14• If you don't want to paste all the items, or if Paste All is not available, you can
paste specific items.
5.3 Finding and Replacing Text
You can easily seek for text, formats, bookmark, graphics, paragraph marks object by
using the Find command. The following method for using this command to conduct a
search in Word:
• If you want to limit the search to within a specific block of text. Select the text.
• Choose Find from the Edit menu
• If you want to perform a search using the options you set the previous time you
used the Find command. If however, you want to set one or more search options,
click the More button to display the options.
• In the Find what box. Enter the text that you want to search for.
• Click Find Next button
5.4 Replacing
• In the Replace with box enter the replacement text.
• Click Find Next button
• Click Replace button.
5.5 Using AutoText
AutoText helps you work faster by entering exact types of text. For example, you can
insert the present date or time. a page number, or different salutation or closing lines
for letters.
5.6 Inserting AutoText
You can insert AutoText from a menu, a toolbar, or a dialog box. The simplest
method is to use the AutoText menu.
• Move the insertion point to the location where you want the new text to appear.
• Choose AutoText from the Insert menu
•
Training Materials on MS Windows XP, MS Office XP and AnitVirus 15• You'll sec the Auto txt submenu.
• The Auto Text entries are grouped by type.
• Choose a type of text to display its submenu and then select the specific text you
want entered. Word inserts the text.
5.7 Insert a comment
• Select the text or item you want to comment on, or click at the end of the text.
• On the Insert Menu click Insert Comment.
• Type the comment text in the comment pane at the bottom of the screen.
After you've inserted a comment, you can click Close to close the comment pane.
5.8 Changing the Case
The Change the command on the Format menu makes it easy to apply, remove, or
change capitalization. To use it, follow these steps:
• Select the text you want to Change
• Choose Change case from the Format menu. You'll see the Change case dialog
box, as shown in Figure
Use the Change case dialog box to Change text capitalization rather than retyping.
Each option's name shows how the text will become visible. The Sentence case
option capitalizes only the first word in a sentence, while the Toggle case option
reverses the case for all of the selected text. Changing uppercase to lowercase and
vice versa.
• Click one of the options and then click the OK button.
5.9 Creating Bulleted and Numbered Lists
Bulleted and numbered lists make your documents more understandable by set off
key points or numbered steps. Bullets are nonnumerical symbols that introduce the
items in a list:
Division
• Dhaka
o Gagipur
o Kumillah
• Barishal
• Rajshahi
• Khulna
o Jessore
Training Materials on MS Windows XP, MS Office XP and AnitVirus 16You can insert bullets or numbers wherever in your document without resorting to
excellent formatting, but when you want to create a whole list of bulleted or
numbered items, it's much easier to use Word's automatic bullet formatting option.
You can choose a variety of bullet and number formats or create custom formats of
your own. When you use a numbered list format, Word numbers items consecutively
and adjusts the numbering when you reorganize or erase list items.
There are three ways to create bulleted or numbered lists:
• Click the Bullets or Numbering button on the Formatting toolbar
• Choose Bullets And Numbering from the Format menu to apply or change a
bullet or number format.
• Create them as you type by taking advantage of Word's AutoFormat feature.
5.10 Creating Bulleted or Numbered Lists
The simplest method to create a bulleted or numbered list is to start one as you type.
Word has predefined AutoFormat rules that recognize certain characters at the
beginning of a paragraph as a signal to begin a bulleted or numbered list. To create a
bulleted or numbered list as you type, follow these steps:
1. Move the insertion point to the beginning of the first line in the list.
2. Type * to begin a bulleted list or a number followed by a period (such as " 1.") to
begin a numbered list.
3. Press the spacebar and then type the text of the first list item.
4. Press Enter to end the line or paragraph. Word recognizes the primary characters,
turns the paragraph into a bulleted or numbered item. and begins another bulleted
item in the paragraph below.
5.11 Using the Bullets And Numbering Dialog Box
To apply a bullet or number format, follow these steps:
• Move the insertion point to the paragraph you want bulleted.
• Choose Bullets And Numbering from the Format menu. You'll see the Bullets
And Numbering dialog box as in
Training Materials on MS Windows XP, MS Office XP and AnitVirus 17With the Bullets and Numbering dialog box you can insert, remove, or customize
bullet and numbered list paragraph formats.
• Click the Bulleted or Numbered tab to display the correct set of options.
• Double-click the format option you want and Word will add it.
You be able to also apply the Bullets And Numbering dialog box to remove bullet or
number formatting by double-clicking the None option.
6 Formatting Paragraph & Document
Microsoft Word offers dozens of ways to change appearance of text on your screen
and in your printed documents. You can apply formatting options to individual
characters (letters), to paragraphs, to sections of a document, or to the whole
document. In this chapter, you’ll learn about spelling & grammar checker, using the
spelling & grammar checker, Thesaurus and the hyphenation, Page Set up and
common formatting options, you’ll use all the time.
6.1 Using the Indent and Alignment Buttons
For set fast indent and alignment options in a paragraph, use the indent and alignment
buttons on the Formatting toolbar, as shown in Figure. A close look at the indent and
alignment buttons gives you a pretty good idea of how they work.
Paragraph Paragraph
Alignment Indent
6.2 Using the Paragraph Dialog Box
The Paragraph dialog box brings jointly all of the alignment and indent settings. It
also adds other options to control the line spacing and page breaks in paragraphs.
When you choose Paragraph from the Format menu, you’ll see the Paragraph dialog
box as shown in Figure.
Training Materials on MS Windows XP, MS Office XP and AnitVirus 186.3 About Styles and Themes
Styles have been a fixture of Word for years, while themes are a newcomer in Word
2002. Both features make it easy to apply just the right format to anything from a
single character to a whole document. But styles and themes can make formatting
much faster and easier, and they can also help you maintain a consistent look in your
documents.
6.4 Formatting Pages
To finish up with crucial formatting techniques, let's look at the basics of formatting
pages. A good number of the time, you'll use just a couple of options in the Page
Setup dialog box to handle page formatting.
6.5 Insert a Section Break
When you need to apply different page format settings in section of your document,
insert a section break. It's easy to do:
• Shift the insertion point to the first line of the new section.
• Choose Break from the Insert menu. You'll see the Break dialog box like this:
• Double-click one of the options in the Section Break Types area or click a button
and then click OK.
6.6 Correcting Spelling Errors
Just as Word can check spelling as you type. You can correct it on the fly as well. To
correct a spelling error, right-click the wavy red underline. You'll see a shortcut menu
as in Figure
Right-click a flagged error to see a menu of suggested replacements and other
options.
Training Materials on MS Windows XP, MS Office XP and AnitVirus 196.7 Using the Spelling and Grammar Dialog Box
When you would like access to more spelling and grammar checking options, choose
Spelling and Grammar from the Tools menu to open the Spelling and Grammar
dialog box, as shown in Figure. If Word has not been checking your document as you
type, opening this dialog box will start a spelling and grammar check.
2 Click to replace error.
Click to replace
all identical
errors in
document.
1 Choose a suggested Click to cancel check or
replacement or edit the click to close when check
word in context. is complete,
6.8 Using the Thesaurus
Word's fixed Thesaurus helps you quickly find the right synonym for any word as
you polish your prose. You be able to look up alternatives for words you use, have
Word insert synonyms in place of selected words in your document, and even find
alternatives to common figures of speech.
6.9 Hyphenating Text
Hyphens split up words into their part syllables so you can use the last bit of space at
the end of one line for part of a word and then put the rest of it at the beginning of the
next line. You can also use hyphens in complex words or proper names, such as
Wilkes-Barre. You can insert hyphens with the keyboard as you work or use Word's
routine hyphenation feature lo ensure proper word breaks and get better the look of
your document.
6.10 Page Setup
To display the Page Setup dialog box, choose Page Setup from the File menu. You'll
see the dialog box shown in Figure.
Training Materials on MS Windows XP, MS Office XP and AnitVirus 207 Print & Manage Document
Microsoft Word offers four different document views to suit your needs when editing,
formatting, organizing, or publishing your work. Other window tools allow you to
split the document window, to open new windows for the same document, and to
magnify or reduce the contents of a file. The different views and window tools help
you work more efficiently and get a more accurate picture of how your documents
will look when either printed or viewed on the World Wide Web. In this chapter
you'll learn about the different document /views and how to preview and print
documents.
7.1 Previewing Documents
Print Preview shows your document, as it will look when printed. It's the best way to
do a quick final check before printing. The main idea of Print Preview is to ensure
your document's formatting before you print. You can set the magnification in this
mode, and you can use the window scroll bars or keyboard navigation keys to
navigate in the window. You can also use the Print Preview mode to adjust the page
margins.
7.2 Using Print Preview Toolbar
When you show Print Preview style, the standard toolbars in the document window
are replaced with the Print Preview toolbar:
One Zoom menu View Ruler Full screen
Print Page
Magnifier Shrink to Context
Fit sensitive help
Multiple
Pages
Training Materials on MS Windows XP, MS Office XP and AnitVirus 217.3 Printing Documents
Once your document looks the way you want, you’re ready to print it. To print a
document, follow these steps:
• Choose Print from the File menu or Ctrl+P. You’ll see the Print dialog box, as
shown in Figure.
Select printing options and print your document with the Print dialog box.
7.4 Setting Printing Options
The Print dialog box contains all of the options you'll normally need to use when
printing. Print dialog box describes these options. You can also set highly developed
options from inside the Print dialog box, and you can change your printer's
characteristics as well.
7.5 Setting Printer Properties
When you click the Properties button in the Print dialog box. you'll see options that
control the way your printer works and the way in which Word prints document
information on each page.
Training Materials on MS Windows XP, MS Office XP and AnitVirus 227.6 Using Advanced Printing Options
When you click the Options button at the bottom of the Print dialog box, you'll see a
whole range of additional options you can choose when printing. Few of these options
will matter to you during basic printing jobs.
8 Formatting Documents Linking & Protect Document
Microsoft Word 2002 has much more powerful formatting features—features that
rival some page layout programs—and you'll begin learning about them in this
chapter. You'll find that Word makes it easy to add headers and footers, to number
pages, to create multicolumn layouts, to vary page-level formatting options within a
page and to create layouts for bound documents. You'll also learn about hyperlink,
password and protect a document.
8.l Using Headers and Footers
The most common "extras" used in page formats are headers and footers. Headers and
footers are areas in the top and bottom page margins. Any text or graphics in them are
printed on every page of the file. Headers and footers are typically used to contain
such text as the file name, subject, page number, author name, or date.
8.2 Adding Header & Footer Text
Header and footer areas always exist in a document's top and bottom margins, but you
must add text to those areas to display header information. To add text to a header,
follow these steps:
Choose Header And Footer form the View menu, Word will switch to Print Layout
view if you're not already in it, scroll through the document to the nearest page header
area, move the insertion point into the header area, and display the Header and Footer
toolbar, as shown in Figure.
Insert number of pages Format page Show/hide document text
Insert page number number Show previous
Insert Autotext Insert date Page Show next
Insert time setup Switch between header
and footer
Same as previous
Training Materials on MS Windows XP, MS Office XP and AnitVirus 23When you view the header and footer, Word switches to Print Layout view and
moves the placing point into the close page header area.
• Type the text you want to appear in the header.
• Use the tools either on the Formatting toolbar or on the Format menu to format
the text as you want it.
• Double-click in the document’s body text or click the Close button on the
Header And Footer toolbar to return to editing the document itself.
8.3 Using Bookmarks
A bookmark is an invisible electronic marker in a document. You can set a bookmark
at the insertion point’s position, or you can add a bookmark to a whole selection of
text. Each bookmark you create in a document has a unique name.
8.4 Adding Bookmarks
You can add a bookmark to any location or selection of text in your document. To do so,
follow these steps:
• Move the insertion point to the bookmark location, or select the text you want to
bookmark
• Choose Bookmark from the Insert menu. You’ll see the Bookmark dialog box.
Add named bookmark to your document to identify text for faster navigation and to
make it easy to insert the text into other documents.
• Type a non-word name for the bookmark. You can’t use more than one word for
a bookmark name.
• Click Add.
8.5 Securing a File with a Password
If you want to prevent illegal users from viewing a file, you can set a password for it.
• Choose Save as from the File menu and name the file, if necessary
• Click the Tools button and choose General Options from the menu that appears.
You’ll see the Save options dialog box, like this:
Training Materials on MS Windows XP, MS Office XP and AnitVirus 24• Enter one or two passwords to protect the file.
• Click OK to close the Save Options dialog box.
• Retype one or both passwords in the Confirm box and click OK.
• Click Save to save the file with those passwords.
9 Tables & Borders
When you work with lists, summaries, and other data. a table is often the easiest and
most efficient way to present information. Microsoft Word 2002 offers significant
improvements in table making—you have far more control over table formatting, and
there are handy new tools to help you create great-looking tables quickly. In this
chapter you'll learn about Word's table, borders and shading features.
9.l Creating a Table
There are several different ways to create a table in Word. You can use the Insert
Table button on the Standard toolbar, use the Insert Table command from the Table
menu or draw, a table's outline and add row's or columns to it.
9.2 The Tables And Borders Toolbar
The Tables And Borders toolbar is very handy when you work with tables. To display
this toolbar, right-click in any toolbar and choose Tables And Borders from the
toolbar menu, or click the Tables And Borders button on the Standard toolbar.
Prepare yourself for the formatting instructions in the sections that follow by noting
the button and menu names on the Table And Borders toolbar:
9.3 Drawing a Table
The Insert Table button and command let you identify table’s contents and format,
but they don’t explain you how much space the table will occupy in your document.
If the exact size matters, however, you can draw a table’s outer border in your
document instead and then and row and column dividing lines to it as you see fit.
9.4 To draw a table, do the following:
1. Switch to Print layout view if necessary.
2. Choose Draw Table from the Table menu or display the Tables And Borders
toolbar and click the Draw Table button there. The mouse pointer becomes a
pencil.
3. Point to the place where you want the upper-left comer of the table to appear
preferably the beginning of a blank line.
4. Click the mouse button and drag down and to the right until the table s outline
is the size you want.
5. Release the mouse button. Word displays the table outline, like
Training Materials on MS Windows XP, MS Office XP and AnitVirus 256. Add row or column dividing lines by drawing them from one edge of the
outline to the opposite edge like this:
Word always draws straight lines when you fill in a table.
7. Click the Draw Table tool in the Tables And Borders toolbar to turn it off when
you're finished so you can begin entering text.
9.5 Aligning Text Inside Cells
You can use Word's standard paragraph alignment tools to align text horizontally in
cells. However, Word also has table format options you can use to align text
vertically and horizontally at the same time.
To align text in a cell do the following:
• Select the cell or cells.
• Click the arrow next to the Align button on the Tables And Borders toolbar to
display a palette of alignment selections, like this:
Select an alignment option from the palette. Word aligns the text in the selected cells.
TRAINING ON MICROSOFT WINDOWS 2002 MCSE TRACK
Course Title Code
Microsoft Windows 2002 Network & Operating System Essentials 2151A
Implementing Microsoft ® Windows® 2002 Professional & Server 2152B
Implementing a Microsoft Windows 2002 Network Infrastructure 2153A
The current alignment setting appears on the Align button itself. To apply that setting
to a cell or cells, just click the button.
9.6 Adding a Row or Column
Another situation you will commonly encounter is running out of rows or columns in
a table. To make a new row at the bottom of a table, move the insertion point to the
end of the text in the last cell in the lower-right corner of the table and press Tab.
Word will create a new-row and move the insertion point into the left-hand cell in
that row. However, Word also gives you the flexibility to add rows or columns
anywhere in a table. Here's how to add a row or column:
• Place the insertion point in the column or row next to the place where you want
new row s or columns added.
• Choose Insert from the Table menu. You'll see the Insert submenu like this:
Training Materials on MS Windows XP, MS Office XP and AnitVirus 269.7 Splitting or Merging Cells
When you need to create more or fewer cells without increasing or decreasing the
overall size of the table, you can split one cell into multiple cells or merge two or
more cells into one.
To split cells with a command, select the cell or cells and choose Split Cells from the
Table menu.
Merge cells Split cells
9.8 Merging Cells
To merge split cells back together, select all of the cells you want to merge and then
choose Merge Cells from" the Table menu. The cells will become one cell again.
The Tables And Borders toolbar contains its own Borders And Shading tools, or you
can use the Borders And Shading command on the Formal menu. You can add a
border or shading to a selection of text insider cell, to a whole cell, to a group of cells,
or to the entire table.
9.9 Using the Borders And Shading Dialog Box
To add a border with the Borders And Shading dialog box. take the following steps:
• Select a cell. text inside a cell. or a group of cells.
• Choose Borders And Shading from the Format menu. Word opens the
Borders And Shading dialog box. as shown in Figure
4 Choose a 5 Choose border line 6 Click lines or buttons to
3 Choose the table area Click to apply the
Training Materials on MS Windows XP, MS Office XP and AnitVirus 27The Borders And Shading dialog box has special options when you work with a table.
You can apply shading options the same way by selecting them on the Shading tab. Page
Border options affect the page on which the table appears, not the table itself.
Training Materials on MS Windows XP, MS Office XP and AnitVirus 2810 Starting Excel and Getting Comfortable
Excel is started like most programs in the Office application suite. To start Excel, click the
Start button on the taskbar, point to the Programs folder, and then click the Microsoft Excel
program icon.
When Excel first starts, it displays a new, empty workbook (which will be defined shortly) in
the application workplace. The following Figure 1 shows the default opening Excel screen,
featuring a standard menu bar, toolbars, formula bar, status bar, and blank workbook. The
application window has been maximized to display all the elements of the Excel user
interface. If your application window doesn't appear maximized when you start it, you can
click the Maximize button on the Excel title bar to give you more space to work with.
Figure 1. The Microsoft Excel user interface with important elements labeled.
The menu bar gives you access to the complete range of commands and settings in the Excel
application. For example, to save a file in Excel you would choose Save from the File menu.
The toolbars provide access to the most common Excel commands and procedures. During
installation, Excel is configured to display the Standard toolbar and the Formatting toolbar
below the menu bar. To use one of the toolbars, click the button containing a picture of the
task you want to complete. For example, to save a file using the toolbar, you would click the
button on the Standard toolbar with the picture of a disk on it. (You'll see many of these
command buttons on Excel menus.)
Like most Office applications, the Excel application window also contains sizing buttons you
can use to minimize, maximize, restore, and close windows, plus a status bar that shows the
state of various keyboard keys, including Num Lock. A special feature of the Excel status bar
is the AutoCalculate box, which displays the result of the selected function (SUM by default)
using the highlighted cells in the active worksheet. To get additional help with the Excel
interface or with any Excel command, click the Microsoft Excel Help button on the right side
Training Materials on MS Windows XP, MS Office XP and AnitVirus 29of the Standard toolbar. If the animated Office Assistant is not already running, clicking this
button will start it.
Excel's application workplace is designed to hold one or more worksheet collections, called
workbooks. When you first open Excel, the default workbook (Book1) appears on the screen
and displays the first worksheet (Sheet1). A worksheet is divided into a grid of rows and
columns, as shown in Figure 1. (An Excel 2000 worksheet can contain up to 65,536 rows
and 256 columns.) A letter is assigned to each column of the worksheet, and a number is
assigned to each row. At the intersection of the rows and columns are worksheet cells, which
are referenced individually by their cell names. For example, the cell at the intersection of
column A and row 1 is known as cell A1. Cell names are also called cell addresses.
At the bottom of the workbook window are tabs that give you instant access to the remaining
worksheets in the workbook. A workbook can contain one or more worksheets, and can also
hold chart sheets containing graphic pictures of your worksheet data.
10.1 Navigating a Worksheet
In a typical Excel worksheet, information is stored in dozens or even hundreds of cells. To
place information in cells that can be used in calculations and that is both visually pleasing
and instantly comprehensible, you need to organize your cells carefully. Accordingly, you
need to be comfortable with several methods for moving around in, or navigating, a
worksheet.
To move the active cell from one location to another, you can press the arrow keys (the Up,
Down, Left, and Right arrow keys) or click the cell you want to activate with the mouse. This
is called selecting or highlighting a cell. (You can see the name of the selected cell by looking
in the Name box.) When you first move the mouse pointer onto the worksheet, it changes its
shape to the cell pointer.
To view part of a worksheet that isn't currently visible in the workbook window, you can click
the vertical or horizontal scroll bars. Each time you click a scroll arrow at the top or bottom of
the vertical scroll bar, the active worksheet scrolls vertically one row. Each time you click a
scroll arrow at the left or right end of the horizontal scroll bar, the active worksheet scrolls
horizontally one column. Note that when you scroll with the scroll bars, you change only your
view of the worksheet— scrolling moves the screen but does not change the active cell. Your
relative position in the worksheet is identified by the scroll boxes in each scroll bar. (These
boxes change size as your worksheet changes size, representing the relative portion of the
entire worksheet that is currently visible.)
To move among the worksheets in your workbook, you can click the worksheet tabs or use
the tab scroll buttons to move among many worksheet tabs.
To scroll down one page, click the scroll bar below the scroll box. You can also drag the
scroll box to move greater distances. As you drag the scroll box, Excel displays the new top
row (or leftmost column) in a pop-up window to help you find your place.
Using the Keyboard
Several key combinations let you move quickly throughout your worksheet. Unlike scroll bar
movements, these key combinations also highlight a new, active cell. Table-1 lists the most
useful keyboard navigation keys in a worksheet.
Training Materials on MS Windows XP, MS Office XP and AnitVirus 30Jumping to a Specific Cell with the Go To Command
To highlight a specific cell in the active worksheet by name, you can choose Go To from the
Edit menu or press F5. When you choose the Go To command, Excel displays the Go To
dialog box, as shown in Figure 2. You can jump to a specific cell by typing the name of the
cell in the Reference text box and clicking OK. (You can also double-click the name of the
cell if it appears in the list box.)
Figure 2. The Go To dialog box lets you jump instantly to a certain cell.
If you would like to highlight a range of cells based on a special attribute, such as all the cells
containing formulas or comments, click the Special button and specify the cell contents you're
interested in. You can also move to a specific cell by clicking the Name box located to the left
of the formula bar, typing the cell name, and pressing Enter.
Table-1. Useful Worksheet Navigation Keys
Use This Key or Key To Move
Combination
← ↑ → ↓ To the next cell in the direction pressed
Ctrl+↑, Ctrl+↓, Ctrl+←,
Ctrl+→
Enter One cell down
Tab One cell to the right
Shift+Enter One cell up
Shift+Tab One cell left
Home To column A of current row
Page Up Up one screen
Page Down Down one screen
Alt+Page Up One screen to the left
Alt+Page Down One screen to the right
Ctrl+Home To cell A1
Ctrl+End To the cell in the last row and last column that contains
data
Ctrl+Backspace To reposition the visible portion of the worksheet to
display the active cell or selected ranges that have
scrolled out of view
10.2 Entering Information
Excel lets you enter the following types of information into a work-sheet cell:
• Numeric values, like the numbers 15,000, $29.95, and 33%
• Text values, like the words Total, 1st Quarter, and 1820 Warren Avenue
• Dates and times, like Feb-97, 11/19/63, or 1:00 PM
Training Materials on MS Windows XP, MS Office XP and AnitVirus 31You can also read